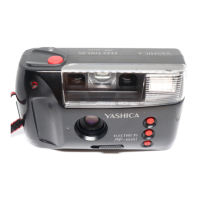
This document is a user manual for the YASHICA ELECTRO 35 AF-mini camera, a 35mm auto-focus, auto-exposure, lens-shutter camera.
Function Description:
The Yashica Electro 35 AF-mini is designed for automatic photography, featuring auto-focusing, auto-exposure, and automatic film handling. It includes a built-in flash for various lighting conditions and a self-timer for delayed shots. Some models are equipped with an auto Date Print unit, allowing the date and time to be imprinted on the film.
Important Technical Specifications:
- Type: 35mm auto-focus, auto-exposure, lens-shutter camera.
- Lens: 34mm f/4.5 (3 elements, 3 groups).
- Shutter: Programmed electronic shutter with a speed range of 2 seconds to 1/360 second.
- Shutter Release: Electromagnetic release.
- Exposure Control: Programmed electronic AE system.
- Film Speed: Automatically set for DX-coded film (ISO 100/200 and 400). Non-DX films are automatically set to ISO 100.
- Focusing: Auto-focusing from 1.2m to infinity. A green lamp indicates completion of auto-focusing, and a focus lock feature is provided.
- Viewfinder: Albada type bright frame viewfinder with picture area frame and focusing frame display.
- Film Loading: Auto loading by 3 times release.
- Film Advance: Automatic.
- Film Rewind: Auto return/auto-stop system.
- Exposure Counter: Automatic resetting, additive type.
- Self-timer: Electronic type providing a delay of approximately 10 seconds with an LED indicator.
- Flash: Automatic firing in dim light, fixed flash head. Flash range is 1.2 to 3.4m (ISO100). Recycle time is approximately 4 seconds (at normal temperature, with a new battery). Features daylight flash capability. A red lamp indicates flash firing and recharging.
- Batteries: One 3V lithium battery (CR123A or DL123A) for the camera. One 3V lithium battery (CR2025) for the auto dating unit (if equipped).
- Power Capacity: Approximately 23 rolls of 24-exposure film, with flash used 50% of the time (at normal temperature, according to testing standards).
- Auto Dating Unit (optional): Liquid crystal display with built-in quartz clock. Print modes include Year-month-day, day-hour-minute, no print, month-day-year, day-month-year (up to the year 2010). Automatic correction of dates and time.
- Dimensions: 118 (W) x 69 (H) x 48.5 (D) mm (standard). 118 (W) x 69 (H) x 52.5 (D) mm (with Auto dating unit).
- Weight: 220g (not including battery) for standard model. 230g (not including battery) for auto dating unit model.
- Battery Weight (DL123A, CR123A): Approximately 15g.
Usage Features:
- Battery Loading: Open the battery compartment cover, insert a 3V lithium battery (CR123A or DL123A) matching polarities, and close the cover. Battery check is performed by opening the lens cover and pressing the shutter release halfway; a green lamp indicates functionality. Replace the battery if the red lamp takes 8 seconds or longer to light up after flash emission.
- Opening the Lens Cover: Move the lens cover knob in the direction of the arrow to open the lens cover and switch on the power supply. The camera will not operate unless the lens cover is open. When opening, a red lamp lights up, indicating flash recharging, and the shutter will not operate until the light goes off.
- Loading the Film: Open the lens cover, slide the camera back release lever, and open the camera back. Hold down the film cassette, pull out the film flat, align the leader with the mark inside the camera, and close the back. Ensure film perforations engage with sprockets. Non-DX coded films are automatically set to ISO 100.
- Exposure Counter: Press the shutter release until the exposure counter advances to "1". If it doesn't move, reload the film. A film check window allows verification of film presence.
- Taking Pictures: Open the lens cover. Position the focus frame over the subject, depress the shutter release halfway to light up the green lamp and lock focus. Press the shutter release fully to take the picture. The film automatically advances one frame. If light is insufficient, the flash activates. Avoid obstructing the light sensor or lens.
- Holding the Camera: When taking vertical flash photos, hold the camera with the flash positioned at the top. Ensure fingers or hair do not cover the lens, auto-focus window, or light sensor.
- Taking Pictures in Dark Surroundings: The flash automatically activates in dark conditions. Depress the shutter release halfway; when both green and red lamps light up, the camera is ready for flash photography.
- Daylight Synchro Flash Photography (Flash on): Depress the daylight flash button while aiming at the object, then trip the shutter. This mode provides clear pictures of back-lit or shadowed objects and can also be used in well-lit places.
- Twilight and Night-time Photography (Flash Off): Use this mode to capture natural lighting. Aim at the object, depress the no flash button, and trip the shutter. Exposure time is automatically determined. A tripod is recommended. The shutter cannot be tripped by pressing both daylight flash and no flash buttons simultaneously.
- Focus Lock: Position the focus frame over the desired object, depress the shutter release halfway. The green lamp lights up, and focus (and AE) is locked. Re-compose the picture while keeping the shutter release pressed halfway, then press fully. Do not change the distance to the subject. Focus lock is cancelled if the finger is lifted.
- Objects Difficult to Focus: For small, dark, shiny, or minute objects, point the camera at an easy-to-focus object at the same distance and use the focus lock. Effective for photography through glass; bring the camera close or hold it at an angle to the glass.
- Using the Self-timer: Press and hold the self-timer button, then press the shutter release. The self-timer LED and green lamp will blink for about 10 seconds before the picture is taken. Flash activates automatically. Press the shutter release from the rear side of the camera. Focus lock and AE lock can be used. Daylight synchro and night-time photography can be combined with the self-timer by pressing the respective flash button and the self-timer button before activating. Close the lens cover lever to cancel the self-timer. A tripod is necessary.
- Rewinding the Film: The camera automatically rewinds the film into its cassette when the specified number of exposures is reached. The exposure counter counts backward to "S". Open the camera back and remove the film. Do not replace the battery during rewinding.
- Date Print (for models with auto dating unit): Allows date or time to be printed on the film.
- Changing Date Display: Press the Mode button to cycle through "year-month-day", "day-hour-minute", "no print", "month-day-year", or "day-month-year".
- Setting Date and Time: Press the Mode button to display date (hours and minutes). Depress the Select button once to make the figures blink. Press Select to set correct values. Press Select again to make figures steady. The "-" mark indicates print condition. Pressing Select after setting minutes makes the colon ":" blink; press again to set print condition. Time can be set to the second by pressing Select to coincide with a time signal while the colon is blinking.
Maintenance Features:
- Cleaning:
- Avoid finger marks or soil on the AF window to maintain focusing accuracy. Clean with lens cleansing tissue moistened with lens cleaner, or use a blower/lens brush.
- Clean the camera body with a soft cloth. Do not use organic solvents like benzene or chemical thinner.
- Clean the camera after use in seaside or dusty environments to prevent corrosion from salty air or damage from sand/dust.
- Storage:
- Store in a well-ventilated place, avoiding humid or dusty areas, wardrobe drawers with mothballs, or laboratories with chemicals.
- Do not leave the camera in hot places (e.g., near the seashore in summer, inside a car under direct sunlight) for prolonged periods, as this can degrade film and battery performance and adversely affect the camera.
- General Care:
- Avoid sudden temperature changes.
- The camera contains a high-voltage circuit; do not attempt to disassemble it if it breaks down.
- Before important events (overseas trips, weddings), check all functions and take test photographs.
- If equipped with a quartz clock (auto Date Print unit), do not place the camera near or in contact with appliances with magnetic fields (e.g., television sets, radios, magnets).
- Replacing the Battery for the Auto Date Print Unit (if equipped): The auto Date print unit uses a 3V lithium battery (CR2025) which lasts about 4 years. Replace when figures appear faint. Correct the date and time after changing the battery. This applies only to data back models.