Do you have a question about the YATO YT-85010 and is the answer not in the manual?
The device in question is a cordless grass trimmer, model YT-85010, designed for household use. Its primary function is to trim grass in areas that are typically inaccessible to conventional lawnmowers, such as near building walls, fences, around trees and shrubs, along path edges, and lawn borders. The trimmer operates by cutting grass with a rotating plastic line. For tougher tasks like cutting shrubs or woody plant shoots, a metal blade can be used. Proper, reliable, and safe operation is emphasized, requiring users to read and retain the entire operating manual before first use. The manufacturer disclaims responsibility for any damage or injury resulting from improper use or non-compliance with safety regulations. Using the device for purposes other than its intended use will void the user's warranty rights.
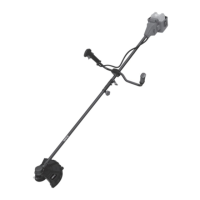
The grass trimmer is supplied complete but requires assembly before its first use. It includes a cutting element guard, a cutting head with a line, a cutting disc, and an auxiliary harness. The power supply battery and charger are not included and must be purchased separately.
Before any assembly or adjustment, the trimmer's power supply must be disconnected by removing the batteries. A visual inspection of the device is recommended, and any observed damage should be remedied before operation. For initial use, the appropriate cutting element (line head or metal blade), cutting element guard, handles, and harness must be installed. The line head is for grass trimming, while the metal blade is for shrubs and woody shoots. The cutting element guard is attached to the spindle guard with screws and is suitable for both line and blade use. It features a small blade for automatic line shortening. If the blade has a protective cover, it must be removed before using the line. The handles are installed by unscrewing the upper part of the clamp, placing the connector in the lower part, and reattaching the upper part with screws. The drive shaft cover parts are connected by loosening a knob, pressing a latch lever, and inserting the lower cover until the latch hook engages. The connection is secured by tightening the knob. The harness (V) or belt (VI) is installed, with adjustable straps to ensure comfort and stability during operation. The trimmer can be suspended from other harnesses or belts if they allow for attachment without modification. The trimmer is hung by passing the harness catch through the clamp eye, ensuring the safety spring returns to its original position to prevent accidental detachment. The handle angle and position are adjusted by loosening a fixing knob to allow full freedom of movement and ensure both hands are positioned to avoid excessive strain, with elbows bent. The cutting element should move parallel to the ground. The clamp position can be adjusted by loosening a screw (VII), moving the clamp, and then tightening it. The clamp should be positioned just behind the center of gravity of the suspended trimmer, causing the cutting element to incline towards the ground. To change the cutting element, the spool with the cutting line or metal blade is installed. Protective gloves are recommended when installing the blade due to injury risk. For line spool installation, the upper fixing flange is installed, and the line spool (VIII) is screwed on while blocking spindle rotation. For blade installation, the upper fixing flange is placed on the spindle, the blade is positioned so its hole aligns with the protruding part of the flange (IX), and the lower fixing flange is added. The flanges and disc are then tightened securely (X) while blocking spindle rotation.
The device is powered by two batteries connected in series, meaning the device receives the sum of their rated voltages. It is recommended to use two batteries of the same capacity, equally charged, and with similar wear levels. Mixing an exhausted battery with a new one is not recommended, even if both are charged and have the same capacity, as this will shorten operating time and accelerate battery wear. Only specific 18 V Li-Ion YATO batteries (YT-82842, YT-82843, YT-82844, YT-82845) are compatible and must be charged with YATO YT-82848 or YT-82849 chargers. Using other batteries or modifying the battery socket/battery is prohibited. Charged batteries are inserted into the battery socket guides until the latch holds them in place (XI), ensuring they do not slide out.
Both batteries are connected to the trimmer. The harness or belt is worn, and the trimmer is attached. The handles are grasped with both hands, ensuring the cutting element is clear of objects and the ground. The right handle has a power switch and a safety lock. To start, the lock is pressed and held, then the power switch is pressed and held. The cutting element will begin to rotate. Releasing the power switch stops the trimmer, though the cutting element will continue to rotate for some time. The trimmer can only be detached and stored after the cutting element has completely stopped.
Before starting work, the workplace must be prepared. A safety zone with a minimum radius of 15 meters, inaccessible to unauthorized persons, should be established. Ensure no obstacles are present that could cause collisions.
Start working only when the cutting element reaches full speed. Hold the trimmer so the cutting element moves parallel to the ground. For maximum cutting performance, adjust the line to its maximum length by running the trimmer at full speed and gently tapping the spool on the ground, allowing the line to extend and be cut by the guard's blade. Do not rest the spool on the ground during operation, as this will consume the entire line. If the line does not extend automatically, stop the motor, disconnect batteries, and check for jams. Extend the line whenever the motor sounds like it's running at higher than normal speed. It is recommended to move the trimmer from right to left to avoid ejected grass residues. Avoid cutting shrubs and bushes, as working near trees can damage bark. Hitting stones, bricks, or walls can cause rapid line wear. When using the blade, avoid cutting with the upper right quarter of the blade (XIII) to prevent kickback if the blade gets blocked. The harness allows for emergency detachment by pulling a red tape near the clamp. The trimmer will detach with the harness catch. Before resuming work after an emergency detachment, inspect the trimmer for damage.
Maintain balance and proper posture, especially on slippery, inclined, or uneven surfaces. Continuously monitor the cutting element and avoid trimming out of sight. Before starting, inspect the workplace for loose branches and residues. Take regular breaks, as noise and vibration can affect the operator. Use personal protective equipment (gloves, hearing protectors, eye protection) to reduce impact. Work only when healthy and in good shape; stop immediately if experiencing nausea, headache, vision problems, hearing problems, or dizziness. Cut tall grass gradually from above to reduce line entanglement. Try to cut only with the line end for the same reason. If any part of the trimmer or guard is damaged or deformed, replace or repair it before resuming work.
Before any maintenance, disconnect the trimmer from the power supply by removing the batteries.
Unscrew the spool housing from the trimmer spindle. Simultaneously press both lock buttons on the spool housing and remove the spool. Remove old line residues, and clean the spool, spool guard, spring, and fixing screw from grass, soil, and other contaminants. Prepare a line section of the specified diameter and length. Pass the line through the gap in the baffle between the two spool parts. Wind the line anti-clockwise on both parts of the spool. Leave about 15 cm of line outside the gaps, passing it through the housing holes. Close the spool in the housing and install it as described in "Preparing the grass trimmer for operation."
After each use, inspect the device, paying particular attention to the ventilation openings. Check the placement of all components and tighten any loose screw connections. Check the cutting element and clean the cutting element guard and spool from grass residues. Replace damaged parts before further work. Do not use the trimmer with damaged guards or spools. Clean the device housing with a soft, dry cloth, removing grass, oil, grease, and other contaminants. Store the disconnected device in a dry, closed room. Store the device in shaded, dry, and well-ventilated places to prevent steam condensation. The storage area should be inaccessible to unauthorized persons, especially children. During storage, blades should always be protected with a guard.
Users are not permitted to replace any parts other than those described in the manual. A detailed list of spare parts is available in the "Download" section of the product page on the TOYA SA website: www.toya.pl.