EasyManua.ls Logo

YIHUA 8858-I - User Manual

YIHUA 8858-I
2 pages
Print Icon
To Next Page IconTo Next Page
Loading...
SOLDERINGSTATION
ESD-SAFEANDTEMPERATURECONTROLLED
English
O P E R AT I O N
INSTRUCTION
04.07.03.177
I. APPLICATION
1. This unit is suitable for desoldering & soldering operations on a broad range
of components. E.g., SOIC, CHIP, QFP, PLCC, BGA, SMD, and more. The unit is
especially suited for desoldering operations on in-line sockets.
2. You can use this unit for heat shrinking, drying, paint removal, glue removal,
defrosting, pre-heating, glue soldering, and more.
SPECIFICATION
L305xW60xH60mm±5mm
0℃〜40℃/32℉〜104℉
100℃~480℃/212℉~896℉
Roots-typeblower
120L/min
LEDNixieTubes
Controlunitdimensions
Operatingambienttemperature
Temperaturerange
Airflowtype
Airvolume
Display
II. PART LIST
Ⅲ. OPERATION
1. Ensure the hot air gun’s stand is installed, and place the gun onto a workbench via the stand.
2. Install the required nozzle (Use of nozzles in larger diameters is recommended). Connect
the hot air gun's power cord to an electrical outlet.
3. Turn ON the power switch, and the display will show the set temperature. Press the tem-
perature adjustment buttons to set the required temperature. (Each press will change the
temperature value by 1°C, press and hold the button to change the value quickly). The
hot air gun will begin operating a few seconds after setting the temperature. Adjust the
air volume knob to set the gun to your desired volume. Begin operation when the tem-
perature stabilizes.
4. Once the operation is complete, turn OFF the power switch, and the hot air gun will then
enter cooling mode. Wait for the cooling process to be complete, and the blower motor
to stop operation before DISCONNECTING the power plug from the electrical socket.
This product should not be thrown in the garbage. In accordance with the European directive
2012/19/EU,electronicequipmentattheendoftheirlifemustbecollected&returnedtoanauthorized
recycling facility. Este producto no debe desecharse en la basura. De acuerdo a la directiva
europea2012/19/EU, losequiposelectrónicosal finaldesuvidase deberànrecogery trasladara una
planta de reciclaje autorizada. Dieses Produkt sollte nicht mit dem Hausmüll entsorgt werden.
In Übereinstimmung mit der europäischen Richtlinie 2012/19/EU müssen elektronische Geräte am
Ende ihrer Lebensdauer eingesammelt und einem autorisierten Recyclingbetrieb zugeführt werden.
MadeinChina
Statement: The company reserves the right to improve & upgrade products,
product specifications and design are subject to change without notice.
Thank you for purchasing this product. Please read the manual
carefully before operating and keep this manual for future reference.
1
5
2
3
4
1. Stand
2. Temperature Adjustment Buttons
3. Temperature Display
4. Power Switch
5. Air Volume Adjustment Knob
Question and Answer IconNeed help?

Do you have a question about the YIHUA 8858-I and is the answer not in the manual?

Overview

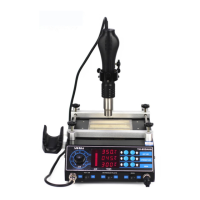
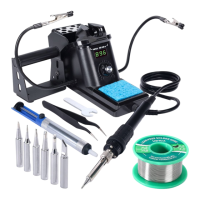
This document provides an operation manual for an ESD-Safe and Temperature Controlled Soldering Station.

Function Description

This soldering station is designed for a wide range of desoldering and soldering operations on various components, including SOIC, CHIP, QFP, PLCC, BGA, and SMD. It is particularly well-suited for desoldering in-line sockets. Beyond soldering, the unit can also be used for heat shrinking, drying, paint removal, glue removal, defrosting, pre-heating, and glue soldering.

Important Technical Specifications

  • Control Unit Dimensions: L305xW60xH60mm ±5mm
  • Operating Ambient Temperature: 0°C~40°C / 32°F~104°F
  • Display: LED Nixie Tubes
  • Temperature Range: 100°C~480°C / 212°F~896°F
  • Airflow Type: Roots-type blower
  • Air Volume: <120L/min
  • ESD-Safe: Yes
  • Temperature Control: Yes

Usage Features

The device is designed for ease of use with several key operational features:

Basic Operation:

  1. Setup: Ensure the hot air gun's stand is installed and placed on a workbench.
  2. Nozzle Installation: Install the required nozzle. The manual recommends using nozzles with larger diameters. Nozzles should only be installed when the steel pipe and nozzle have cooled, and should not be installed with brute force or overtightened.
  3. Power Connection: Connect the hot air gun's power cord to an electrical outlet.
  4. Power On: Turn on the power switch. The display will show the set temperature.
  5. Temperature Adjustment: Use the temperature adjustment buttons to set the desired temperature. Each press changes the value by 1°C, while pressing and holding changes it quickly. The hot air gun begins operating a few seconds after the temperature is set.
  6. Air Volume Adjustment: Adjust the air volume knob to set the desired air volume.
  7. Operation: Begin operation once the temperature stabilizes.
  8. Cooling Down: After operation, turn off the power switch. The hot air gun will enter cooling mode. Wait for the cooling process to complete and the blower motor to stop before disconnecting the power plug.

Temperature Display (°F/°C) Selection:

  1. Turn off the power switch and connect the power cord.
  2. Press and hold both temperature increase and decrease buttons for 2 seconds. The display will blink with 'C'.
  3. Use the temperature increase or decrease buttons to select Fahrenheit or Celsius mode.
  4. The system automatically saves the setting and exits the interface after approximately 4 seconds.

Digital Temperature Calibration: This feature allows correction of temperature discrepancies that may arise due to environmental changes or replacement of components like the heating element.

  1. Connect the power cord and turn on the power switch. Allow the hot air gun to heat up and stabilize, then measure the actual hot air temperature.
  2. Press and hold both temperature increase and decrease buttons for approximately 2 seconds. A digit-dot at the bottom-right corner will turn on, and the displayed temperature will blink (e.g., "300.0").
  3. Use the temperature increase or decrease buttons to input the measured temperature value.
  4. Press and hold both temperature increase and decrease buttons again for approximately 2 seconds to confirm. The system will automatically save the setting and exit the interface.

Nozzle Selection: The manual provides a detailed list of nozzle styles with their specifications and corresponding IC sizes, including QFP, PLCC, SOJ, BGA (CSP), TSOL, and SOP types, along with single-tube nozzles of various diameters. This allows users to select the most appropriate nozzle for specific tasks. When using nozzles smaller than standard machine nozzles, it is crucial to use maximum air volume with a relatively lower temperature setting and complete the operation in the shortest possible duration to avoid damaging the hot air gun.

Maintenance Features

General Maintenance & Precautions:

  • Air Outlet: Keep the air outlet clear and free of blockages at all times.
  • Nozzle Installation: Nozzles must only be installed when the steel pipe and nozzle have cooled. Install correctly without brute force, pulling the nozzle edge with tweezers, or overtightening screws.
  • Distance from Subject: Maintain a minimum distance of 2mm between the subject and the hot air gun's air outlet.
  • Safety: Do not allow the hot air to come into direct contact with facial parts to prevent burn injuries.
  • Initial Use: Upon first use, the hot air gun may emit white fumes, which will dissipate shortly.
  • Quality Control Note: The station uses high-strength stainless steel tubes and undergoes multiple testing and calibration procedures. It is normal for the steel tube to exhibit a light bronze color due to these quality control efforts, even on a brand-new station.

Troubleshooting:

  • Display shows ONLY the digit-dot: This indicates the hot air gun is in standby mode. Disconnect the power cord when not in use for extended periods.
  • Display shows 'S-E': This indicates a fault in the sensor modules. The solution is to replace the heating element (which includes the sensor modules).
  • Displayed temperature is lower than 100°C/212°F, and the operation indicator is ON but the hot air gun is not heating up: This indicates a faulty heating element. The solution is to replace the heating element.

Replacing the Heating Element:

  1. Loosen the 3 screws securing the steel tube.
  2. Remove the steel tube and disconnect the grounding wire.
  3. Extract the faulty heating element.
  4. Replace it with a new heating element.
  5. Wrap the new heating element with the MICA paper.
  6. Install the steel tube and reconnect the grounding wire.
  7. Tighten the screws.

YIHUA 8858-I Specifications

General IconGeneral
BrandYIHUA
Model8858-I
CategorySoldering Gun
LanguageEnglish

Related product manuals