2.
3.
4.
5.
6.
1.
2.
3.
Nozzle can be install after the heating pipe and nozzle are cool.
High temperature can burn the human body, do not touch the heating pipes, or
put the heat air spurting to face. At the starting, may be emitted white smoke,
this is a normal phenomenon, this phenomenon will disappear later.
When replace the heating element, be careful don't damage the ground wire.
When doing replacement, should pay attention to the order and color of the
connecting wire, it could not be wrong connection!
Please replace the same type of heating element or heater!
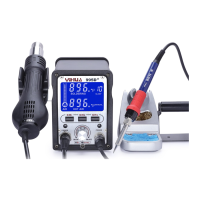
IX. Display Notes
When the LED digital display - ", it means the outlet temperature is below
1000C; the hot air rework station is in standby mode, and the handle is placed
on the handle's rack.
When the LED digital displays "S-E", it means the Soldering iron and Hot Air
rework's sensor is having a problem or handle is un-plugged, if this the case it
needs to replace the heating element (heating core's element and sensor
components).
Display "F-1/F-2", shows the air gun is no wind protection, you need to check
the fan and air gun power supply circuit.
X. Interchangeable Component Description
Replacementof thesoldering iron'stip andsolderingiron heating Figure4
core's element
1.
2.
8.
Replacement of Hot Air rework heating element Figure 3
1.
2.
3.
4.
5.
6.
8.
9.
Ensure the Hot Air Rework is fully cooled down before replacing the element.
Figure, loosen the two screws on the handle.
Turns the handle anti-clockwise until it comes off and then remove the
handle's cover.
Gently takes out the fan, loosen the three screws to remove the fixed wiring
board.
The wiring board vice versa, apart from the heater wiring board connection
cable, pay attention to the connection location.
Remove from the heat pipe heat body wrap body with mica paper, careful not
broken in place.
According to the original location of the connection to connect heater.
When the reverse process by open bottles and handle back.
13
Unscrews the nut No. 1, and then removes the steel tube No.2, followed by
removing the tip which is going to be replaced.
For the replacement of heating core's element can be performed by
unscrewing the plastic cap No.4, pulls out gently the heating core's element
No.6 along with the circuit board No. 7, please carefully remember the
connection of spring No.5.
The iron core from the circuit board welding, the replacement of the heating
core, can be fitted well. Note that the order of the iron core wire connection.
14
 Loading...