This document provides assembly instructions for a YITAHOME ceiling fan with light, model TLCFLS-1002. It covers safety guidelines, installation steps, electrical connections, operation, troubleshooting, and maintenance.
Function Description
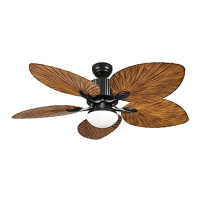
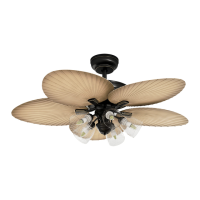
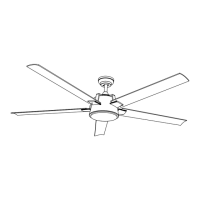
The YITAHOME ceiling fan with light is designed to provide both air circulation and illumination for a room. It features multiple blades for effective airflow and an integrated light kit to serve as a primary or supplementary light source. The fan's operation, including speed and light, can be controlled remotely. It also includes a reverse switch to change the direction of blade rotation, allowing for year-round use to optimize comfort in both warm and cool weather. The fan is intended for indoor use and requires proper installation to ensure safe and efficient operation.
Usage Features
The ceiling fan offers several features to enhance user experience and comfort:
- Remote Control Operation: The fan and light functions are primarily controlled via a remote transmitter. This allows users to adjust settings conveniently from anywhere in the room.
- Adjustable Fan Speeds: The remote control provides options for different fan speeds: High (H), Medium (M), and Low (L). This allows users to select the desired airflow intensity based on their comfort needs and room conditions.
- Light Control: The remote control includes a "LIGHT ON/OFF" button to toggle the light. It also features a "LIGHT" button to set different color temperatures for the light, offering flexibility in ambiance.
- Light Memory Function: If a specific color temperature is set for more than 3 seconds, the light will remember this setting and turn on with the same color temperature the next time it is activated.
- Fan Stop Function: A dedicated "FAN STOP" button on the remote allows for immediate cessation of fan rotation.
- Timer Function: The remote control includes timer settings (1H, 2H, 4H, 8H) to automatically turn off the fan after a specified duration, promoting energy saving and convenience, especially during sleep.
- Reversible Blade Direction: The fan features a slide switch (XX) on the motor housing that controls the direction of blade rotation.
- Forward (Switch Down): Creates a downward airflow, producing a cooling effect suitable for warm weather (summer time). This allows for setting the air conditioner at a higher temperature without compromising comfort.
- Reverse (Switch Up): Creates an upward airflow, moving warm air off the ceiling. This is beneficial for cool weather (winter time), allowing the heating unit to be set at a lower temperature while maintaining comfort. It is crucial to ensure the fan has come to a complete stop before operating the reverse switch.
- Pull Chain Control (Alternative): In addition to the remote, the fan also features a pull chain for basic speed control: 1 pull for High, 2 pulls for Medium, 3 pulls for Low, and 4 pulls for Off.
- Installation Flexibility: The fan can be mounted on angled ceilings (up to 15 degrees), provided the hanger can withstand the fan's weight.
- Safety Features: The design emphasizes secure mounting to an outlet box marked "acceptable for fan support" and directly to the building structure, capable of supporting at least 100 pounds, to mitigate risks of fire, electric shock, or personal injury.
Maintenance Features
Maintaining the YITAHOME ceiling fan is straightforward and primarily involves routine cleaning and occasional checks to ensure optimal performance and longevity:
- Periodic Cleaning: The only required maintenance is periodically cleaning the ceiling fan. This should be done using a soft brush or a lint-free cloth to avoid scratching the paint or finish.
- Power Disconnection for Cleaning: It is crucial to turn off the electricity power at the main fuse box or circuit panel before cleaning the fan to prevent electrical shock.
- Avoid Water and Detergents: Do not use water or detergents to clean the fan or its blades. Water can damage the motor or blades and pose a risk of electrical shock. A dry or lightly dampened cloth is recommended.
- Lubrication: The motor is equipped with permanently lubricated ball bearings, eliminating the need for additional oiling throughout its lifespan.
- Blade Balancing Kit: A balancing kit is included to address any wobbling issues. Users are instructed to check blade and blade arm screw security, measure blade levels for uniformity (deviation should be within 1/8 inch or 0.32 cm), and use the balancing kit if wobbling persists. Interchanging adjacent blades can also help redistribute weight for smoother operation.
- Noise Management: Small, occasional noises are normal, especially in quiet environments. A 24-hour "breaking-in" period is suggested, as most noises from a new fan tend to disappear over time.
- Pre-Installation Checks: Before installation, it is recommended to consult a qualified licensed electrician if unfamiliar with electrical wiring, ensuring all connections comply with local and national electrical codes.
- Regular Screw Checks: Periodically check that all screws securing the mounting bracket, downrod, light kit, fan blades, motor coupling, and other hardware are firmly tightened to prevent wobbling and ensure safety.
- Remote Control Battery Care: If the remote control will not be used for an extended period, remove the 12V battery to prevent damage to the transmitter and store it away from excessive heat or humidity.
- Structural Integrity Check: Ensure the ceiling beam meets the minimum tensile test strength of 30KG for installation to support the fan's weight and movement.
- Blade Inspection: Regularly inspect the airfoils and brackets to ensure they are not bent or deformed. Confirm that the fan blades are not cracked; if they are, replace them with new blades of the same brand to maintain compatibility and balance.