Do you have a question about the York Fitness G510 and is the answer not in the manual?
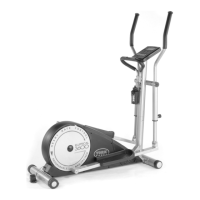
| Resistance Type | Magnetic |
|---|---|
| Display Type | LCD |
| Programs | 12 |
| Heart Rate Monitoring | Hand pulse sensors |
| Maximum User Weight | 120 kg |
| Display Features | Time, speed, distance, calories, pulse, resistance level |
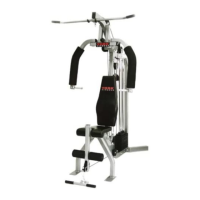
Key safety warnings, necessary tools, and assembly guidance before starting the unit setup.
Guidelines for cleaning upholstery and regularly checking equipment components for wear and tear.
Securing the front upright supports and rear stabilizer to the bottom cross support using provided fixings.
Attaching the weight plate posts and main frame support to the bottom cross support via connecting plates.
Loading the weight plates, top plate, and selector stem onto the weight plate post and securing it.
Attaching the top cross support to the main frame support using connecting plates and fixings.
Fixing the leg extension unit to the front of the bottom cross support using specified hardware.
Attaching the right and left pec cam covers to the pec arm top support.
Inserting and securing the pivot shaft rod through the pec arm top support and top cross support.
Sliding arm foam rollers onto the right and left pec arms for user comfort.
Fitting pec arm assemblies, handle pivot shaft, and press handle to the main frame.
Fixing seat and back rest upholstery, and installing foam roller post into the leg extension unit.
Routing the lat pull cable, fitting pulley wheels, covers, and the adjustable pulley bracket.
Threading the lat pull cable into the top of the weight selector stem and tightening the lock nut.
Setting up the pec cable pulley system with fixing plates, covers, wheels, and connecting cables.
Connecting pec cables to pec arms and mounting pulley wheels under top connecting plates.
Connecting the connecting cable to the bench press ratio bracket and hooking pulley wheels.
Routing the low pull cable, fitting pulley assemblies, covers, and connecting cable to the bottom cross support.
Connecting the adjustable pulley assembly and the connecting cable to the ratio pulley bracket.
Attaching snap lock hooks to the chain, and connecting the top lat bar and low pulling bar.
Instructions on performing the pec curl exercise with the hand wheel knob fitted securely.
Instructions on performing the press exercise with the hand wheel knob removed.
Instructions on performing the low pulley exercise with the retaining pin fitted correctly.
Instructions on performing leg extension/curl exercise with the retaining pin removed.
Step-by-step guide to adjust the press handle grip from narrow to wide and vice-versa.
Guidance on fitting or removing the hand wheel knob for specific pec and press exercises.
How to adjust the weight ratio for the pec/press arms to increase resistance from 50kg to 100kg.
Instructions on correct placement of the retaining pin for leg extension and low pulley exercises.