EasyManua.ls Logo

Z-Line Designs ZL1441-1DU User Manual

Z-Line Designs ZL1441-1DU
12 pages
To Next Page IconTo Next Page
Page #1 background imageLoading...
Page #1 background image
ZL1441-1DU--Page 1 of 10
ZLN # ZL1441-1DU
DO NOT return to the store if parts are missing or damaged.
For Parts Replacements and Inquiries, please call us Toll-Free 1-888-736-2141 or E-mail
CustomerService@Z-LineDesigns.com
.
To ensure a timely delivery, please include the following:
1. Full Name
2. Physical Address (Our primary carrier, FedEx, will NOT deliver to P.O. Boxes)
3. Phone Number
4. QC Number: NH
5. ZLN Number: ZL1441-1DU_V01
6. Part Number(s) or Letter(s)
7. Quantity
8. We also request that you please provide a brief description of the reason for your request.
Our Customer Service Representatives will be available to assist you Monday – Friday 7:00 am to 3:30 pm
Pacific Standard Time (Except Holidays).
Belaire Glass L Desk
061912
Question and Answer IconNeed help?

Do you have a question about the Z-Line Designs ZL1441-1DU and is the answer not in the manual?

Z-Line Designs ZL1441-1DU Specifications

General IconGeneral
BrandZ-Line Designs
ModelZL1441-1DU
CategoryIndoor Furnishing
LanguageEnglish

Summary

Important Information

Assembly Prerequisites

Details estimated time, required personnel, and preparation steps before assembly.

Required Tools for Assembly

Specifies the necessary tools required for assembling the product.

Hardware Identification

Hardware Components A-H

Lists and quantifies floor levelers, bolts, wrenches, screws, plugs, and pads.

Pre-assembled Parts I-J

Identifies pre-assembled plastic end caps for reference.

Parts Identification - Frame Components

Frame Parts 1-9

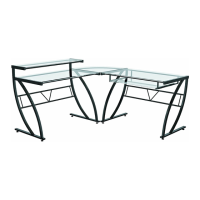
Lists and quantifies main desk frame, computer desk frame, back frame, and crossbars.

Parts Identification - Glass and Corner Components

Glass and Frame Parts 10-14

Lists and quantifies corner frame, corner glass, desk glass, shelf glass, and keyboard glass.

Assembly Instructions

Step 1: Install Floor Levelers

Attaches floor levelers to the bottoms of the main and computer desk frames.

Step 2: Assemble Main and Computer Frames

Connects back frames and shelf crossbars to desk frames using Allen bolts.

Step 3: Connect Computer Desk Crossbars and Corner Frame

Attaches computer desk crossbars and corner frame using Allen bolts.

Step 4: Connect Main Desk Crossbars and Corner Frame

Attaches main desk crossbars and corner frame using Allen bolts.

Step 5: Install Keyboard Glides and Rubber Plugs

Connects keyboard glides and inserts rubber plugs into various frame components.

Step 6: Attach Keyboard Frame and Felt Pads

Secures the keyboard frame and adheres felt pads to its inner corners.

Step 7: Install Glass Components and Final Tightening

Places glass panels and fully tightens all Allen bolts to complete assembly.

Product Dimensions

Desk Dimensions Overview

Provides visual representation and measurements of the desk's width, depth, and height.

Safety and Usage Guidelines

Maximum Weight Capacities

Details the weight limits for different sections of the desk to ensure stability.

Glass Surface Precautions

Lists specific warnings for handling and cleaning the glass surfaces to prevent damage.

1 Year Limited Warranty

Warranty Coverage and Limitations

Details what the warranty covers, exclusions, and limitations on materials and components.

How to Obtain Warranty Service

Outlines the procedure for claiming warranty service through a dealer or customer service.

Customer Service Contact Information

Provides toll-free number and email for warranty inquiries and assistance.

Related product manuals