EasyManua.ls Logo

Z-Wave RAZBERRY 7 PRO - User Manual

Z-Wave RAZBERRY 7 PRO
6 pages
Print Icon
To Next Page IconTo Next Page
Loading...
Installation steps:
1. Install the RaZberry 7 Pro shield on the Raspberry Pi GPIO
2. Install Z-Way software
The RaZberry 7 Pro shield is designed to work with the Raspberry Pi 4 ModelB,
but is fully compatible with all previous models, such as: A, A+, B, B+, 2B, Zero,
Zero W, 3A+, 3B, 3B+. The maximum potential of the RaZberry 7 Pro is achieved
together with Z-Way software.
There are several ways to install Z-Way:
1. Download a ash card image based on Raspberry Pi OS with pre-installed
Z-Way (ash card minimum size is 4 GB)
https://storage.z-wave.me/z-way-server/raspberryPiOS_zway.img.zip
2. Install Z-Way on Raspberry Pi OS from an apt repository:
wget -q -O - https://storage.z-wave.me/RaspbianInstall | sudo bash
3. Install Z-Way on Raspberry Pi OS from a deb package:
https://storage.z-wave.me/z-way-server/
It is recommended to use the latest version of Raspberry Pi OS
NOTE: RaZberry 7 Pro is also compatible with other third party Z-Wave
software supporting Silicon Labs Z-Wave Serial API.
After the successful installation of Z-Way, make sure that Raspberry Pi has
Internet access. In the same local network go to https://nd.z-wave.me, you
will see the local IP address of your Raspberry Pi below the login form. Click
on the IP to reach the Z-Way Web UI initial setup screen. The welcome screen
shows the Remote ID and will prompt you to set the administrator password.
NOTE: If you are in the same local network with the Raspberry Pi, you can
access Z-Way Web UI using a browser by typing in the address bar: http://
RASPBERRY_IP:8083.
After setting the administrator password you can access the Z-Way Web UI
from anywhere in the world, to do this go to https://nd.z-wave.me, type
ID/login (e.g. 12345/admin) and enter your password.
PRIVACY NOTE: Z-Way by default connects to the server nd.z-wave.me
inorder to provide remote access. If you don’t need this service, you can turn
off this feature after logging into Z-Way (Main menu > Settings > Remote
Access). All communications between Z-Way and the server find.z-wave.me
are encrypted and protected by certicates.
RaZberry 7 Pro Z-Wave shield (Raspberry Pi not included)
Congratulations! You have got a modern Z-Wave shield
RaZberry 7 Pro with extended radio range. RaZberry 7 Pro
will transform your Raspberry Pi into a full featured smart
home gateway.
Z
-
WAVE SHIELD
WITH EXTERNAL ANTENNA
RAZBERRY 7 PRO
ZMEERAZBERRY7_ANT
ZMEURAZBERRY7_ANT
LEARN MORE ABOUT RAZBERRY 7 PRO
Full documentation, training videos and
technical support can be found on the website
https://z-wave.me/raz.
You can change the radio frequency of the
RaZberry 7 Pro shield at any time by going to
the Expert UI http://RASPBERRY_IP:8083/
expert, Network > Control and select the
desired frequency from the list.
RaZberry 7 Pro shield constantly improves
and adds new features. To use them, you
need to update the rmware and activate the
necessary functions. This is done from the
Z-Way Expert UI under Network > Controller
Information.
https://z-wave.me/raz
Dashboard (1)
Rooms (2)
Widgets (3)
Device widgets (7)
Widget settings (8)
Events (4)
Quick automation (5)
Main menu (6)
INTERFACE
The “SmartHome” user interface looks similar on different devices such
asdesktops, smartphones or tablets, but adapts to the screen size. The user
interface is intuitive and simple:
1. Favourite devices are displayed on the Dashboard (1)
2. A devices can be assigned to a Room (2)
3. The full list of all devices is in Widgets (3)
4. Every sensor or relay triggerings are displayed in Events (4)
5. Set up scenes, rules, schedules and alarms in Quick Automation (5)
6. Apps and system settings are in the Main menu (6)
The device can provide several functions, for example a 3-in-1 Multisensor
provides: motion sensor, light sensor and temperature sensor. In this case
there will be three separate widgets (7) with individual settings (8).
Advanced automation can be congured using local and online Apps. Apps
allow you to set up rules like “IF > THEN”, to create scheduled scenes, set
auto off timers. Using applications you can also add support for additional
devices: IP cameras, Wi-Fi plugs, EnOcean sensors and set up integrations
with Apple HomeKit, MQTT, IFTTT etc. More than 50 applications are built-in
and more than 100 can be downloaded for free from the Online Store.
Applications are managed in the Main menu > Apps.
Question and Answer IconNeed help?

Do you have a question about the Z-Wave RAZBERRY 7 PRO and is the answer not in the manual?

Summary

Installation and Setup

Installing the Z-Way Software

Describes multiple methods for installing the Z-Way software on Raspberry Pi, including flash card image and apt repository.

Accessing the Z-Way Web UI

Guides users on how to access and perform the initial setup of the Z-Way Web User Interface via IP address or find.z-wave.me.

Z-Wave Interface Overview

Dashboard and Device Navigation

Explains the main components of the Z-Wave UI, including the dashboard, rooms, widgets, and event displays.

Automation and App Management

Covers quick automation features, system settings, and the management of third-party applications for advanced control.

Hardware Description and Specifications

Shield Components and Indicators

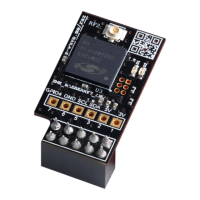
Details the physical connectors, LEDs, and the U.FL connector for external antenna connection on the RaZberry shield.

Antenna and RF Performance

Describes the included antenna, its specifications, and radio signal transmission efficiency based on VSWR charts.

FCC Compliance and Regulatory Information

FCC Statement and Device ID

Presents the FCC ID, compliance statement, and warnings regarding modifications to the device.

RF Exposure and Co-location Warnings

Addresses RF exposure limits, minimum installation distance, and co-location restrictions for safe operation.

OEM Integration Guidelines

Provides instructions and conditions for Original Equipment Manufacturers integrating the module into host products.

Operational Use Conditions and Labeling

Summarizes specific operational use conditions and requirements for end device labeling and FCC identification.

Part 15 B Compliance and RF Exposure

Details Class B digital device compliance, RF exposure considerations, and antenna design.

Additional Testing and Disclaimer

Covers information on test modes, additional testing requirements, and a disclaimer for modular transmitter use.

Overview

The RaZberry 7 Pro is a Z-Wave shield designed to transform a Raspberry Pi into a full-featured smart home gateway. It comes with an external antenna for extended radio range and is compatible with Raspberry Pi 4 Model B and all previous models.

Function Description:

The primary function of the RaZberry 7 Pro is to enable Z-Wave communication for a Raspberry Pi, turning it into a central hub for smart home devices. It utilizes Z-Way software, which provides a comprehensive user interface for managing smart home functionalities. The Z-Way interface is designed to be intuitive and adaptable to various screen sizes, including desktops, smartphones, and tablets.

Key functionalities of the Z-Way software include:

  • Dashboard: Displays favorite devices for quick access.
  • Rooms: Allows users to assign devices to specific rooms for organized management.
  • Widgets: Provides a full list of all connected devices, each with individual settings. For multi-sensors (e.g., motion, light, temperature), separate widgets are created for each function.
  • Events: Shows all sensor or relay triggerings, providing a historical log of activities.
  • Quick Automation: Enables users to set up scenes, rules (IF > THEN logic), schedules, and alarms.
  • Main Menu: Access point for apps and system settings.
  • Apps: Supports advanced automation and integration with additional devices such as IP cameras, Wi-Fi plugs, EnOcean sensors, Apple HomeKit, MQTT, and IFTTT. Over 50 applications are built-in, and more than 100 can be downloaded from the Online Store.

The device also supports remote access via find.z-wave.me, allowing users to manage their smart home from anywhere in the world. This remote access is encrypted and protected by certificates. Users can also access the Z-Way Web UI locally by typing the Raspberry Pi's IP address and port 8083 in a browser.

Important Technical Specifications:

  • Z-Wave Transceiver: Silicon Labs ZGM130S.
  • Wireless Range: Minimum 40 meters indoors in direct line of sight.
  • Dimensions/Weight: 30 x 17 x 12 mm / 16 gr.
  • LED Indication:
    • Red: Indicates Inclusion and Exclusion Mode.
    • Green: Indicates Data Transmission.
  • Interface: TTL UART (3.3 V) compatible with Raspberry Pi GPIO pins.
  • Frequency Range:
    • ZMEERAZBERRY7_ANT: 865-869 MHz (Europe, India, Russia, China, South Africa, Middle East). Default: Europe (EU), India (IN), Russia (RU).
    • ZMEURAZBERRY7_ANT: 908-917 MHz (America, excluding Brazil and Peru, Israel). Default: America (US), Israel (IL).
    • 919-921 MHz (Australia/New Zealand/Brazil/Peru, Hong Kong, Japan, Taiwan, Korea).
  • Antenna: Includes a 100 mm Linx SMA coaxial cable with a U.FL connector and a Linx antenna. The antenna base can rotate 360° and tilt 90°, enhancing radio signal transmission efficiency and range.
    • Linx ANT-868-CW-HWR-SMA antenna for 865-869 MHz.
    • Linx ANT-916-CW-HWR-SMA antenna for 908-917 MHz and 919-921 MHz.
  • FCC Compliance: FCC Device ID: ALIB2-ZMERAZBERRYZANT. Complies with Part 15 of the FCC Rules.
  • RF Exposure: Equipment must be installed and operated with a minimum distance of 20 cm between the radiator and the user's body. It must not be co-located or operated in conjunction with any other antenna or transmitter.

Usage Features:

  • Easy Installation: The shield connects to pins 1-10 on the Raspberry Pi GPIO. Z-Way software can be installed by downloading a flash card image, using an apt repository, or from a deb package.
  • User-Friendly Interface: The Z-Way "SmartHome" UI is designed for ease of use, adapting to various device screens.
  • Customization: Users can assign devices to rooms, configure individual device settings, and create complex automation rules.
  • Remote Access: Secure remote control of the smart home gateway via find.z-wave.me.
  • Frequency Adjustment: The radio frequency can be changed at any time through the Expert UI under Network > Control.
  • Compatibility: Works with Raspberry Pi 4 Model B and all previous models (A, A+, B, B+, 2B, Zero, Zero W, 3A+, 3B, 3B+). Also compatible with other third-party Z-Wave software supporting Silicon Labs Z-Wave Serial API.

Maintenance Features:

  • Self-Test: Upon powering on, both LEDs should shine for approximately 2 seconds and then turn off. If they don't, it indicates a defective device (hardware problem or bad firmware).
  • Firmware Updates: The RaZberry 7 Pro shield is continuously improved with new features. Users need to update the firmware and activate necessary functions from the Z-Way Expert UI under Network > Controller Information.
  • Troubleshooting: If static electricity or electromagnetism causes data transfer to fail, users are advised to restart the application or disconnect and reconnect the communication cable.
  • Interference Management: If the equipment causes harmful interference, measures like reorienting the receiving antenna, increasing separation from the receiver, connecting to a different circuit, or consulting a technician are recommended.
  • Privacy Control: Users can disable remote access to find.z-wave.me if not needed, enhancing privacy.

Z-Wave RAZBERRY 7 PRO Specifications

General IconGeneral
BrandZ-Wave
ModelRAZBERRY 7 PRO
CategoryNetwork Hardware
LanguageEnglish