Zenit PhotoSniper User manual, 1992 year
– 1 –
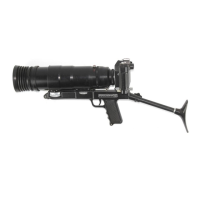
Zenit PhotoSniper
This text is identical to the one in the Instruction manual, English version.
Attention!
The present Instruction Manual contains brief characteristics and essential rules of using the
PHOTOSNIPER photogun.
Before using the photogun, make thorough study of the handling rules according to the present
Manual to master correct procedures.
Minor differences between the Description and your photogun may be due to ever-advancing
development of the camera and design.
To ensure long period and trouble/free operation of the camera the following should be kept
in mind:
Do not touch the surfaces of the optics with hands as it is likely to cause damage of the coating.
Do not turn the release button, if not necessary, while releasing the shutter to avoid the cutting out
of the shutter setting mechanism.
Do not rotate the shutter speed dial in the interval between “B” and “500”.
While cocking the camera shutter, always turn the setting lever up to the mechanical limit to avoid
blank frames on the film.
Check the work of the shutter before loading the camera. To do this turn the shutter cocking lever
with one or more movements up to the mechanical limit. Then press the release button.
1. Application and Advantages
The PHOTOSNIPER photogun in a combination of a special TAIR-3-PhS long focus lens and ZENIT-
ES reflex camera. The lens with the camera is mounted on a gun stock with a grip fitted with a release
mechanism.
The photogun is designed for taking close-up picture of animals, birds and plants under natural
conditions.
The photogun can be successfully used for sports photograph as well as for taking close-up pictures
of distant architectural details.
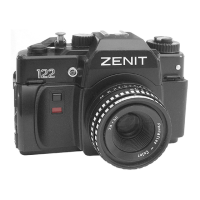
The ZENIT-ES camera has many attractive features including an instant return mirror, providing
continuous watching of the subject to be photographed (except for the moment of exposure), built-in
exposure meter (particularly valuable when photographing on a colour film), shutter setting lever and
hinged back cover.
In the photograph of 13×18 cm size (5 times magnification of the negative picture size) one can
distinguish the details that can be clearly seen through the field glass. The size of the details
distinguishable in the picture equals approximately to 1/10000 of the taking distance.
The ZENIT-ES type camera of the photogun is fitted with a built-in uncoupled exposure meter and
an instant return mirror. Unlike the ZENIT-E camera, it has an additional release button at the bottom
of the camera body (coupling the camera with the grip trigger), more remote exit pupil of
the viewfinder eyepiece (for comfortable shooting) and 42×1 mm thread that makes possible to use
lenses from the Praktica, Asahi, Pentax, Pentacon, Edixa, etc. cameras as interchangeable ones.
Using the reflex viewfinder (ground glass focusing) and extension rings, one can do reproduction