EasyManua.ls Logo

Zenith 7013W User Manual

Zenith 7013W
10 pages
To Next Page IconTo Next Page
Page #1 background imageLoading...
Page #1 background image
Pg 1 of 10
www.zenith-products.com IS7016
©2013 Zenith Products Corp. MCS 12/06/2013
Assembly Instructions - Model 7013W / 7013WP (White)
Instrucciones de Ensamblado - Modelo Model 7013W / 7013WP(Blanco)
Instructions d'assemblage - Modèle Model 7013W / 7013WP (Blanc)
Before You Begin:
Thank you for purchasing this product. Please identify all parts and hardware pieces before you begin.
When laying out parts, place them on a soft surface to prevent scratching.
If any pieces are missing, call our Toll Free Number 1-800-892-3986 between 8:00AM-5:00PM EST Monday
through Friday or contact our website at www.zenith-products.com for more information.
Antes de que empiece:
Muchas gracias por comprar este
producto.
Identifique todas las piezas y las piezas de ferretería antes de
comenzar. Al distribuir las piezas, colóquelas sobre una superficie suave para evitar que se rayen.
Si faltaran piezas, llame a nuestro número gratuito 1-800-892-3986 entre las 8:00 a.m.- 5:00 p.m., hora
del este, de lunes a viernes o contáctenos a través de nuestro sitio web en www.zenith-products.com
para solicitar mas información.
Avant de commencer :
Merci d’avoir acheté ce produit. Veuillez identifier toutes les pièces et les accessoires de montage avant de
commencer. Lorsque vous déballez les pièces, placez-les sur une surface non rugueuse afin d’éviter les
éraflures.
S’il venait à vous manquer des pièces, appelez notre numéro sans frais 1.800.892.3986 entre 8 h et 17 h
(heure de l’Est des États-Unis), du lundi au vendredi, ou contactez notre site Web à www.zenith-products.com
pour de plus amples informations.
Question and Answer IconNeed help?

Do you have a question about the Zenith 7013W and is the answer not in the manual?

Zenith 7013W Specifications

General IconGeneral
BrandZenith
Model7013W
CategoryIndoor Furnishing
LanguageEnglish

Summary

Before You Begin

Identify Parts and Hardware

Identify all parts and hardware pieces before beginning assembly.

Prevent Scratching

Place parts on a soft surface to prevent scratching during layout.

Missing Pieces Support

Call toll-free number or visit website if any pieces are missing.

Parts Identification

Straight Tube (A)

One straight tube with spring packed inside.

Tapered Tubes (B & C)

Includes one short and two long tapered tubes.

1/2" Diameter Tubes (D & E)

Includes one long and three short 1/2-inch diameter tubes.

Additional Components

Hooks and Brackets

Includes plastic hook, elbow and hinge brackets, and wall bracket.

End Caps and Wedges

Includes various end caps (soft vinyl, T-cap, small) and wedges.

Fasteners and Adhesive Items

Includes screws, wall anchor, adhesive pad, and adhesive tape strips.

Assembly Instructions

Step 1: Assemble Towel Bar Units

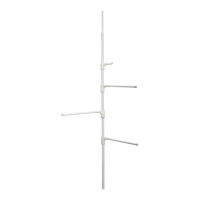
Assemble three towel bar units using short tubes, elbow brackets, and end caps.

Step 2: Assemble Upper Tube

Assemble upper tube with wedges, notched collars, and towel bar assemblies.

Step 3: Assemble Lower Tube

Repeat procedure to assemble the lower tube with a towel bar assembly.

Step 4: Connect Tube Assemblies

Connect the lower tube assembly to the upper tube assembly.

Step 5: Add End Caps to 1/2" Tube

Add end caps and T-cap to the long 1/2-inch diameter tube.

Step 6: Attach Hook and Straight Tube

Attach hook and straight tube with end cap to the assembly.

Step 7: Tub Ledge Installation

Install assembly onto tub ledge, compressing top against ceiling.

Step 8: Apply Seam Tape

Apply tape strips around tube seams to protect from moisture.

Step 9: Shower Stall Installation

Install assembly into shower stall, placing it on the floor.

Step 10: Apply Seam Tape (Repeat)

Apply tape strips around tube seams to protect from moisture.

Step 11: Hinge Installation

Install hinge brackets on door hinges using wedges and tube assembly.

Step 12: Secure Hinge Brackets

Remove hinge pin, align bracket, and replace pin for secure mounting.

Step 13: Optional Wall Bracket

Use wall bracket for added stability, fastening it to the wall.

Related product manuals