EasyManua.ls Logo

Zenna Home 2265NN User Manual

Zenna Home 2265NN
9 pages
To Next Page IconTo Next Page
Page #1 background imageLoading...
Page #1 background image
www.zennahome.com IS02265-I
Pg 1 of 9
©2016 Zenith Home Corp.
MCS 5/6/2016
Assembly Instructions / Instrucciones de Ensamblado / Instructions d'assemblage
Model / Modelo / Modèle
2265NN (Satin Nickel /
Satinado y Niquelado
/ Nickel satiné)
Before You Begin:
Thank you for purchasing this product. Please identify all parts and hardware pieces before you begin.
When laying out parts, place them on a soft surface to prevent scratching.
If any pieces are missing, call our Toll Free Number 1-800-892-3986 between 8:00AM-5:00PM EST Monday
through Friday or contact our website at www.zenith-products.com for more information.
Antes de que empiece:
Muchas gracias por comprar este
producto.
Identifique todas las piezas y las piezas de ferretería antes de
comenzar. Al distribuir las piezas, colóquelas sobre una superficie suave para evitar que se rayen.
Si faltaran piezas, llame a nuestro número gratuito 1-800-892-3986 entre las 8:00 a.m.- 5:00 p.m., hora
del este, de lunes a viernes o contáctenos a través de nuestro sitio web en www.zenith-products.com
para solicitar mas información.
Avant de commencer :
Merci d’avoir acheté ce produit. Veuillez identifier toutes les pièces et les accessoires de montage avant de
commencer. Lorsque vous déballez les pièces, placez-les sur une surface non rugueuse afin d’éviter les
éraflures.
S’il venait à vous manquer des pièces, appelez notre numéro sans frais 1.800.892.3986 entre 8 h et 17 h
(heure de l’Est des États-Unis), du lundi au vendredi, ou contactez notre site Web à www.zenith-products.com
pour de plus amples informations.
Question and Answer IconNeed help?

Do you have a question about the Zenna Home 2265NN and is the answer not in the manual?

Zenna Home 2265NN Specifications

General IconGeneral
BrandZenna Home
Model2265NN
CategoryIndoor Furnishing
LanguageEnglish

Summary

Before You Begin

Product Identification and Preparation

Identify all parts and hardware and lay them on a soft surface to prevent scratches.

Customer Support and Information

Contact customer service for missing parts or visit the website for more information.

Tools and Parts List

Tools Required for Assembly

Lists the necessary tools for assembling the product.

Components of the Unit

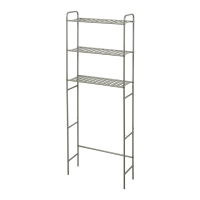
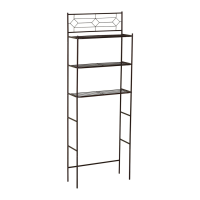
Details the various parts including shelves, tubes, braces, and top pieces.

Hardware Components

Fasteners and Connectors

Includes large screws, small screws, tube caps, mounting screws, and wall anchors.

Cleaning and Care Instructions

Recommended Cleaning Method

Clean with a dry or damp cloth; avoid strong detergents or abrasive cleaners.

Assembly Step 1: Base Assembly

Install Tube Caps and Bottom Brace

Insert tube caps into bottom side panels and attach the support tube.

Assembly Step 2: Attach Middle Sides

Connecting Middle Support Sections

Attach the middle side panels to the base structure.

Assembly Step 3: Install Back Tubes

Securing Vertical Back Supports

Attach the back tubes to the unit.

Assembly Step 4: Install Shelves

Attaching the Shelving Units

Secure the shelves to the vertical supports using screws.

Assembly Step 5: Install Top Pieces

Connecting Top Structure and Shelves

Insert top pieces and attach the uppermost shelf.

Wall Mounting Instructions and Safety

Pre-Mounting Safety Precautions

Verify utility lines before drilling; be aware of potential injury.

Wall Mounting Procedure Details

Mark points, install anchors/studs, align unit, and tighten mounting screws.

Stepladder Usage Recommendation

For safe installation, it is imperative to use a stepladder.

Related product manuals