Do you have a question about the Zippity HAMPTON ZP19009 and is the answer not in the manual?
Key points for safe and effective assembly, including surface protection and force application.
Guidance on handling missing or damaged components and ordering replacements via website.
Contact information and advice for seeking assistance with assembly or installation.
Instructions for initiating product returns through the original point of purchase.
Instructions for inserting surface mounts into the bottom of all four posts.
Instructions for inserting post extensions into the bottom of all four posts.
Attaching rail brackets to Post A using self-drilling screws.
Attaching rail brackets to Posts B, C, and D.
Positioning and securing a U-Channel between brackets with screws.
Installing U-channels on the remaining three posts.
Positioning posts and sliding horizontal rails into brackets.
Inserting privacy boards into the bottom rail and U-channel.
Sliding a horizontal rail over privacy boards and securing it.
Repeating assembly steps for the second shower wall.
Positioning side walls and installing a horizontal rail into brackets.
Inserting privacy boards into the bottom rail and U-channel.
Sliding the upper horizontal rail into brackets and securing.
Sliding post trim caps over the top of the posts.
Inserting and securing the beams into the routed holes in the posts.
Applying glue to end caps and attaching them to beams.
Visually squaring the unit by ensuring diagonal distances are equal.
Marking hole locations and securing surface mounts or lag screws.
Digging holes and securing posts with concrete.
Attaching privacy strips to the inside of posts using screws.
Assembling the door frame with horizontal and vertical rails.
Inserting privacy boards into the door rails.
Assembling the top of the door frame and securing brackets.
Assembling and securing the door brace.
Securing hinges and latch to the shower door.
Securing hinges to posts and opening the door.
Marking and drilling a hole for the latch bolt.
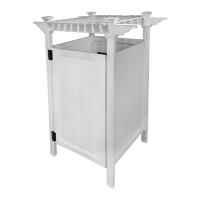
Fastening shade slats to the top of the beams using screws.
| Type | Towel Bar |
|---|---|
| Mounting Location | Wall |
| Number of Handles | 0 |
| Product Type | Towel Bar |
| Material | Metal |
| Finish | Chrome |
| Mounting Type | Wall Mount |
| Number of Bars | 1 |
| Installation Required | Yes |
| Length | 18 in |