Do you have a question about the Zippity OCEANSIDE and is the answer not in the manual?
Check packed materials, use non-abrasive surface, and assemble in a spacious area.
Instructions for ordering replacement parts via website or contacting customer service.
Contact information for help with assembly or installation of the product.
Guidance on how to initiate a return if unsatisfied with the product.
Secure Rail Brackets to Post A using pre-drilled holes and screws.
Repeat bracket installation for Posts B, C, and D.
Position and secure U-Channel between Rail Brackets with screws.
Repeat U-Channel installation for remaining Posts.
Attach Horizontal Rail to Rail Brackets on Posts A and B with screws.
Insert Privacy Boards into Horizontal Rail and U-Channel.
Slide middle Privacy Board vertically into place.
Attach another Horizontal Rail over Privacy Boards with screws.
Slide Shower Rods into smaller routed holes in Posts.
Slide Beams into larger routed holes and fasten with screws.
Pressure fit Post Caps onto the top of each Post.
Apply glue to Decorative End Caps and attach to Beams.
Square the unit by ensuring diagonal distances between posts are equal.
Surface Mount install: Mark and secure mounts with anchors or lag screws.
Post Extension install: Dig holes, set unit, fill with concrete, and secure.
Secure Shade Slats to Beams using steel screws.
Install shower curtain according to product instructions.
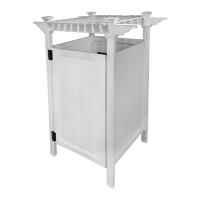
The Zippity Oceanside Outdoor Vinyl Shower Kit (ZP19024) is a freestanding, 3' x 3' enclosure designed to provide a private outdoor showering experience. This product is ideal for use in backyards, near pools, or at beach houses, offering convenience and privacy for rinsing off before or after outdoor activities. The kit is constructed from durable vinyl, which is known for its weather resistance, low maintenance, and long-lasting aesthetic appeal, making it suitable for outdoor environments.
The primary function of the Zippity Oceanside Outdoor Vinyl Shower Kit is to create a dedicated and private space for outdoor showering. It features a robust vinyl structure that encloses a showering area, complete with shower rods for hanging a shower curtain (not included) and beams that support shade slats for partial overhead coverage. The design allows for the installation of a showerhead and plumbing (not included) to complete the functional shower setup. Its modular design allows for relatively straightforward assembly, making it an accessible solution for homeowners looking to add an outdoor shower.
The Zippity Oceanside Outdoor Vinyl Shower Kit offers a practical, durable, and aesthetically pleasing solution for adding an outdoor shower to any property, designed for ease of assembly and minimal long-term maintenance.
| Brand | Zippity |
|---|---|
| Model | OCEANSIDE |
| Category | Bathroom Fixtures |
| Language | English |