12
ENVIRONMENT
The device is delivered in a package to protect it against any possible
transport damage. The packaging is made from non-processed
material and can be recycled. Throw the materials to appropriate
colour containers for selective waste collection.
Protect the environment and do not throw used batteries
into household wastes. Return them to the point of sale
or a special recycling centre.
Used electrical equipment (including the computer and
power supply) are recyclable. Do not throw them out with
household waste as they may contain substances dangerous to the
health and environment. You can actively contribute to sustainable
use of natural resources and the protection of the natural
environment by handing the used device to a recycling centre for used
electrical devices.
ASSEMBLY
The device must be assembled carefully by an adult. In case of doubt,
ask a more experienced person for help.
• Prior to the assembly, make sure the set contains all
the listed elements and whether none of the parts was
damaged during transport. If any parts are missing or you have
any other reservations, contact the seller.
• Have a look at the drawings and explanations and follow the
assembly manual when assembling the device.
• Be careful during the assembly. There is a risk of injury when
using the tools and parts.
• Remember to keep your surroundings safe. Do not let tools
and parts lie around in chaos. Remember that plastic foil and
bags pose o suffocation risk to small children.
• Assembly parts necessary for a specific step in
the assembly manual are shown in pictures and included in
instructions. Use the elements indicated in the assembly
manual.
• Do not tighten parts completely during the first stages
of the assembly. Tighten connections after all parts are placed
and fitted properly.
• The manufacturer may have assembled some parts.
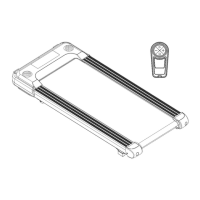
ASSEMBLY DIAGRAM (→ See page 2)
ATTENTION! Do not use parts other than those provided by the
manufacturer.
PARTS LIST
Bottom frame fixing strip
ASSEMBLY INSTRUCTIONS
The treadmill does not require assembly.
NOTE! Before using the treadmill, check that all screws are correctly
screwed in.
VERTICAL POSITIONING (→ See page 3)
NOTE! Before you start folding, check if all the bolts are tight and
disconnect the power supply cable.
NOTE! Be careful with your hands and fingers when folding so that
they do not get crushed.
After raising the treadmill to vertical, pull the support with your hand
and rotate it down so that it touches the floor. Make sure the treadmill
is stably supported and let go of the frame.
ADJUSTMENTS
Levelling
Level the device by rotating the levelling feet in the front base.
COMPUTER MANUAL
START
The device starts five seconds after pressing the START button.
ENERGY SAVER
The treadmill computer automatically goes into the energy saving
mode if no action is performed within 10 minutes. Press any button to
wake the system up.
BUTTONS
• START — it is used to start the treadmill in the manual mode or
to start a selected programme.
• STOP — stops a running treadmill. When it is pressed, settings
are reset as well. After a restart, the device is in the manual
mode.
• SPEED +/- — it is used to adjust (increase and decrease ) the
speed in 0.1 km/h steps. The buttons are located on the
computer and handrails.
FUNCTIONS (SPECIFICATION)
Displays the current speed.
TIME Total exercise duration, from the
00:00-99:59 min
CALORIES Total calories burnt from the start
to the end of the exercise.
(The measurement is an
approximation for comparing
training sessions.
Do not use for
0,0-999 kcal