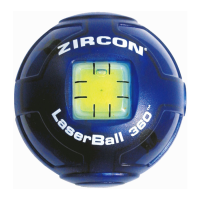
LaserBall 360
™
LIMITED 2 YEAR WARRANTY
Zircon Corporation, (“Zircon”) warrants this product to be free from defects in materials and workmanship
for two years from the date of purchase. Any in-warranty defective product returned to Zircon*, freight
prepaid with proof of purchase date and $5.00 to cover postage and handling, will be repaired or replaced
at Zircon’s option. This warranty is limited to the electronic circuitry and original case of the
product and specifically excludes damage caused by abuse, unreasonable use or neglect. This warranty is
in lieu of all other warranties, express or implied, and no other representations or claims of any nature
shall bind or obligate Zircon. Any implied warranties applicable to this product are limited to the one year
period following its purchase. IN NO EVENT WILL ZIRCON BE LIABLE FOR ANY SPECIAL, INCIDENTAL OR
CONSEQUENTIAL DAMAGES RESULTING FROM POSSESSION, USE OR MALFUNCTION OF THIS PRODUCT.
In accordance with government regulations, you are advised that: (i) some states do not allow limitations
on how long an implied warranty lasts and/or the exclusion or limitation of incidental or consequential
damages, so the above limitations and/or exclusions may not apply to you, and further (ii) this warranty
gives you specific legal rights and you may also have other rights which vary from state to state.
Return product freight prepaid with proof of purchase date (dated sales receipt) and $5.00 to cover
postage and handling, to:
UPS SCS C/O ZIRCON RETURNS
Lohstrabe 30a
85445 Schwaig
Munich, Germany
Be sure to include your name and return address. Out of warranty service and repair, where proof of
purchase is not provided, shall be returned with repairs charged C.O.D. Allow 4 to 6 weeks for delivery.
Customer Service, 1-800-245-9265 or 1-408-963-4550
Monday–Friday, 8:00 a.m. to 5:00 p.m. PST
E-mail: info@zircon.com
U.S. Patent 7174647, International Patents Pending
©
2007 Zircon Corporation • P/N 62650 Rev A 05/07
1. SAFETY INSTRUCTIONS
WARNING: Never shine a laser directly into eyes, doing so
can cause serious eye injury. LaserBall 360
™
laser level is a
precision tool, handle with care. Avoid water, shock, vibrations,
and extreme temperatures.
Avoid Exposure, laser radiation is emitted from this tool.
Do not disassemble LaserBall 360 laser level.
Do not aim laser at reflective surfaces.
Do not remove warning labels.
This product conforms to Applicable Standards of 21 CFR parts
1040.10 and 1040.11.
Caution: Use of controls, adjustments, performance of
procedures (other than those specified herein) may result in
hazardous radiation exposure.
Assembled in China of
U.S. and imported parts.
2. PLACING THE CUP
Remove the paper covering on one side of
the adhesive disc.
Firmly stick the adhesive disc onto the
outer flat portion of the cup.
Remove the second paper covering when
you are ready to place on the wall.
Choose a point on the wall that will act as
your starting point. Find that point through
the open center hole in the cup.
Place the cup on the wall. Press firmly to
get a strong bond. Thumb tacks or push
pins can also be used to hang the cup.
Adhesive discs are intended for single use.
4-Way
Bubble Level
Power Switch
Cup
LaserBall
Laser ApertureBattery DoorAdhesive Disc
3. OPERATING AND ADJUSTMENTS
Rotating LaserBall 360
™
laser level will allow
you to control the level of the line.
4. ADHESIVE REMOVAL
Remove the magnetically held LaserBall 360
™
laser level from the
cup first, then place it aside.
With minimal force, determine if the adhesive has made an overly
strong bond to the wall.
Slowly twist the cup away from the adhesive.
Use a fingernail, start on an edge of the adhesive disc, and roll it
off the wall.
Note: Additional discs can be ordered from Customer Service
at 1-800-245-9265.
5. REPLACING THE BATTERIES
To replace the batteries, use a coin or flat object
to remove the spring-loaded battery door.
Requires three LR44 batteries.
6. BEFORE YOU DRILL
Pivoting LaserBall 360
™
laser level allows
control over the intensity of the laser line.
Use LaserBall 360
™
laser level on wall
that it is attached to. Not intended for
showing level on adjacent walls.
Centering the bubble
between these two lines
finds level and plumb.
Use a StudSensor
™
/Stud Finder to
locate the perfect place to drill.
To level around corners or for
multiple lines, use additional
LaserBall 360
™
laser levels.
To turn ON/OFF, use Power Switch.
Visit www.zircon.com/support for the most current instructions.
LaserBall 360, StudSensor, and Zircon are registered trademarks, or trademarks of Zircon Corporation.
LaserBall 360
™
EINGESCHRÄNKTE 2-JÄHRIGE GEWÄHRLEISTUNG
Zircon Corporation, (“Zircon”) gewährleistet für 2 Jahr ab Kaufdatum, dass dieses Produkt keine
Material- und Verarbeitungsmängel aufweist. Jedes defekte Produkt, das innerhalb der
Gewährleistungsfrist an Zircon* retourniert wird, wobei die Frachtkosten im Voraus entrichtet sein
und ein Nachweis zum Kaufdatum sowie ein Betrag von Euro 5,-- für Postgebühren und Bearbeitung
beiliegen müssen, wird nach Gutdünken von Zircon entweder repariert oder ersetzt. Diese
Gewährleistung beschränkt sich auf die elektronische Schaltung und das Original-Gehäuse des
Gerätes und schließt ausdrücklich alle Schäden, die durch Missbrauch, unbestimmungsgemäßen
Gebrauch oder Nachlässigkeit verursacht wurden, aus. Diese Gewährleistung tritt an Stelle von allen
anderen Gewährleistungen, ob direkt oder indirekt, und keine anderen Vertretungen oder
Forderungen jeglicher Natur sollen für Zircon bindend oder verpflichtend sein. Jegliche indirekte
Gewährleistungen, die für dieses Produkt anwendbar sind, beschränken sich auf die 1-jährige
Gewährleistungsfrist nach Kauf. IN KEINEM FALLE IST ZIRCON HAFTBAR FÜR JEGLICHE SPEZIELLE,
BEGLEITENDE ODER FOLGE-SCHÄDEN, DIE DURCH DEN BESITZ, DIE VERWENDUNG ODER
FEHLFUNKTION DIESES PRODUKTS ENTSTEHEN.
Wir setzen Sie ferner davon in Kenntnis, dass in Übereinstimmung mit den gesetzlichen Vorschriften:
(i) einige Staaten Einschränkungen hinsichtlich der Dauer einer indirekten Gewährleistung und/oder
den Ausschluss oder eine Einschränkung von begleitenden oder Folgeschäden nicht erlauben, sodass
die o.a. Einschränkungen und/oder Ausschlüsse nicht für Sie gelten mögen, und dass des weiteren
(ii) diese Gewährleistung Ihnen spezifische gesetzliche Rechte gibt und Sie auch, je nach Staat,
andere Rechte haben können.
Falls Sie Reparatursendungen haben, wenden Sie sich bitte an unsere Web Seite:
www. zircon-tools.de http://www.zircon-tools.de, wo Sie genaue Angaben zu Ihrer Retoure finden.
UPS SCS C/O ZIRCON RETURNS
Lohstrabe 30a
85445 Schwaig
Munich, Germany
Patente fuer U.S.A. 7174647, International eingereicht
©2007 Zircon Corporation • P/N 62650 Rev A 05/07
1. SICHERHEITS-ANWEISUNGEN
WARNHINWEIS:Lassen Sie niemals den Laserstrahl in Ihre Augen scheinen. Dies
kann schwerste Augenverletzungen verursachen. LaserBall 360
™
Laser Level ist ein
Präzisionsgerät, das mit Vorsicht und Sorgfalt behandelt werden muss. Setzen Sie
das Gerät weder Wasser, Schock, Vibrationen noch extremen Temperaturen aus.
Vermeiden Sie Laserbestrahlung: Dieses Gerät sendet Laserstrahlen aus.
Zerlegen Sie daher den LaserBall 360
™
Laser Level unter keinen Umständen.
Zielen Sie den Laser nicht auf reflektierende Flächen.
Entfernen Sie die Warnaufkleber nicht.
Dieses Produkt entspricht den anwendbaren Normen von 21 CFR Parts
1040.10 und 1040.11.
Vorsicht: Gebrauch des Gerätes, anders als in dieser Anleitung
spezifiziert, kann gefährliche Strahlenbelastung ergeben.
Assembliert in China aus Teilen
mit Ursprungsland U.S.A. und
aus importierten Teilen.
2. ANBRINGEN DER HALTERUNG
Entfernen Sie das Abdeckpapier auf einer der beiden
Seiten der Haftscheibe.
Kleben Sie die Haftscheibe fest auf den äußeren flachen
Teil der Halterung.
Entfernen Sie das Abdeckpapier auf der anderen Seite
der Haftscheibe, wenn Sie zum Anbringen der Halterung
an der Wand bereit sind.
Wählen Sie einen Punkt an der Wand, der als
Anfangspunkt dienen soll, aus. Lokalisieren Sie diesen
Punkt durch das offene mittlere Loch in der Halterung.
Fixieren Sie die Halterung entsprechend an der Wand.
Drücken Sie sie fest an, um eine starke Haftung zu
erzielen. Sie können auch Stecknadeln oder Reißnägel
zum Befestigen der Halterung verwenden
Die Haftscheiben sind nur für einmaligen Gebrauch ausgelegt.
Nivellierungs-Libelle
für 4 Richtungen
Ein-/Ausschalter
Halterung
LaserBall
Austrittsöffnung
für Laser
Abdeckung des
Batteriefachs
Haftscheibe
3. BETRIEB UND ANPASSUNGEN
Durch das Zentrieren der Libelle zwischen diesen
beiden Linien lokalisieren Sie die Nivelierungsebene.
4. ENTFERNUNG DES HAFTMATERIALS
Entfernen Sie zuerst den magnetisch festgehaltenen LaserBall 360
™
von der
Halterung und legen Sie diesen zur Seite.
Überprüfen Sie mit möglichst geringem Kraftaufwand, ob das Klebematerial sehr
stark an der Wand haftet.
Drehen Sie die Halterung langsam und vorsichtig hin und her und vom
Klebematerial weg.
Beginnen Sie an einer Ecke der Haftscheibe damit, diese mit einem Finger nagel
von der Wand abzuziehen.
5. AUSWECHSELN DER BATTERIEN
Verwenden Sie eine Münze oder einen anderen flachen Gegenstand,
um das mit einer Feder ausgestattete Batteriefach zu öffnen.
Benötigt drei LR44 Batterien.
6. VOR DEM BOHREN
Durch Drehen des LaserBall 360
™
Laser Levels können
Sie die Stärke der Laserlinie kontrollieren.
Benutzen Sie den LaserBall 360
™
Laser Level nur an der
Wand, an der er angebracht ist. Ist nicht darauf ausgelegt,
die Nivellierung auf angrenzenden Wänden anzuzeigen
Durch das Zentrieren der Libelle
zwischen diesen beiden Linien
findet man die Lotlinie.
Verwenden Sie ein(en)
StudSensor
™
/Pfosten-Ortungsgerät
zum Lokalisieren der besten Stelle
für das Bohren.
Zum Nivellieren um Ecken herum
oder für mehrfache Linien benutzen
Sie bitte zusätzliche LaserBall 360
™
Laser Level Halterungen.
Durch das Hin- und Herdrehen des LaserBall 360
™
Laser Levels können Sie die Ebene
der Laserlinie ausrichten.
Suchen Sie www.zircon.com/support auf, fuer die neuesten Anweisungen.
LaserBall 360, StudSensor, und Zircon sind registrierte Warenzeichen oder Warenzeichen von Zircon Corporation.