EasyManua.ls Logo

Zircon MultiScanner - User Manual

Zircon MultiScanner
4 pages
Print Icon
To Next Page IconTo Next Page
Loading...
MultiScanner
®
/MultiScanner
®
Pro SL
Stud & Metal Locator
with AC Tracing
The Zircon MultiScanner
®
scanner uses four different scanning modes to detect studs, metal, and hot unshielded
AC wiring behind walls, floors, and ceilings, as well as rebar in concrete. MultiScanner
®
Pro SL also features the
SpotLite
®
Pointing System, which automatically displays a beam of light over the edge of a stud or near metal/AC.
On/Off Button
Mode Selector Switch
LCD Display
SpotLite
®
Pointing System
(MultiScanner Pro SL only)
Metal Sensor
TruCal
®
Calibration Indicator
Low Battery Indicator
AC Indicator
Battery (back of unit)
Stud Edge Indicator
LIMITED 1 YEAR WARRANTY
Zircon Corporation, (“Zircon”) warrants this product to be free from
defects in materials and workmanship for one year from the date of
purchase. Any in-warranty defective product returned to Zircon*, freight
prepaid with proof of purchase date and $5.00 to cover postage and
handling, will be repaired or replaced at Zircon’s option. This warranty is
limited to the electronic circuitry and original case of the product and
specifically excludes damage caused by abuse, unreasonable use or
neglect. This warranty is in lieu of all other warranties, express or implied,
and no other representations or claims of any nature shall bind or
obligate Zircon. Any implied warranties applicable to this product are
limited to the one year period following its purchase. IN NO EVENT WILL
ZIRCON BE LIABLE FOR ANY SPECIAL, INCIDENTAL OR CONSEQUENTIAL
DAMAGES RESULTING FROM POSSESSION, USE OR MALFUNCTION OF
THIS PRODUCT.
In accordance with government regulations, you are advised that: (i) some
states do not allow limitations on how long an implied warranty lasts
and/or the exclusion or limitation of incidental or consequential damages,
so the above limitations and/or exclusions may not apply to you, and
further (ii) this warranty gives you specific legal rights and you may also
have other rights which vary from state to state.
Return product freight prepaid with proof of purchase date (dated sales
receipt) and $5.00 to cover postage and handling, to:
Zircon Corporation
*Attn: Returns Department
2390 Boswell Road, Suite 300
Chula Vista, CA 91914-3510 USA
Be sure to include your name and return address. Out of warranty service
and repair, where proof of purchase is not provided, shall be returned with
repairs charged C.O.D. Allow 4 to 6 weeks for delivery.
Customer Service, 1-800-245-9265 or 1-408-866-8600
E-mail: customer.service@zircon.com
U.S. Patent #4464622, 5352974, 5619128, 6023159, 6259241, D427166
Canada Patent #1106932 G.B. Patent #2117909B, 2159630B
©2002 Zircon Corporation P/N 58933 Rev B (11/02)
Question and Answer IconNeed help?

Do you have a question about the Zircon MultiScanner and is the answer not in the manual?

Summary

Limited 1 Year Warranty

Warranty Terms and Conditions

Details product coverage, exclusions, and Zircon's responsibilities for defects.

Return Procedure for Warranty Service

Instructions for returning defective products for repair or replacement, including costs and addresses.

Legal Rights and Limitations

Advises on state-specific warranty rights and limitations on incidental/consequential damages.

Operating the MultiScanner

Installing the Battery

Instructions for installing a 9-V battery, including door removal and replacement.

Powering On and Off

Describes how to turn the MultiScanner on and off using the designated button.

Selecting Scanning Modes

Explains how to use the mode selector switch to choose scanning modes.

Calibrating and Scanning in Stud Modes

Details calibrating and scanning for studs, including positioning and detecting edges.

Calibrating and Scanning in Metal Mode

Outlines the process for calibrating and scanning for metal objects with the device.

Scanning in AC Mode

AC Scanning Procedure

Details how to select AC Scan mode, calibrate, and detect hot wires.

AC Detection Capabilities

Specifies voltage and frequency range detected, and limitations.

Operating Cautions and Material Considerations

General Operating Cautions

Warns about potential detection of wiring/pipes and stud spacing.

Working with Different Materials

Provides advice for scanning through wallpaper, plaster, and ceilings.

FCC Part 15 Compliance

States compliance with Class B digital device rules and interference correction.

Troubleshooting and Helpful Hints

Addressing Scan Errors

Solutions for flashing display, error indicators, and missed studs.

Improving Detection Accuracy

Tips for detecting other objects, multiple targets, and AC wire proximity.

Resolving Detection Issues

Guidance for difficulty detecting metal, wide metal images, and wires near windows.

Handling Low Battery

Indicates low battery status and advises on battery replacement.

Overview

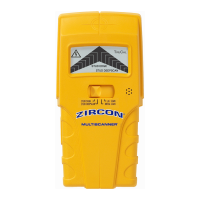
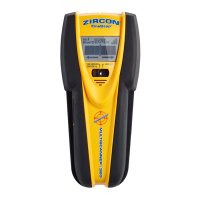
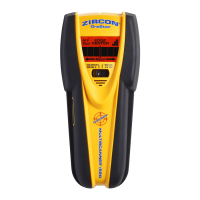
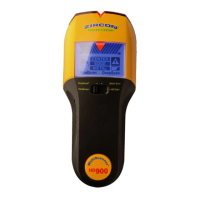
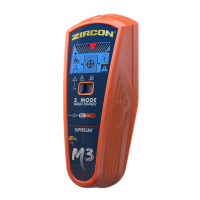
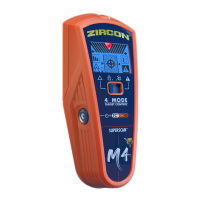
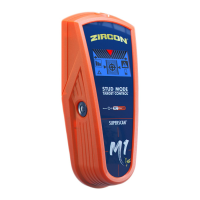
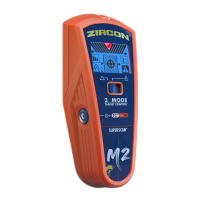
The Zircon MultiScanner® is a versatile handheld device designed to detect studs, metal, and live unshielded AC wiring within walls, floors, and ceilings, as well as rebar in concrete. The MultiScanner® Pro SL model enhances usability with a SpotLite® Pointing System, which projects a beam of light over the edge of a detected stud or near metal/AC objects, aiding in precise marking.

Function Description:

The MultiScanner® operates in four distinct scanning modes: Stud Scan, Stud DeepScan®, Metal Scan, and AC Scan.

  • Stud Scan Mode: This mode is ideal for detecting studs at depths up to approximately 3/4 inch (19 mm). When scanning, the device identifies the edges of studs.
  • Stud DeepScan® Mode: For deeper detection, this mode can locate studs up to 1 1/2 inches (38 mm) deep. It is particularly useful for thicker walls or when the standard Stud Scan mode is insufficient.
  • Metal Scan Mode: This mode allows for the detection of metal objects, including pipes, rebar, and metal studs, up to a depth of about 1 1/2 inches (38 mm) in walls. It can also be used to locate nail heads in lath and plaster walls.
  • AC Scan Mode: Designed to identify the presence of hot, unshielded AC electrical wiring, this mode can detect wires up to 2 inches (51 mm) deep. The device detects AC voltage ranging from 90 to 250 V at 50 to 60 Hz. This feature operates continuously in all modes for enhanced safety.

Usage Features:

Installation and Power:

To begin, a 9-V battery needs to be installed. This involves pressing down the battery door release with a coin, connecting the battery to the cable, and then replacing the door. A fresh battery typically lasts approximately two years under normal conditions. To power on the device, press and hold the On/Off button located on the left side. Releasing the button turns the device off. The MultiScanner® features an automatic shut-off function after 15 minutes of continuous use to conserve battery life.

Mode Selection:

Scanning modes are selected using the Mode selector switch. This switch can be operated whether the unit is on or off, allowing users to choose between Stud Scan, Stud DeepScan®, Metal Scan, or AC Scan.

Calibration and Scanning in Stud Scan/DeepScan® Modes:

For accurate stud detection, the MultiScanner® must be placed flat against the wall in the desired mode. Press and hold the On/Off button. The TruCal® calibration indicator will appear on the LCD screen, signifying that the device is automatically calibrating, which takes less than one second. It is crucial not to lift or tilt the unit during calibration or scanning.

Once calibrated, slowly slide the unit horizontally across the wall. When a full arrow appears on the LCD and a steady tone sounds, the edge of a stud has been located. This spot should be marked. On the Pro SL model, the SpotLite® Pointing System will illuminate a beam of light at the stud edge. Continue scanning beyond the marked spot until the arrow bars disappear. Without releasing the On/Off button, slide the unit in reverse to locate the other edge of the stud. The middle of the stud is centered between these two marks.

Calibration and Scanning in Metal Mode:

To scan for metal, select Metal mode. Press and hold the On/Off button, then calibrate the MultiScanner® in the air, away from any metal objects, until the TruCal® calibration indicator appears. After calibration, place the MultiScanner® flat on the surface. While holding the On/Off button, slowly move the unit randomly to locate the target. The LCD screen will indicate proximity to metal, with a center arrow pointing to the closest proximity. The Pro SL model will also use its SpotLite® to shine a beam of light at this spot. If the target is wide, reverse the direction to locate and mark the other edge. This helps differentiate between narrow rebar and wider objects like metal studs or junction boxes.

Scanning in AC Mode:

For detecting hot wires, select AC Scan mode. Begin by placing the MultiScanner® at a position away from any suspected hot wiring. While holding the On/Off button, slowly slide the unit across the wall. The AC indicator will appear on the LCD if a hot wire is nearby, and the LCD display will show proximity with a center arrow indicating the closest point. Mark this spot. The Pro SL version will also activate its SpotLite® beam. Continue tracing the wire by observing the indications as the unit moves along other areas of the wall.

Operating Cautions:

Users should always exercise caution when nailing, cutting, or drilling in walls, floors, and ceilings, as these areas may contain electrical wiring or pipes. Studs and joists are typically spaced 16 inches (406 mm) or 24 inches (610 mm) apart and are 1 1/2 inches (38 mm) wide. Any objects found closer together or with different widths may not be studs, joists, or firebreaks. It is always recommended to turn off the power when working near electrical wires.

The MultiScanner® functions normally on walls covered with wallpaper or fabric unless these materials contain metallic foil, metallic fibers, or are wet. In lath and plaster walls, stud detection can be challenging due to plaster thickness irregularities; switching to Metal mode to locate nail heads can be helpful. If plaster has metal mesh reinforcement, the MultiScanner® may not detect anything. For acoustic ceilings with uneven surfaces, placing thin cardboard on the ceiling and scanning over it in DeepScan mode, calibrated with the cardboard in place, is recommended. For wood flooring, subflooring, or gypsum drywall over plywood sheathing, DeepScan mode should be used. The MultiScanner® cannot scan for wood studs and joists through ceramic floor tile or carpeting and pad. In difficult situations, using Metal Scan to locate vertically aligned nails or drywall screws can help pinpoint a stud.

Maintenance Features:

The MultiScanner® comes with a limited 1-year warranty covering defects in materials and workmanship. If a product is found defective within this period, it can be returned to Zircon Corporation for repair or replacement. The warranty covers the electronic circuitry and original case, excluding damage from abuse, unreasonable use, or neglect. For warranty service, the product should be returned freight prepaid with proof of purchase and a handling fee. Out-of-warranty service and repair are available, with charges applied C.O.D.

Troubleshooting (Helpful Hints):

  • Flashing Display/Error Indicator: This usually means scanning began on a dense part of the wall, over a stud, or the unit was not flat/tilted. Solutions include turning the unit off, moving a few inches, and restarting, or placing thin cardboard on rough surfaces for smoother scanning.
  • Working in DeepScan mode and can't detect studs: This might occur if the unit was calibrated over a stud or held like a TV remote. Recalibrating a couple of inches away from the initial spot is recommended.
  • Detects other objects besides studs: Electrical wiring or metal/plastic pipes near the wall surface can cause this. Switching to Metal mode and using continuous AC detection can help. Checking for other studs at standard intervals (12, 16, or 24 inches apart) can confirm if it's a stud. Always use caution when drilling near potential wiring.
  • Finding more targets than there should be: This can be due to static charge on drywall, spreading voltage detection. To narrow detection, turn the unit off and on again at the edge of the initial detection, and place a free hand flat against the wall to drain static.
  • Center arrow doesn't appear on LCD: This indicates a particularly thick or dense wall. Interpreting the pair of LCD bars closest to the center as the stud edge or switching to DeepScan mode may help.
  • Difficulty detecting metal: This can happen if the unit is not properly calibrated or if metal targets are too deep. Calibrate in the air for best sensitivity. Scanning in both horizontal and vertical directions can increase sensitivity.
  • Image of metal object appears wider than actual size: This occurs when metal has greater density than wood. To reduce sensitivity, recalibrate the MultiScanner® over one of the first two marks.
  • Constant readings of studs near windows and doors: Double and triple studs are common around these areas, with solid headers above them. Detect outer edges to establish a starting point.
  • Suspect electrical wires, but do not detect any: Wires might be shielded in metal conduit, behind metallic wall covering, too deep (over 2 inches/51 mm), or not hot. Try Metal scan, turn off power when working near wires, and ensure switches to outlets are on.
  • Low Battery Indicator: Simply replace the battery.

For further assistance, users can visit the Zircon website and access product support.

Zircon MultiScanner Specifications

General IconGeneral
Duplex ScanningYes
Ultrasonic Double Feed DetectionYes
Detection TechnologyUltrasonic, Infrared
Material DetectionPaper, Cardstock, Plastic Cards
Power SourceAC Adapter
Audio AlertsYes
Auto-CalibrationYes

Related product manuals