
K
kayla58Sep 12, 2025
What should I do for Low current in reverse direction to cell in Zodiac Pool Systems Nature2 Fusion soft Lighting Equipment?
- UufordSep 12, 2025
Clean cell if necessary. Check DC Cord.
What should I do for Low current in reverse direction to cell in Zodiac Pool Systems Nature2 Fusion soft Lighting Equipment?
Clean cell if necessary. Check DC Cord.
What to do if the “Service” indicator is on for Zodiac Pool Systems Nature2 Fusion soft?
If the “Service” indicator is illuminated on your Zodiac Pool Systems Lighting Equipment, consider these potential causes and solutions: * **Low salt level:** Test the salinity and add salt if necessary. * **Cell requires cleaning:** Perform an acid wash cleaning. * **DC power cord connection:** Check the connection of the DC power cord to the cell for any dirt or corrosion. * **Flow/temp/salinity sensor:** Plug the flow/temp/salinity sensor into the connector on the power center printed circuit board (Cycle Power). * **Low water temperature:** Winterize your pool.
How to reduce high chlorine level in Zodiac Pool Systems Nature2 Fusion soft Lighting Equipment?
If the chlorine level in your Zodiac Pool Systems Lighting Equipment is too high because the electrolytic cell is manufacturing too much chlorine, decrease the chlorine production rate using the adjustment button. If the chlorine output at the lowest setting consistently provides excessive chlorine levels, decrease daily pump operation time as much as necessary. If chlorine output at lowest setting is still excessive the Nature2 Fusion Soft system is oversized for the pool.
Why is my Zodiac Pool Systems Nature2 Fusion soft Lighting Equipment LCD screen blank?
A blank LCD screen on your Zodiac Pool Systems Lighting Equipment could be due to: * **No Power to Unit**: Check the power supply by turning on the pump. It may be due to a defective automatic timer or pump switch or a loose connection at the automatic timer or pump switch. * **Loose ribbon cable**: Ensure the ribbon cable is fully inserted into the connector. * **Incorrect wiring**: Verify the unit is correctly wired for 240 VAC and connected to 240 VAC. * **Loose or bad connection**: Check the connector at the white plug to ensure a proper connection.
What causes chlorine odor in Zodiac Pool Systems Nature2 Fusion soft?
A chlorine odor in your Zodiac Pool Systems Lighting Equipment is caused by the presence of excess chloramines (combined chlorine). To resolve this, manually shock the pool following the directions.
What to do if my Zodiac Pool Systems Nature2 Fusion soft shows low or no chlorine?
If your Zodiac Pool Systems Lighting Equipment is showing low or no chlorine, here are several potential causes and solutions: * **Low stabilizer (cyanuric acid) level:** Add stabilizer to maintain a level between 10 - 50 ppm. * **Chlorine production percentage set too low:** Increase chlorine production using the Chlorine Production Rate Adjustment button. * **Recent temperature increases:** Increase chlorine production to compensate for the warmer weather. * **Heavy organic load:** Activate 'Boost' mode for 24 hours. If the level remains low, super chlorinate the pool with an outside source. * **Low salt level:** Test the salinity and ensure it is above 2.5 gpl. * **New pool water:** Super chlorinate the pool. * **Clogged or dirty cell:** Inspect and clean the cell if need...
What to do if my Zodiac Pool Systems Nature2 Fusion soft shows Cell needs to be cleaned?
Clean cell if necessary.
Why is the “No Flow” indicator continuously on for my Zodiac Pool Systems Nature2 Fusion soft Lighting Equipment?
The continuous illumination of the “No Flow” indicator on your Zodiac Pool Systems Lighting Equipment can stem from several reasons: * Insufficient water flow due to pump malfunction. Ensure the pump is working correctly and hasn't lost prime, and that strainer baskets aren't clogged. * Improperly set or closed valves. Verify and adjust all valve alignments. * A clogged basket or dirty filter. Follow the appropriate filter cleaning procedures. * An obstruction within the Nature2 Fusion Soft cell. Remove the cell for inspection and proceed with cleaning if necessary. * Incorrect installation of the flow/temp/salinity sensor. * The flow/temp/salinity sensor not plugged in. Ensure the flow/temp/salinity sensor is correctly plugged into the connector on the power center printed ci...
What should I do for Extremely low current to cell in Zodiac Pool Systems Nature2 Fusion soft Lighting Equipment?
Clean or replace cell if necessary. Check DC Cord.
What to do if my Zodiac Pool Systems Nature2 Fusion soft shows Salt level too low?
If your Zodiac Pool Systems Lighting Equipment indicates a low salt level, it could be due to: * Not enough salt added on startup: Add salt to pool, aiming for 3.0 gpl to 3.5 gpl. * Heavy rainfall: Add salt to pool, aiming for 3.0 gpl to 3.5 gpl. * Leak in pool: Repair pool. * Dirty flow/temp/salinity sensor contacts or faulty flow sensor: Remove and clean flow/temp/salinity sensor contacts. Check flow/temp/salinity sensor cable for damage. Verify salinity with Myron 'L' meter calibrated for NaCl, titration test units, or other salt meters.
All electrical work must be performed by a licensed electrician and conform to all national, state, and local codes.
Always turn pump off and release pressure before working on the system.
Never remove or replace spa/hot tub suction fittings with ones rated less than specified.
Always add acid to water, never water to acid, to prevent dangerous reactions.
Only qualified pool service professionals should perform installation and repairs.
Keep children away from equipment to prevent pool access and drowning.
Spa water should not exceed 104°F (40°C); lower for children and extended use.
Exercise care entering/exiting, avoid drugs/alcohol, consult physician for health conditions.
Prolonged hot water immersion can cause hyperthermia, leading to dizziness and unconsciousness.
Ensure pool/spa materials are compatible with chemicals; consult contractor.
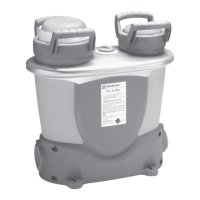
Overview of the Nature² Fusion Soft as an all-in-one sanitizing system.
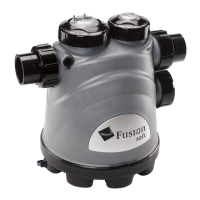
Details the main components of the Nature² Fusion Soft system.
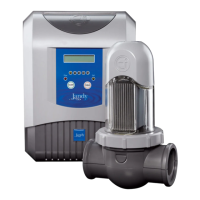
Describes the power center for AquaLink RS integration.
Explains the function of the vessel with electrolytic cell and mineral cartridge.
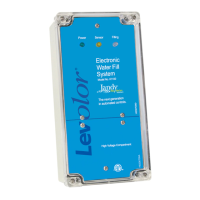
Details the sensor's role in monitoring water conditions.
Technical specifications including capacity, dimensions, and operating limits.
Details electrical requirements, including circuit protection and voltage configuration.
Guidance on selecting the correct fuse for circuit breaker protection.
Important caution regarding wiring for 240 VAC vs 120 VAC service.
List of all necessary materials and tools for installing the system.
Key requirements for positioning and plumbing the vessel.
Specific guidelines for vessel placement relative to other pool equipment.
Instructions for securely mounting the vessel to the equipment pad.
Step-by-step guide for connecting the vessel into the plumbing system.
Procedure for installing the system in a bypass configuration.
Instructions for split-return configuration with water features.
Guide for mounting the control/power center unit.
Essential safety steps for grounding and bonding the equipment.
How to reconfigure the interface board for different models.
Steps for installing the user interface on a PDA bezel.
Detailed instructions for connecting the flow/temp/salinity sensor.
Diagram for 240 VAC wiring with AquaLink RS.
Diagram for 120 VAC wiring with AquaLink RS.
How to integrate the Nature² Fusion Soft with AquaLink RS.
Power pack wiring to the Jandy AquaLink RS controller.
Connecting PureLink electronics to the AquaLink RS system.
Setting up operation with external ORP controllers.
Calculate pool volume in gallons for system sizing.
Calculate pool volume in liters for system sizing.
Guidance on choosing the correct mineral cartridge.
Key water chemistry parameters affecting system performance.
Recommended water balance levels for optimal operation.
Information on salt levels, type, and addition for the system.
Step-by-step instructions for adding salt to the pool.
Explanation of controls on the unit's user interface.
Operating controls when the system is managed by AquaLink RS.
Understanding the status indicators and messages on the display.
How to read salinity and interpret ADD SALT/SERVICE indicators.
What the SERVICE indicator means and how to interpret service codes.
How to adjust the audible alarm volume and confirm settings.
General guidance on daily operation and chlorine production adjustment.
Procedures for initial startup, including cartridge, shocking, and power application.
Steps for installing the start-up cartridge.
How to shock the pool during startup.
Steps to apply power, calibrate, and set initial chlorine production.
Guidelines for winter operation and protection.
Important do's and don'ts for system operation.
Daily tasks: filtration, circulation, and filter checks.
Weekly tasks: chlorine and pH testing.
Monthly checks: salt, alkalinity, stabilizer, hardness, metals.
Procedure for replacing the Nature² mineral cartridge.
Detailed steps for replacing the Nature² mineral cartridge.
How to manually clean the electrolytic cell.
Procedure for cleaning the flow/temp/salinity sensor.
Steps for winterizing the system to prevent damage.
Common issues and their solutions for low chlorine or no display.
List of service codes and their meanings for error diagnosis.
Service codes indicating issues requiring professional help.
Explanation of letter codes displayed by the system.
How to switch between Celsius and Fahrenheit display modes.
List of replacement parts for the control/power pack.
List of replacement parts for the Nature² Fusion Soft vessel.
| Brand | Zodiac Pool Systems |
|---|---|
| Model | Nature2 Fusion soft |
| Category | Lighting Equipment |
| Language | English |