EasyManua.ls Logo

Zoom Q3 - User Manual

Zoom Q3
2 pages
Print Icon
To Next Page IconTo Next Page
Loading...
Using the Zoom Q3 Audio/Video Recorders
Before you begin:
Make sure the Zoom Q3 is
either plugged in with it’s mains
power adaptor, or has enough
battery life for the usage period.
We recommend using the
power adaptor for recordings
above an hour. It will ensure
that you don’t have any drop-
outs during recording and save
on batteries.
To use the mains adaptor
simply plug it into the power
socket n the left side of the
Zoom (when looking at the
screen) and the plug into
mains. To check battery life turn
on the Zoom (by holding the
power button), on screen you
will see a 3-Segment battery
display giving an indication of
remaining life.
The Zoom also estimates
remaining recording time based
on space on the Data Card and
settings chosen.
Question and Answer IconNeed help?

Do you have a question about the Zoom Q3 and is the answer not in the manual?

Overview

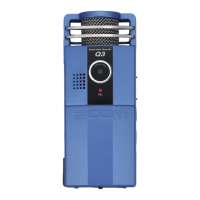
The Zoom Q3 is a portable audio/video recorder designed for ease of use and high-quality capture. It is capable of recording both audio-only and video with accompanying audio.

Function Description:

The primary function of the Zoom Q3 is to record audio and video. Users can select between these modes using a switch located on the left side of the device (when facing the screen). An icon representing a microphone indicates audio-only mode, while a video camera icon indicates video recording mode. The device's screen will display the corresponding icon based on the selected setting.

Important Technical Specifications:

  • Lens: VGA CMOS Lens
  • Microphones: XY Stereo Microphones
  • Display: 2.4-inch QVGA LCD Screen
  • Storage: SD/SDHC Card Slot
  • Connectivity:
    • USB2.0 Hi-Speed cable (built into the bottom of the device)
    • TV Output Jack
    • PHONES LINE Output Jack
    • DCSV Jack (for power adapter)
  • Audio Quality Options:
    • Recommended: 320kbps MP3 (good balance of file size and quality)
    • CD Quality: WAV (PCM for Video) 16bit/44.1kHz
  • Audio Gain Settings: L (Low), H (High), and Auto.
  • Power: Can be powered via a mains adapter (plugged into the DCSV Jack) or internal batteries.

Usage Features:

  • Power On/Off: The device is turned on by holding the Power Switch.
  • Battery Life Indicator: A 3-segment battery display on the screen indicates remaining battery life.
  • Recording Time Estimation: The Zoom Q3 estimates remaining recording time based on available space on the SD card and current settings.
  • Audio Level Monitoring: A stereo level meter at the bottom of the screen provides a visual indication of incoming audio levels.
  • Gain Control: The MIC GAIN Switch allows users to select between Low, High, or Auto gain settings.
    • Low Gain: Suitable for louder sound sources.
    • High Gain: Increases gain to pick up quieter sound sources.
    • Auto Gain: Automatically switches between low and high throughout the recording. Manual settings (Low or High) are generally preferred for more realistic recordings as they prevent fluctuations. Auto gain is useful for long recordings like lectures where sound levels may vary significantly.
  • Optimal Audio Levels: For best results, audio levels should peak around -1, staying mostly in the green section of the meter and occasionally tipping into yellow for loud notes. Gain can be adjusted, and the device's distance from the sound source can be varied to achieve desired levels. For balanced stereo audio recording, a distance of at least 3 meters from the source is recommended.
  • Recording Initiation/Termination: The REC Key starts and stops recordings.
  • Playback: The PLAY Key (>) allows users to playback recorded content. Headphones can be connected to the PHONES LINE Output Jack for private listening.
  • Menu Navigation: The MENU Key provides access to various settings, including audio quality adjustments.
  • File Management:
    • Transferring Files: Files can be transferred to a computer by connecting the built-in USB cable or by removing the SD card and inserting it into an SD card reader. The device will appear as a USB stick, allowing for drag-and-drop or copy operations.
    • Erasing Files: After transferring, it is important to erase the card either via the device's MENU or by deleting files from the computer while the device is connected. This ensures the next user has a clean card with full capacity.
  • Video/Audio Switch: A dedicated switch (MOVIE/AUDIO Switch) allows quick toggling between video and audio recording modes.
  • Tripod Mount: The device includes a Tripod Mount for stable positioning during recording.
  • Strap Attachment Hole: A Strap Attachment Hole is provided for attaching a wrist strap or lanyard.

Maintenance Features:

  • Power Source: For recordings exceeding an hour, using the mains power adapter is recommended to prevent drop-outs and conserve battery life.
  • Battery Monitoring: Regularly checking the battery display ensures sufficient power for recording sessions.
  • SD Card Management: Erasing the SD card after each use ensures optimal performance and storage capacity for subsequent recordings.

Zoom Q3 Specifications

General IconGeneral
BrandZoom
ModelQ3
CategoryRecording Equipment
LanguageEnglish

Related product manuals