Do you have a question about the Zoom H6 Handy Recorder and is the answer not in the manual?
Explains symbols used to highlight warnings and cautions to prevent accidents.
Details specific warnings regarding AC adapter and battery usage, and product alterations.
Covers product handling, operating environment, AC adapter, battery handling, and mic connection precautions.
Discusses interference with other equipment, cleaning, and general usage advice.
Instructions on what to do if the unit breaks down or malfunctions.
Lists trademarks, registered trademarks, and copyright notices.
Explains the swappable mic system and available options for different recording needs.
Details the unit's capability to record up to six tracks simultaneously using various inputs.
Highlights advanced features like large diaphragm mics, backup recording, and improved input gain.
Lists operational benefits such as SDXC card support, display readability, and connectivity options.
Lists the primary recording device.
Details the included XY and MS stereo microphone capsules.
Lists the SD card, batteries, and USB cable included with the recorder.
Describes the main unit case, software DVD, and windscreen.
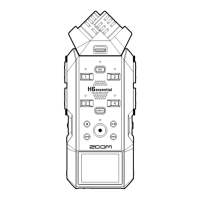
Identifies controls and features on the left and front of the H6 Handy Recorder.
Details the controls and ports located on the right and bottom of the unit.
Explains the features and usage of the dual-crossing directional XY microphone capsule.
Details the mid-side microphone's capabilities for stereo width adjustment.
Step-by-step instructions for attaching microphone capsules to the main unit.
Guidance on safely removing microphone capsules from the recorder.
Instructions for connecting dynamic and condenser microphones via XLR jacks.
Guidance on connecting keyboards and mixers via TRS jacks.
Explains how to link inputs for stereo recording.
Illustrates mic and input configurations for film recording scenarios.
Shows typical setup for recording live concerts.
Details the directional shotgun microphone accessory.
Describes the accessory for adding XLR/TRS inputs.
Lists items included in the accessory pack.
Explains the wired remote control accessory.
Describes the windscreen accessory for microphones.
Details the AC adapter accessory for powering the unit.
Explains the elements and indicators of the main recording display.
Details the display elements shown during playback.
Instructions for installing and using AA batteries for power.
Steps to connect and use the external AC adapter for power.
Describes how to correctly insert an SD card into the recorder.
Steps to power on the H6 Handy Recorder.
Procedure for safely shutting down the device.
How to enable the button lock to prevent accidental changes.
Steps to disable the button lock.
Guide to choosing between English and Japanese for the interface language.
Instructions to set the recorder's date and time for accurate file logging.
How to inform the recorder about the battery type for accurate charge display.
A visual guide to the sequence of recording, playback, and editing.
How to choose the audio file format for recording.
Steps to select which tracks to record and monitor.
Guidance on setting appropriate input gain and using PAD switches.
Explains how projects and files are organized on the SD card.
How to choose tracks and set up stereo linking.
Steps to set input levels for optimal recording.
Controls for initiating and managing the recording process.
How to insert markers during recording.
Guide to navigating and selecting project folders.
Steps to set up automatic recording based on input level.
How to configure the trigger levels for auto recording.
How to enable recording two seconds before the record button is pressed.
Setting up the metronome to provide a count-in before recording starts.
How to adjust the side mic level for stereo width, especially in RAW mode.
Steps to activate a secondary recording at a lower level.
Guide to layering new audio onto recorded tracks.
Information on handling multiple overdub takes and monitoring.
How to initiate playback of recorded projects.
Details on navigating, adjusting volume, and adding marks during playback.
Procedure to exit playback mode and return to the main screen.
Steps to browse and select projects for playback.
How to alter the playback speed between 50% and 150%.
Guide to defining start and end points for looped playback.
How to start the defined loop playback.
Options to set playback to 'Play All', 'Play One', 'Repeat One', or 'Repeat All'.
How to alter the pitch of playback in semitones without changing speed.
Adjusting volume, panning, and pitch balance of playback tracks.
How to switch mixer adjustments on and off during playback.
Accessing details like project name, path, and recording parameters.
How to view a list of all recorded marks in a project.
Steps to edit the names of recorded projects.
Choosing the output format (WAV or MP3) for the mixed file.
How to increase the volume of tracks to a standard level.
How to specify where a project should be split into two.
How to define the section of a project to be kept.
How to select and confirm the deletion of a single project.
Steps to delete all projects within a selected folder.
How to attempt to fix projects with missing or corrupted files.
Instructions for recording short audio memos associated with projects.
How to switch playback to the backup recording instead of the main file.
Steps to connect the H6 to a computer to access SD card data.
Procedures for safely removing the H6 from a computer.
How to choose between Stereo Mix and Multi Track modes for audio interface use.
Steps for physically connecting the device.
How to enable zero-latency monitoring.
How to send mixed audio back to the computer/iPad.
Adjusting the mix of input signals for the audio interface output.
Choosing between chromatic and instrument-specific tuning modes.
How to use pitch shifting for drop tuning.
Options for click, pre-count, and tempo settings.
Customizing the metronome's sound, rhythm pattern, and volume.
How to activate the low-cut filter on selected tracks.
Guide to choosing from various compression and limiting presets.
How to adjust the monitoring mix for inputs.
How to monitor mid-side signals in RAW format.
Guide to selecting the audio file format and quality settings.
How to define input levels for automatic recording start/stop.
How to set the time delay for automatic recording to stop.
How to set automatic project naming formats.
How to turn phantom power on/off for inputs and select voltage.
How to activate plug-in power for compatible microphones.
How to adjust the reference level for VU meter readings.
Steps to dim or turn off the display backlight for power saving.
How to adjust the screen brightness for better visibility.
How to check the current firmware version of the device.
Steps to reset all user settings to factory defaults.
How to check the available storage space on the SD card.
Instructions for formatting an SD card for use with the recorder.
How to test the SD card's read/write speed.
Steps to copy update file and execute firmware update.
How to make SD cards from older models compatible with the H6.
Instructions for connecting the remote control to the H6.
Solutions for common problems like no sound or quiet output.
Guidance for when the computer doesn't recognize the H6.
Details on SD card types, mic inputs, gain settings, and output jacks.
Information on supported file formats and recording duration.
Details on display resolution and USB functionality.
Information on battery life, physical size, and package contents.
Warnings regarding radio frequency interference and compliance.
Guidance on proper product disposal and recycling.
| Microphone Preamps | 6 |
|---|---|
| Recorder Channels | 6 |
| Maximum Sample Rate | 96 kHz |
| Maximum Bit Depth | 24-bit |
| Built-In Speaker | Yes |
| File Format | WAV, MP3 |
| Display | LCD |
| Equivalent Input Noise (EIN) | -120 dBu |
| Headphone Output | Yes |
| Line Output | Yes |
| USB Interface | USB 2.0 |
| Audio Inputs | 4 x XLR/TRS Combo |
| Microphone Type | Interchangeable |
| Phantom Power | 48V |
| Input Connectors | XLR/TRS combo |
| Recording Media | SD/SDHC card |
| Power Source | 4 AA batteries or AC adapter |
| Battery Life | Up to 20 hours |
| Frequency Response | 20 Hz to 20 kHz |
| Max Input Level | +22 dBu |
| Built-in Effects | Limiter, Compressor |