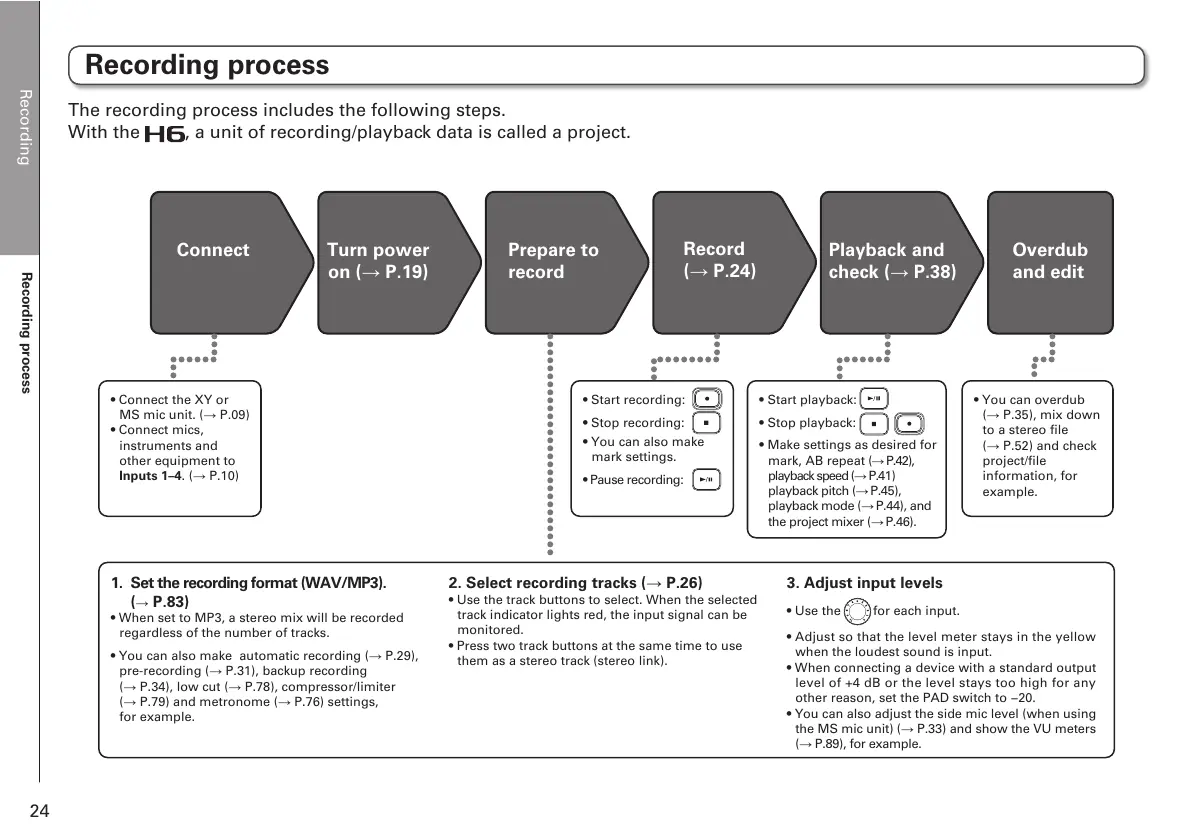
Recording
Recording process
24
Recording process
Connect Turn power
on (ĺP.19)
Prepare to
record
Record
(ĺ P.24)
Playback and
check (ĺP.38)
Overdub
and edit
• Connect the XY or
MS mic unit. (ĺ P.09)
• Connect mics,
instruments and
other equipment to
Inputs 1–4. (ĺ P.10)
• Start recording:
• Stop recording:
• You can also make
mark settings.
• Pause recording:
• Start playback:
• Stop playback:
• Make settings as desired for
mark, AB repeat (ĺ P.42),
playback speed (ĺP.41)
playback pitch (ĺP.45),
playback mode (ĺP.44), and
the project mixer (ĺP.46).
• You can overdub
(ĺ P.35), mix down
to a stereo file
(ĺ P.52) and check
project/file
information, for
example.
1. Set the recording format (WAV/MP3).
(
ĺ P.83)
• When set to MP3, a stereo mix will be recorded
regardless of the number of tracks.
• You can also make automatic recording (ĺ P.29),
pre-recording (ĺ P.31), backup recording
(ĺ P.34), low cut (ĺ P.78), compressor/limiter
(ĺ P.79) and metronome (ĺ P.76) settings,
for example.
2. Select recording tracks (ĺ P.26)
• Use the track buttons to select. When the selected
track indicator lights red, the input signal can be
monitored.
• Press two track buttons at the same time to use
them as a stereo track (stereo link).
3. Adjust input levels
• Use the for each input.
• Adjust so that the level meter stays in the yellow
when the loudest sound is input.
• When connecting a device with a standard output
level of +4 dB or the level stays too high for any
other reason, set the PAD switch to −20.
• You can also adjust the side mic level (when using
the MS mic unit) (ĺ P.33) and show the VU meters
(ĺ P.89), for example.
The recording process includes the following steps.
With the
, a unit of recording/playback data is called a project.

 Loading...