Do you have a question about the Zupapa Dome Climber and is the answer not in the manual?
Guidelines for supervisors to ensure safe play.
Identification and quantity of all parts for assembly.
Initial setup of the base frame.
Connecting poles to form the first layer.
Building the second layer of the dome structure.
Completing the third layer of the dome structure.
Securing the top central connection point.
Attaching grips to the dome structure joints.
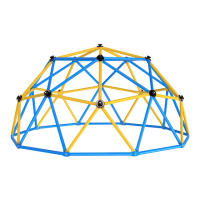
The Zupapa Dome Climber is a recreational outdoor play structure designed for children aged 3 to 10, promoting physical activity, coordination, cognition, and memorization. It is built with safety, reliability, and versatility in mind, making it a suitable addition to a family's backyard or indoor play area.
The primary function of the Zupapa Dome Climber is to provide a safe and engaging environment for children to play, climb, dangle, and explore. Its geodesic dome structure allows for multiple children (up to 6) to interact simultaneously, fostering social play and physical development. The climber encourages active play, helping children to expend energy and develop gross motor skills. Beyond climbing, the structure can be adapted with a customized canopy to transform into a private space for reading, gaming, or napping, adding to its versatility. This adaptability allows the dome climber to serve various recreational needs, from energetic play to quiet relaxation. The design aims to offer a perfect playground that can withstand inevitable wear and tear, providing a durable solution for children's play needs.
The Zupapa Dome Climber is designed for ease of assembly and use, with clear guidelines to ensure a safe play experience.
Placement: Before assembly, it is crucial to select a safe and appropriate location. The dome climber should be placed on a level, well-drained, and well-lit ground. It is essential to keep the play area clear of obstacles and potential hazards such as toys, tree branches, laundry lines, and electrical wires. The climber should not be placed over hard surfaces like concrete, asphalt, or packed earth, as falls onto such surfaces can lead to serious injuries. Similarly, it should be kept away from other recreational devices or structures like seesaws, slides, swings, swimming pools, or hot tubs.
Surfacing Materials: To minimize the risk of life-threatening injuries from falls, appropriate surfacing materials are highly recommended. The manual references CPSC guidelines for playground safety, emphasizing the importance of protective surfacing. Options include unitary materials (rubber mats and tiles) or loose-fill materials (engineered wood fiber, rubber mulch, sand, pea gravel, wood mulch, wood chips). For loose-fill materials, specific depths are recommended based on the fall height and material type, with a minimum of 9 inches for most loose-fill materials (except shredded/recycled rubber, which recommends 6 inches). It is important to note that loose-fill materials compress over time and require frequent maintenance to ensure adequate depth, especially under high-traffic areas like swings and slide exits. Installation over hard surfaces is strongly discouraged unless additional protective layers, such as a gravel base for drainage and a geotextile cloth, are added beneath the loose-fill.
Assembly: The assembly process is designed to be straightforward, with step-by-step instructions and video tutorials available. At least two adults are required for assembly and for moving the dome climber after it is built. Users are advised to wear gloves during assembly and ensure all parts are dry. A key tip for easier assembly is to slightly loosen the bolts of adjacent joints when connecting the last joint of each layer. The assembly progresses from the bottom to the top, involving six main steps:
Disassembly: Disassembly follows the assembly instructions in reverse order (Step 6 to Step 1). Two adults are required, and it is highly recommended to keep all bolts, nuts, and tools in a sealed bag or durable container to prevent loss.
Dome Canopy: An optional dome canopy is available for 10-foot dome climbers with grips. It attaches in two steps:
Proper maintenance is essential to ensure the longevity and safety of the Zupapa Dome Climber.
Regular Checks: All hardware, including bolts and nuts, should be tightened regularly, but not overtightened, to prevent damage to threads or cracking. Protective parts should be checked for looseness, cracks, or missing pieces and replaced as needed. The overall structure and accessories should be checked monthly to prevent falling hazards.
Protective Coatings: The poles have protective coatings that are effective against rust. Care should be taken not to damage these coatings.
Rust Prevention: If signs of oxidation or rust appear on the equipment, it should be repainted with non-lead-based paints.
Cleaning: The dome climber should not be cleaned with abrasive cleansers. A soft, damp cloth is sufficient to wipe away dust and dirt. For the canopy, avoid washing it; simply wipe off dirt with a damp cloth. Harsh chemical cleaners or bleach should not be used on the canopy.
Storage: When not in use, the dome climber should be stored in a dry area with good ventilation. The canopy must be completely dry before storage and kept away from fire.
Canopy Usage: When the canopy is in use, no extra weights should be placed on it. The canopy is lightweight (approximately 5 pounds) and designed for ease of maintenance.
Customer Support: Zupapa Customer Happiness Executives are available to assist with any questions regarding assembly, maintenance, or replacement parts. Users are encouraged to provide the order number, part number, quantity, and photos or video clips (if applicable) when requesting replacements.
| Brand | Zupapa |
|---|---|
| Age Range | 3-10 years |
| Assembly Required | Yes |
| Material | Steel |
| Color | Blue |