EasyManua.ls Logo

ZURN Z1231EZ User Manual

ZURN Z1231EZ
3 pages
To Next Page IconTo Next Page
Page #1 background imageLoading...
Page #1 background image
Zurn Industries, LLC | Specication Drainage Operation
1801 Pittsburgh Avenue, Erie, PA 16502, Ph. 855.663.9876
In Canada | Zurn Industries Limited
7900 Goreway Drive, Unit 10, Brampton, Ontario L6T 5W6, Ph. 877.892.5216
www.zurn.com
WARNING: Cancer and Reproductive Harm - www.P65Warnings.ca.gov
ADVERTENCIA: Cáncer y daño reproductivo - www.P65Warnings.ca.gov
AVERTISSEMENT: Cancer et e󰀨ets néfastes sur la reproduction - www.P65Warnings.ca.gov
Rev. -
Date: 4/03/2020
C.N. No. 142533
Prod. | Dwg. No. C66 Page 1 OF 3
Z1231EZ
WALL-HUNG LAVATORY ADJUSTABLE CARRIER INSTALLATION INSTRUCTIONS
1. Drill holes in concrete and place anchors.
a. Two diagonally spaced anchors per foot
are required for correct installation.
b. Anchor holes for either 3/8 (A) or 1/2 (B)
(Furnished by others) See Fig.1
Note: Ensure using anchors with a minimum pullout
force of 980 lbs
2. Place carrier over anchors and secure with nuts
and washers
a. Torque to 25-35 ft-lbs
3. Adjust the height of one header plate to desired
rough-in location per lavatory to be installed.
a. Hold header bracket in place
b. Loosen 4 (C) nuts on header plate
c. Loosen height adjustment bolt (D)
(on side of header)
d. Slide along upright to desired location
e. Hand tighten height adjustment bolt (D) ensuring
the header bracket does not deect. See Fig. 3
4. Adjust height of second header plate
a. Hold header bracket in place
b. Loosen 4 nuts (C in Fig 3) on header plate
c. Loosen height adjustment bolt (D in Fig 3)
(on side of header)
d. Place level on top of both header sleeves
and adjust height until level. See Fig 4
e. Hand tighten height adjustment bolt (D in Fig 3)
ensuring the header bracket does not deect.
Optional - Use integrated pipe support bracket to
secure supply and drainage lines.
5. Adjust width of the header brackets (E) per the
lavatory manufacturer ’s recommendation for spacing
and tighten the 4 nuts (C) on the header bracket in a
star pattern to 30-35 ft-lbs.
Fig. 1
Fig. 3
Fig. 4
Fig. 5
B
B
A
A
Rough-in
Height
C
C
D
1
2 3
4
5
6
7
C
E
1 2 3 4 5 6
7
11 12 13 14 15 16 170
C
D
C
C
Rough-in
Height
Question and Answer IconNeed help?

Do you have a question about the ZURN Z1231EZ and is the answer not in the manual?

ZURN Z1231EZ Specifications

General IconGeneral
CategoryToilets
Flush Volume1.28 gpf
MaterialVitreous China
Bowl ShapeElongated
Water Consumption1.28 gpf
ADA CompliantYes
Rough-In Size12 inches
Bowl Height16.5 inches

Summary

Adjustable Carrier Installation Steps

Drill Holes and Place Anchors

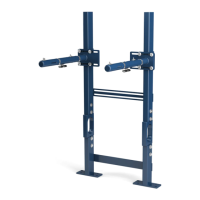
Drill concrete holes and place anchors, ensuring correct spacing and anchor type for installation.

Secure Carrier to Anchors

Position carrier over anchors and secure with nuts and washers, torquing to 25-35 ft-lbs.

Adjust First Header Plate Height

Adjust one header plate height to desired rough-in location by loosening nuts and adjustment bolt.

Adjust Second Header Plate Height

Level the second header plate by adjusting its height until level with the first header plate.

Adjust Header Bracket Width

Adjust header bracket width based on lavatory manufacturer specs and tighten nuts in a star pattern.

Install Drywall Sleeves

Install drywall ensuring sleeves protrude through the wall opening for carrier arm insertion.

Position Carrier Arms

Insert carrier arms into header plate mounting sleeves according to lavatory manufacturer dimensions.

Secure Carrier Arms

Tighten locknut against the sleeve to secure arms, ensuring minimum 1-inch thread engagement.

Adjust Leveling and Lock-down Hardware

Obtain leveling screws and lock-down hardware, adjust as needed, and tighten clamping screws.

Position Lavatory on Arms

Slide lavatory onto carrier arms to 1/16" from the wall, aligning access holes with arm hardware.

Adjust Lavatory Height and Level

Adjust leveling screws to raise the fixture until it is level side-to-side and front-to-back.

Lock Lavatory in Place

Reverse lock-down bar screw until rubber pads contact the fixture, securely locking it.

Caulk Lavatory Seal

Caulk or silicone the lavatory to the wall for a watertight seal.