EasyManua.ls Logo

ZURN ZSHIELD Z1072 User Manual

ZURN ZSHIELD Z1072
2 pages
To Next Page IconTo Next Page
Page #1 background imageLoading...
Page #1 background image
Z1072
ZSHIELD BARRIER TRAP INSTALLATION INSTRUCTIONS
Zurn Industries, LLC | Specification Drainage Operation
1801 Pittsburgh Avenue, Erie, PA U.S.A. 16502 · Ph. 855-663-9876, Fax 814-454-7929
In Canada
| Zurn Industries Limited
3544 Nashua Drive, Mississauga, Ontario L4V 1L2 · Ph. 905-405-8272, Fax 905-405-1292
www.zurn.com
Rev. B
Date: 11/19/2018
C.N. No. 140861
Form No. FD95 Page 1 of 2
Fig. 1
Z1072 ZSHIELD
TM
can be installed in Extra Heavy Cast Iron Soil
Pipe, Hubless Cast Iron Soil Pipe, PVC Drain, Waste and Vent
Pipe, PVC Schedule 40 Pipe and Service Cast Iron Soil Pipe.
For 2", 3" and 3.5" Retro-Fit Installation
4" Size can be Retro-Fit, if the -HD (4" Shank) top assembly was
installed
1. Remove screws and strainer from installed drain.
Make sure drain outlet is clear of any debris or obstructions prior to
installing the Z1072.
2. Align Z1072 with the center of the drain assembly
3. Push Z1072 into bottom of drain body or outlet pipe until the
underside of the barrier trap is flush with bottom of drain or top of
the pipe. See Fig. 3)
If using the 3.5" barrier trap seal push the barrier trap down until the
underside of the barrier trap is flush with the shank of the strainer.
See Fig. 3a
Fig. 2
Fig. 3
Fig. 3a
WARNING: Cancer and Reproductive Harm - www.P65Warnings.ca.gov
ADVERTENCIA: Cáncer y daño reproductivo -
www.P65Warnings.ca.gov
AVERTISSEMENT: Cancer et effets néfastes sur la reproduction - www.P65Warnings.ca.gov
Question and Answer IconNeed help?

Do you have a question about the ZURN ZSHIELD Z1072 and is the answer not in the manual?

ZURN ZSHIELD Z1072 Specifications

General IconGeneral
BrandZURN
ModelZSHIELD Z1072
CategoryPlumbing Product
LanguageEnglish

Summary

Z1072 ZSHIELD™ Barrier Trap Installation Instructions

Retro-Fit Installation Guidance

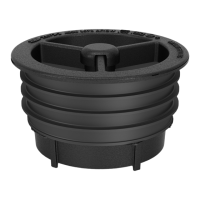
Information on retro-fit installation for 2", 3", 3.5" and 4" pipe sizes, including specific conditions for 4" sizes.

Step 1: Prepare Drain Outlet

Remove existing strainer and screws. Ensure the drain outlet is clear of debris or obstructions.

Step 2: Align Z1072

Align the Z1072 with the center of the drain assembly to ensure proper placement.

Step 3: Insert Z1072 into Pipe

Push the Z1072 into the drain body or outlet pipe until flush with the bottom of the drain or pipe.

Step 4: Check Rubber Seal

Verify that the rubber seal was not damaged during installation and is smooth and flat.

Step 5: Replace Strainer and Screws

Reinstall the strainer and screws after the Z1072 has been properly inserted.

New Installation for 2", 3", and 4" Sizes

Guidance for installing the Z1072 in new pipe installations of various sizes.

Step 6: Align Z1072 for New Installation

Align the Z1072 over the center of the pipe or drain body for IC, IG, NPT, NL, or NH connections.

Step 7: Insert Z1072 for New Installation

Ensure the bottom of Z1072 is flush with the top of the pipe or bottom of the drain body.

Step 8: Finish Drain Installation

Complete the drain installation process according to the manufacturer's instructions.

Related product manuals