EasyManua.ls Logo

2gig Technologies Touch Screen Wireless Keypad User Manual

Default Icon
5 pages
To Next Page IconTo Next Page
Page #1 background imageLoading...
Page #1 background image
INSTALL INSTRUCTIONS
Thisdocumentdescribesthebasicinstallationinformationforthe2GIG
TS1andthestepsnecessaryto“pair(orlearnin)theTouchscreen
WirelessKeypadtotheControlPanel.
Box Contents
•2GIGTS1
•ACPowerSupply
•ACPowerSupplyBracket
•Screwsandanchors
TIP: TheboxcontentswillvarydependingonwhethertheTS1was
purchasedaspartofakitornot.
BEFORE YOU BEGIN
Is the 900 MHz Transceiver installed in the Panel?
FortheTS1tocommunicatewiththeControlPanel,the900MHz
Transceiver(2GIGXCVR2)mustbealreadybeinstalledintheControl
Panel.
Does the TS1 firmware version match the Control
Panel firmware version?
TheTS1andtheControlPanelarerequiredtohavethesamefirmware
versiontofullycommunicatewitheachother(e.g.CPv1.10andTS1
v1.10).
To check for matching firmware versions
1 FromboththeTS1andControlPanelHomeScreen,chooseSecurity
/Menu/Toolbox.
2 FromtheToolboxScreen,usethe→arrowunlyouseetheVersion
Screen.
TS1 Version Screen
Control Panel Version Screen
TS1 PRODUCT OVERVIEW
TheModel2GIGTS1TouchScreenWirelessKeypadisaremotecontrol
devicethatoffersthefunctionalityofasystemkeypadbutalsoextends
allusercontrolofthe2GIGControlpaneltootherlocationsinausers
home.UsingtheTS1,userscancontrollights,thermostatanddoorlocks
andseethest
atusofeve
ryzoneintheirhomeusingtheexactsameand
familiarinterfacefoundontheControlPanel.Thekeypadisdesignedfor
indooruseonly.
IMPORTANT: NotforUL985installations.
Thepanelandbuttonsserveascontrolsaswellasindicators.
Pressingthe(Emergency)buttondisplaysemergencyiconsonthe
displayforPanic,Fire,andEmergencyalarmactivation(eachhas
programmableoptionsandcanbeenabledordisabled).Pressingthe
(Home)buttonchangesthesystemdisplaytotheHomeScr
een.The
ke
ypadispoweredfromapluginpowersupply.The2GIGTS1ex changes
informationthroughasecure2wa ywirelessconnectionwiththeControl
Panel.
NOTE: BeforeusingtheTS1itmustbe“learned”intotheControl
Panel.
Mounting Tools
SomespecialtoolsmayberequiredtomounttheTS1ontothewall:
•Screwdriver
•Pencil
•Wirestripper
•Staplegun
•Drywallsaw(orequivalent)
Ladder
PREPARING THE KEYPAD
NOTE: CheckthattheTS1Keypadisfunctioningbeforeselectinga
locationfortheKeypad.
1 Remove the screw.
2 Flip open the back cover of the TS1.
3 Disconnect the hanging strap.
4 Use the back cover as the mounting plate.
2GI
Touch Screen Wireless Keypad
ForRemoteControlofthe2GIG SecuritySystem
Question and Answer IconNeed help?

Do you have a question about the 2gig Technologies Touch Screen Wireless Keypad and is the answer not in the manual?

2gig Technologies Touch Screen Wireless Keypad Specifications

General IconGeneral
Brand2gig Technologies
ModelTouch Screen Wireless Keypad
CategoryKeypad
LanguageEnglish

Summary

INSTALLATION OVERVIEW AND PREPARATION

TS1 Product Overview

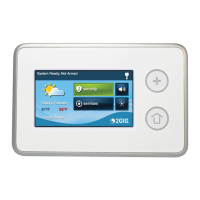
Overview of the TS1 keypad's features, controls, and system integration capabilities.

Before You Begin Checks

Key prerequisites like transceiver installation and firmware version matching.

Mounting Tools

Lists necessary tools for mounting the TS1 keypad.

Keypad Preparation

Steps for initial physical preparation of the TS1 keypad for installation.

KEYPAD MOUNTING AND WIRING

Location Selection and Wiring Hole

Guidance on choosing a location and creating a wiring access hole.

Mounting Plate and Wire Routing

Instructions for attaching the mounting plate and routing power wires.

Wire Size and Length Guidelines

Table specifying maximum lengths for different wire gauges.

Connecting Power Wires

Steps for connecting power wires to the TS1, emphasizing polarity.

LEARNING AND PAIRING THE TS1

Control Panel Configuration

Steps to configure the Control Panel for TS1 pairing.

TS1 Identification and Pairing

Steps to identify the TS1 and initiate the pairing process.

RF Keypad Assignment

Selecting and assigning a unique RF keypad number and equipment code.

PAIRING COMPLETION AND RESET

Successful Pairing Confirmation

Messages confirming successful learning on both TS1 and Control Panel.

Factory Reset Procedure

How to reset the TS1 to its default settings.

Secret Duress Button Function

Using the TS1's home screen logo for duress code entry.

UNLEARNING THE TS1

Removing TS1 from Control Panel

Steps to remove a previously paired TS1 from the control panel.

REGULATORY AND WARRANTY INFORMATION

Wireless Product and FCC Notices

Information on radio controls, FCC compliance, and potential interference.

Industry Canada Notices

Details on Industry Canada certification and connection requirements.

Temperature and Warranty

Recommended operating/storage temperatures and product warranty details.

Related product manuals