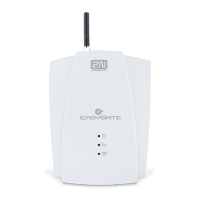
2N® EasyGate Pro UMTS Quick Start
Basic Functions
The primary purpose of 2N® EasyGate Pro
UMTS (from now only ‘Easy Gate’) is to
transmit voice between a UMTS or GSM
network and an attached analogue
communication device connected to the FXS
interface on the EasyGate.
You can establish data connection and
send/receive SMS in combination with a PC.
You can send an SMS to a pre-
programmed number using the SMS
sending input.
The battery backed-up EasyGate version
allows you to maintain your traffic even in
the event of power outage.
Read the CD-ROM User Manual carefully to get familiar with all system
functions.
EasyGate supports HSPA, UMTS, EDGE, GPRS and CSD technology for data
connection. The connection speed and quality depend on the mobile
network provider, accessible services, signal coverage and network
status.
2N® EasyGate Pro UMTS Installation and Connection
Proper Location
- Install EasyGate with respect to a good
mobile network signal strength.
- Place EasyGate out of range of sensitive
devices and human bodies for
electromagnetic interference reasons.
- EasyGate is designed for indoor use. Do
not place it near heat sources and on
direct solar radiation. It may not be
exposed to rain, flowing water and
moisture, aggressive gas, solvents etc.
External Antenna Connection
Screw the antenna cord into the SMA
antenna connector. Tighten the
antenna connector gently with your
hand, never use a wrench!
SIM Card Installation
Slot for SIM card is placed on the
connector panel. Insert the SIM card to
the slot according to the picture and
make sure that the card is locked
properly. Select the required GSM
provider and SIM card services, such as
call forwarding, call barring, preferred
networks, SMS centre, etc. using your
mobile phone before inserting your SIM
card into EasyGate.
Telephone Line Connection
EasyGate can be connected to any
FXO-interface equipment (standard
telephone set, answering machine, PBX
CO line etc.). EasyGate is equipped with
identification of calling party (CLIP) via
FSK and so it is advantageous to connect
a terminal that is able to display the CLI.
Battery installation (battery
backup type)
Insert four pieces of rechargeable
battery NiMh size AA into the covered
compartment on the back side of the
gateway. Refer to the compartment
label for proper battery placement and
polarity. Use mentioned type of
batteries only!
Mains Supply Connection and
Switch On
EasyGate is 12 V DC voltage powered.
Connect the attached power adapter
(12 V / 1 A DC) to the power supply
connector. After connection, switch on
EasyGate with the power switch on the
right-hand side of connector panel (on
battery version only).
 Loading...