Do you have a question about the 360 Systems Instant Replay2 and is the answer not in the manual?
Instant Replay II Plus compliance with UL 1950 and EN 60950 safety standards.
Product conformity with EU standards for professional use audio equipment.
Statement regarding Canadian Interference-Causing Equipment Regulations compliance.
Warning about the hard disk drive's vulnerability to shock and handling precautions.
Lists trademarks and patents associated with 360 Systems Instant Replay and DigiCart.
Records the dates of software version releases for the Instant Replay manual.
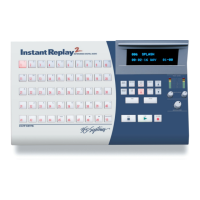
Overview of Instant Replay's front panel controls, functionally grouped.
Explains the functions of STOP, PLAY, RECORD, LOOP, and PAUSE transport control buttons.
Details about BANK SELECT, ASSIGN HOT-KEYS, and PREVIEW function buttons.
Instructions on navigating the MENU system and its configuration options.
Describes using arrow keys for selection and parameter adjustment.
Explains the function of the ENTER key for menu navigation and confirmations.
Step-by-step instructions for powering on the Instant Replay unit.
Explanation of information displayed on the Instant Replay unit's screen.
Guide to connecting analog and digital audio sources to the Instant Replay.
Illustrates the rear panel layout of the Instant Replay unit with labeled ports.
Details on cut types, word length, format, and record times supported by the DR-600.
Notes on sample rate conversion and mixing analog/digital audio input types.
Instructions for selecting analog or digital input sources via the menu system.
Steps to start recording and name the audio cut.
Method for playing audio cuts by assigning them to front panel Hot-Keys.
Advice on pausing playback and reviewing Hot-Key assignments silently.
Instructions for permanently deleting audio cuts from the device via the front panel.
How to select different cuts for assignment to Hot-Keys using scroll or find functions.
Method to find audio cuts by index number or name using the FIND function.
Using the Preview function to find available Hot-Keys for assignment.
How to adjust and store the playback level for individual audio cuts.
Explanation of the Record Sample Rate Converter's function for digital inputs.
Instructions for converting 24-bit digital audio to 16-bit using the dither option.
Steps to enable both dither and the sample rate converter simultaneously.
Overview of the three methods for setting playback sample rates for cuts.
Final step to confirm the selected playback sample rate.
Explanation of how to perform head and tail trims on audio cuts.
Details on setting the head trim for new recordings or existing cuts.
Instructions on how to perform tail trims on audio cuts.
Guide on setting the pre-roll duration before performing a tail trim.
Instructions for setting the fade-in duration for audio cuts.
Steps to set the fade-out duration for audio cuts.
Details on adjusting fade values using cursor and numeric keys.
How to navigate back through the menu levels after making adjustments.
Steps to create new playlists for organizing and playing sequences of cuts.
Procedure for clearing an existing playlist assigned to a bank.
Options for setting playlist playback modes: MANUAL STEP or FOLLOW-ON.
How to remove individual steps from a playlist.
Instructions on how to loop a playlist for continuous playback.
Steps to enable playlist protection to prevent editing or deletion.
Overview of Instant Replay's 10/100 ethernet connectivity and FTP server capabilities.
How to export WAV files from Instant Replay to a computer.
Rules and restrictions for naming files when transferring them to Instant Replay.
Example illustrating how long filenames are truncated when uploaded to Instant Replay.
Lists FTP clients that have been tested and approved for use with Instant Replay.
Specifies the operating system platforms supported by the approved FTP clients.
Instructions for connecting the Ethernet cable to the Instant Replay unit.
Option to enable DHCP for automatic IP address acquisition.
Steps to optionally set a new login password for FTP access.
Configuration of the network subnet mask for FTP connections.
Recommendation to ensure the unit is at the top-level menu before connecting.
How to connect to Instant Replay using a DOS command prompt.
Steps for logging into Instant Replay via FTP to download files.
Instructions for uploading files from a computer to Instant Replay via FTP.
Steps for deleting files from Instant Replay using FTP commands.
Instructions for renaming files on Instant Replay using FTP.
Steps to establish a connection to Instant Replay using the Flash FXP client.
How to initiate the connection process within the Flash FXP software.
Guide on moving files between Instant Replay and a computer using drag-and-drop in Flash FXP.
Method for renaming or deleting files using the context menu in Flash FXP.
Overview of the settings available in the EDIT menu for audio processing.
Options for selecting the recording format, including sample rate and bit depth.
Setting to protect Hot-Key assignments from accidental changes.
Enables protection for playlists, preventing editing or deletion.
Information regarding power connection, voltage, and cord requirements.
Note that fuses are not user-replaceable and require professional service.
Details on connecting analog audio sources to the XLR inputs.
Description of the XLR connector for AES/EBU digital audio input.
Troubleshooting tips for digital audio interface mismatches and data errors.
Description of the XLR output for AES/EBU digital audio.
Note on setting digital output to CONSUMER or COPY PROT. CONS. for S/P DIF.
Details about the 10/100 ethernet port and its FTP server capabilities.
Instructions on how to format the internal hard disk via a special power-on sequence.
Step-by-step guide to initiate the hard disk formatting process.
| Brand | 360 Systems |
|---|---|
| Model | Instant Replay2 |
| Category | Audio recorder |
| Language | English |