5
Parts List
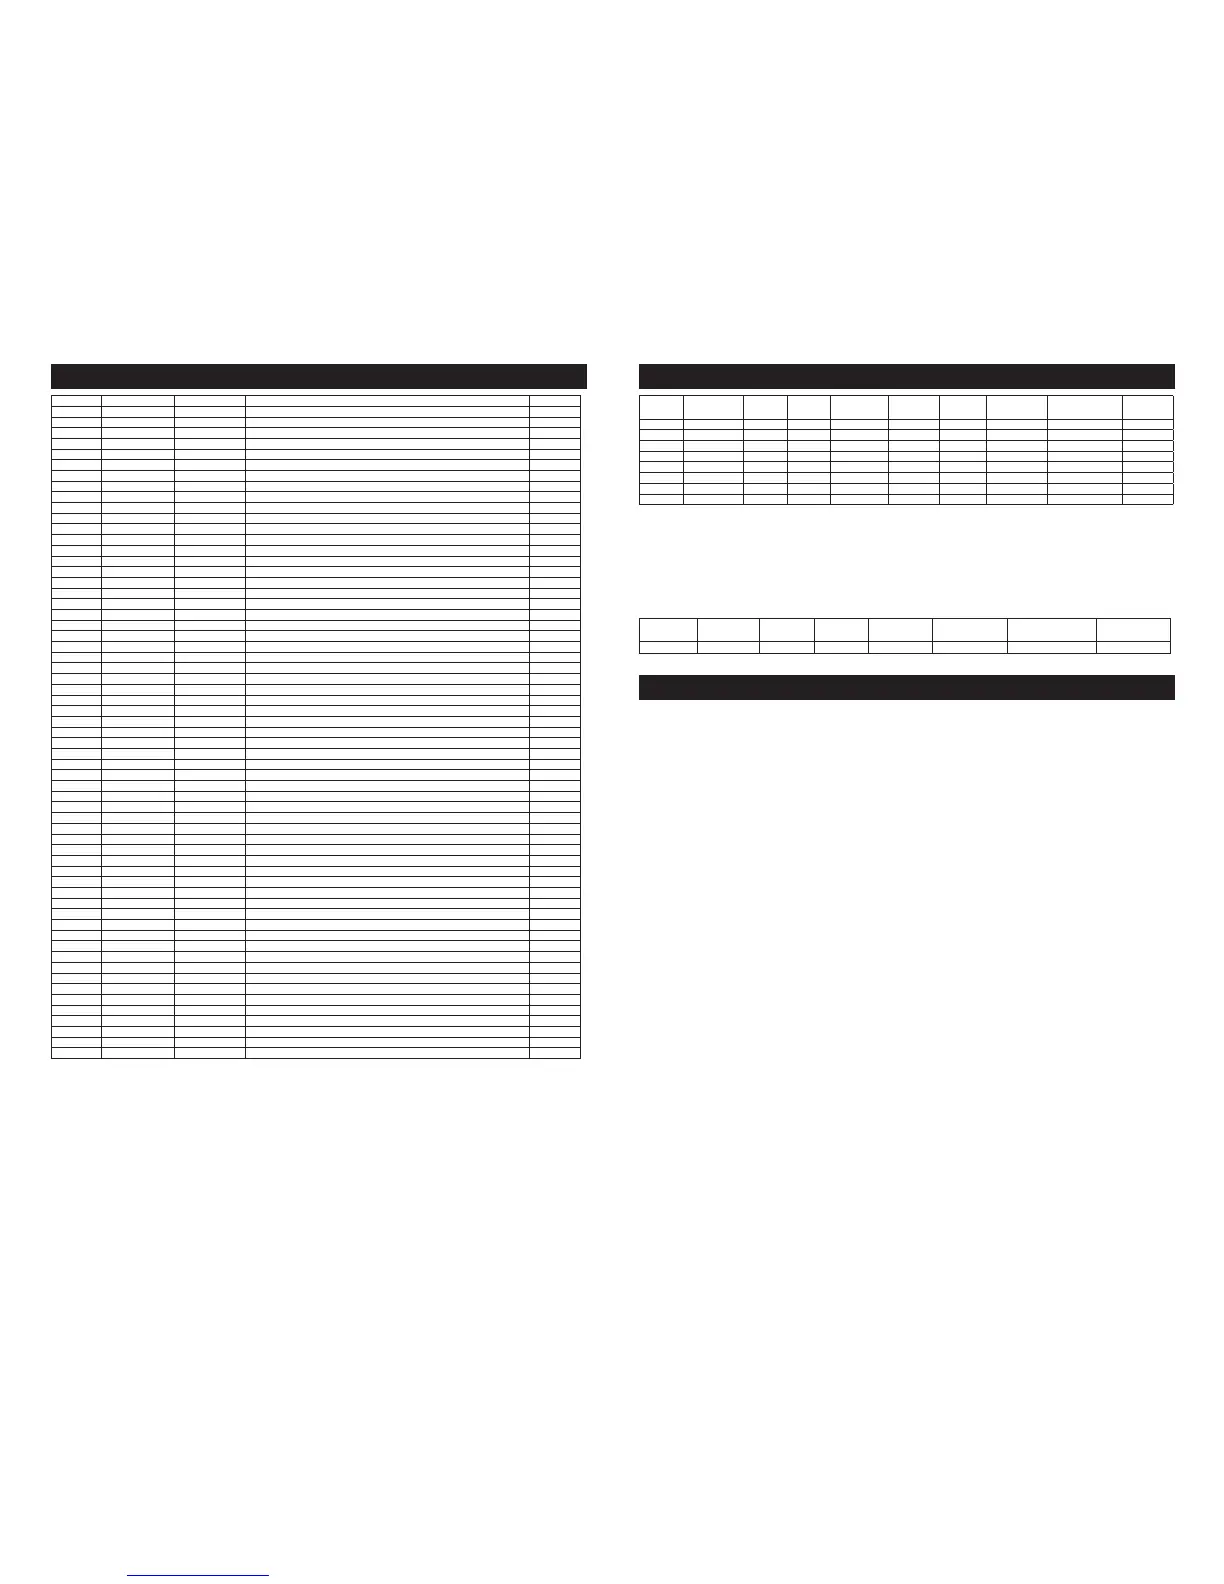
Item 3M UPC PN 3M PN Description QTY
1 28113 A0040 External Retaining Ring 1
2 28107 A0021 Bearing - 2 Shields (6000ZZ) 10 mm x 26 mm x 8 mm 1
3 55135 55135 Rear End Plate 1
4 55116 55116 Stator 1
5 55136 55136 Fixed Ring 1
6 55125 55125 Rotor 1
7 55161 55161 Set Screw (M3 x 3L) 3
8 55143 55143 Front End Plate 1
9 55133 55133 Bearing - 2 Shields (6002ZZ) 15 mm x 32 mm x 9 mm 1
10 55132 55132 O-Ring 44.4 mm x 3.1 mm 1
11 55130 55130 Lock Ring (M56) 1
12 55137 55137 Cooling Fan 1
13 55117 55117 Small Spacer - Cooling Fan 1
14 55118 55118 Large Spacer - Cooling Fan 1
15 55141 55141 Orbit Shaft Balancer 5 x 3/32 in. 1
15 55142 55142 Orbit Shaft Balancer 5 x 3/16 in. 1
15 55153 55153 Orbit Shaft Balancer 6 x 3/32 in. 1
15 55154 55154 Orbit Shaft Balancer 6 x 3/16 in. 1
16 30320 30320 Double Row Angular Contact Bearing - 1 Seal 12 mm x 28 mm x 16 mm 1
17 28103 A0016 Spacer 12.1 Inner Diameter (ID) x 18.0 Outer Diameter (OD) x 0.2 Thick 1
18 28104 A0017 Belleville Washer 1
19 28105 A0018 Retaining Ring 1
20 28174 B0018 Spindle 1
21 55146 55146 Grip 5 in. / 6 in. 1
22 55128 55128 Lever for 3M 10,000 RPM 2.5 mm (3/32 in.) Orbit 1
22 55129 55129 Lever for 3M 10,000 RPM 5 mm (3/16 in.) Orbit 1
23 28109 A0031 Lever Spring Pin 1
24 55145 55145 Machined Housing 5 in. / 6 in. 1
25 55150 55150 Non-Vacuum Shroud 5 in. / 6 in. 1
26 55147 55147 Central Vacuum Shroud 5 in. 1
26 55155 55155 Central Vacuum Shroud 6 in. 1
27 28108 A0022 Pad Wench 24 mm 1
28 NA NA 1 Pad supplied with each tool 1
29 55134 55134 Dust Cover 1
30 55119 55119 VALVE STEM SYSTEM INCLUDES: 1
31 NA NA Magnet 1
32 55120 55120 Spring, 10.3 mm OD x 25 mm (L) x 0.85 mm Ø 1
33 55138 55138 Grip Mounting Plate 1
34 55157 55157 Plain Washer (M5 x 10) 1
35 55158 55158 Hexagon Socket Button Head Screw (M5 x 6L) 1
35 55159 55159 Hexagon Socket Button Head Screw (M5 x 10L) 1
36 55160 55160 Hexagon Socket Button Head Screw (M5 x 25L) 1
37 55139 55139 PRINTED CIRCUIT BOARD CONTROLLER INCLUDES: 1
38 NA NA Connector Assembly 2
39 NA NA Speed Button 1
40 NA NA Base Plate 1
41 55151 55151 Wrist Rest 1
42 55127 55127 Logo Plate - 3M 1
43 55094 55094 Hexagon Socket Head Cap (M2 x 12L) 4
44 55148 55148 Swivel Exhaust Fitting 5 in. 1
44 55156 55156 Swivel Exhaust Fitting 6 in. 1
45 55163 55163 Super Vacuum Swivel Hose Fitting 1 in./28 mm 1
46 28301 28301 Vacuum Hose - Ø 1 in. x 6 ft. 1
47 20341 20341 Hose End Adaptor - 1 in. / 28 mm Hose Thread x 1 1/2 in. OD 1
48 28434 28434 Female Connector Cable Assembly (12 feet) 1
48 28435 28435 Female Connector Cable Assembly (24 feet) 1
49 55149 55149 Frame-Front End 1
50 28436 28436 Power Supply 1
51 55152 55152 Frame-Rear End 1
52 28478 28478 Power Cord 1
53 28775 28775 Stator Wire Support 1
6
Product Confi guration / Specifi cations: Electric Random Orbital Sander
Model
Number
Vacuum Type
Orbit
mm (in.)
Pad Size
mm (in.)
Product Net WT.
kg (lb.)
Height mm
(in.)
Length mm
(in.)
*Noise Level dBA
Pressure (Power)
**Vibration Level m/
s
2
(ft/s
2
)
**Uncertainty
K m/s
2
28426 Non-Vacuum 2.5 (3/32) 127 (5) 0.875 (1.92) 97.2 (3.82) 173 (6.81) 70 (81) 2.36 (7.67) 1.5
28427 Non-Vacuum 5.0 (3/16) 127 (5) 0.9 (1.98) 97.2 (3.82) 173 (6.81) 69 (80) 2.73 (8.87) 1.5
28428 Non-Vacuum 2.5 (3/32) 150 (6) 0.905 (1.99) 97.2 (3.82) 185 (7.28) 70 (81) 2.76 (8.97) 1.5
28429 Non-Vacuum 5.0 (3/16) 150 (6) 0.93 (2.04) 97.2 (3.82) 185 (7.28) 70 (81) 3.21 (10.4) 1.5
28430 Central Vacuum 2.5 (3/32) 127 (5) 0.945 (2.08) 96.6 (3.8) 214 (8.42) 70 (81) 2.27 (7.37) 1.5
28431 Central Vacuum 5.0 (3/16) 127 (5) 0.965 (2.12) 96.6 (3.8) 214 (8.42) 68 (79) 2.48 (8.06) 1.5
28432 Central Vacuum 2.5 (3/32) 150 (6) 0.995 (2.19) 96.6 (3.8) 225 (8.85) 70 (81) 3.22 (10.4) 1.5
28433 Central Vacuum 5.0 (3/16) 150 (6) 1.02 (2.24) 96.6 (3.8) 225 (8.85) 72 (83) 3.33 (10.8) 1.5
* Declared noise levels; measurements carried out in accordance with standard EN 60745-1 and EN 60745-2-4. (Uncertainty K=3dB).
** Declared vibration levels in accordance with EN 12096; measurements carried out in accordance with standard EN 60745-1 and EN 60745-2-4.
IMPORTANT NOTE: The noise and vibration values stated in the table are from laboratory testing in conformity with stated codes and standards and are not
suffi cient risk evaluation for all exposure scenarios. The actual exposure values and amount of risk or harm experienced to an individual is unique to each
situation and depends upon the surrounding environment, the way in which the individual works, the particular material being worked, work station design, as
well as upon the exposure time and the physical condition of the user. 3M cannot be held responsible for the consequences of using declared values instead of
actual exposure values for any individual risk assessment.
POWER SUPPLY SPECIFICATIONS
Model Number Mains Input
Voltage*
Mains
Frequency
Output Effi ciency Total Output
Regulation
Operating Temperature
C (F)
Operating Humidity
28436 100-240 47-63 Hz 30 Vd.c. 5A 85% Min. +/- 2% 0-40 (23-105) 10-90% H
* Note: Device evaluated @ 100-120 Va.c. only for U.S. and Canada.
Operating Instructions
PRIOR TO THE OPERATION
The tool is intended to be operated as a hand held tool. It is always recommended that while using the tool, operators stand on a solid fl oor, in a secure position
with a fi rm grip and footing. Be aware that the sander can develop a torque reaction.
“STAND-BY” MODE AND “RUN” MODE
The tool has a safety function that reduces the chance of unintended operation. When the tool is connected to the Power Supply, it is in “Stand-By” Mode. This
mode prevents tool from running if the lever is pushed accidentally. “Run” Mode is the normal function of the tool while it is being used.
To switch the tool from “Stand-By” to “Run” Mode:
1. Ensure the tool is connected to the Power Supply and the Power Supply is in the “l” (ON) position. The LED on the back of the Sander will show fl ashing green
color. This shows that the Sander is in “Stand-By” Mode.
2. Press either the “+” or “-“ button one time, on the back of the Sander. The LED on the back of the Sander will show solid green color. This shows that the
Sander is in “Run” Mode. The tool can now be used normally. While in “Run” Mode, the “+” and “-” buttons will operate to raise and lower the speed of the
tool.
3. The Sander will automatically switch back to “Stand-By” Mode anytime it is left un-used for 5 minutes. It can be put back into “Run” Mode by repeating Step 2
above.
STARTING AND STOPPING SANDER
CAUTION: Make certain the Switch on the Power Supply is in the “O” (OFF) position, and the AC power source is the same as specifi ed range on the Power Supply
nameplate.
1. Connect the AC power cord to the Power Supply.
2. Connect the 12 ft (3.6 m) or 24 ft (7.4 m) DC cable the tool and to the Power. Ensure both ends of the DC cable are connected and screwed in completely.
3. Turn the Switch on the Power Supply is in the “ l ” (ON) position. The “DC OK” LED on the Power Supply will show green color. The LED on the back of the
Sander will show fl ashing green color. This shows that the sander is in “Stand-By” Mode.
4. Press either the “+” or “-” button one time, on the back of the Sander. The LED on the back of the Sander will show solid green color. This shows that the
sander is in “Run” Mode.
5. Press the lever to start the tool. Release the Lever to stop the tool.
6. When the tool is left un-used in “Run” Mode for 5 minutes, it will go back into “Stand-By” Mode. To return to “Run” Mode, press either the “+” or “-” button on
the back of the Sander.

 Loading...