4
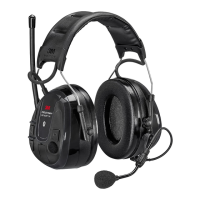
8.2. ADJUST RADIO VOLUME
(Figure D:8)
Turn the radio volume control knob (D:8) clockwise to
increase volume and counter clockwise to decrease volume.
8.3. SEARCH FOR RADIO STATIONS
(Figure D:10)
Turn the channel search control knob (D:10).
8.4. ADJUST LEVEL-DEPENDENT FUNCTION
(AMBIENT LISTENING)
(Figure D:9)
Turn the level-dependent function control knob (D:9)
clockwise to increase volume and counter clockwise to
decrease volume.
8.5. EXTERNAL AUDIO INPUT
(Figure D:8 and D:12)
The volume is controlled from the external source. Switch the
headset on as described in section 8.1. Lower the radio
volume to the minimum level (D:8). Connect your external
audio source via the 3.5 mm stereo jack (D:12).
NOTE: Do not connect any external unit unless it can be
ensured that the input voltage doesn’t exceed the maximum
value. Refers to ”Safety Statements” in section 2.1.
9. PRODUCT LIFETIME
It is recommended that you replace your product within
5 years from date of manufacture. The lifetime of the product
will be highly dependent on the environment in which the
product is stored, used, serviced, and maintained. The user
must regularly inspect the product to determine when it has
reached its end of life. Examples that the product may have
reached its end of life are:
• Visible defects such as cracks, deformations, loose or
missing parts.
• Experience of a deterioration in the hearing protector’s
attenuation performance, strange noise or abnormal high
sound volumes from the product’s electronic sound
reproduction.
NOTE: Product lifetime does not include batteries.
10. CLEANING AND MAINTENANCE
Carry out a visual battery condition check. Replace if battery
leakage or defects are detected.
Use a cloth wetted with soap and warm water to clean the
outer shells, headband and ear cushions.
NOTE: Do NOT immerse the hearing protector in water.
If the hearing protector gets wet from rain or sweat, turn the
earmuffs outwards, remove the ear cushions and foam liners,
and allow to dry before reassembly. The ear cushions and
foam liners may deteriorate with use and should be examined
at regular intervals for cracking or other damage. When used
regularly, 3M recommends replacing the foam liners and ear
cushions at least twice a year to maintain consistent
attenuation, hygiene, and comfort.
In hot and humid environments more frequent changes may
be required to maintain acceptable hygiene. If an ear cushion
is damaged, it should be replaced. See Spare Parts Section
below.
10.1. REMOVING AND REPLACING THE EAR
CUSHIONS
(Figure E:9 - E:11)
E:9 To remove the ear cushion, slide your ngers under the
inside edge of the ear cushion and rmly pull straight out.
E:10 Remove existing liner(s) and insert new foam liner(s).
E:11 Fit one side of the ear cushion into the groove of the
earcup and then press on the opposite side until ear cushion
snaps in place.
10.2. REPLACING THE CARRIER ATTACHMENT
PLATE
(Figure E:12 - E:13 and Table D)
For proper tting on different compatible carrier devices, the
carrier attachment plate may need to be replaced. Find the
recommended attachment in Table D. The headset comes
assembled with P3E carrier attachment.
Other plates can be obtained from your dealer. A screwdriver
is needed to replace the carrier attachment plate.
E:12 Loosen the screw holding the plate and remove the plate.
E:13 Attach the appropriate plate while ensuring the left (L)
and right (R) designated plates are on the appropriate
earmuff, if applicable, and then tighten the screw.
11. SPARE PARTS AND ACCESSORIES
Article number Description
HY81 Hygiene kit
Replaceable hygiene kit consisting of
two attenuation cushions and two
snap-in ear cushions. Replace at
least twice a year to ensure constant
attenuation, hygiene and comfort.
HY100A Single use protectors
A single-use protector that is easy
to t to the ear cushions. Pack of
100 pairs.
M60/2 Wind protection for ambient
microphones
Effective against wind noise;
enhances life span and protects the
microphones. One pair per pack.
1173SV Battery cover
FL6CE/1 Connection cables for external
audio input
With 3.5 mm stereo jack.
12. STORAGE
• Store the product in a clean and dry area before and after
use.
• Always store the product in the original packaging and away
from any sources of direct heat or sunlight, dust and
damaging chemicals.
EN
 Loading...