EasyManua.ls Logo

3M Shower Filter - User Manual

3M Shower Filter
2 pages
Print Icon
To Next Page IconTo Next Page
Loading...
Shower Filter
USER MANUAL
CASE A
CASE B
CASE C
CASE D
CASE E
CASE E
CASE D
There is a foreign substance in the large rubber
ring (O-ring) mounted under the body, which may
cause intermittent leakage.
Or it may not be properly tightened.
After removing the bottom, lightly wash the
O-ring part with water and reassemble.
If the shower hose is not properly tightened.
Refit until no more turns.
Are there any leaks between
the body and bottom?
Is there a leak between the tail and
the shower hose?
CASE B
CASE A
If there is no rubber stopper (gasket) in the nut joint, water leakage may occur, or the proper
tightening between the nut joint and the faucet may not work. Tighten the nut joint further until it
no longer turns. If necessary, use a spanner. Do not turn the shower filter (head/body) at this time,
as there is a risk of damage.
Product assembly is defective.
Please return or exchange after contacting our.
Is there a leak between the nut joint and the faucet?
Are there any leaks between the nut joint and the head?
CASE C
The small rubber ring (O-ring) mounted on the body may contain foreign substances, causing
intermittent leakage. After separating the body and head, wash the rubber ring lightly with water
and reassemble.
Are there any leaks between the head and body?
3M™ shower filter self-diagnosis and solution
If there is any leakage after installing the product, please see self-diagnosis for the five cases below.
We do not compensate for loss due to incorrect use or carelessness, and if a problem occurs
with this product, we will refund the purchase price or exchange the purchased product.
This 3M product is a registered trademark of 3M Corporation.
This product can be compensated according to the consumer dispute resolution
standards in accordance with the Consumer Protection Act.
*
*
*
Korea 3M Co., Ltd.
Filter Product Business Team
18th floor, 82 Uidang-daero, Yeongdeungpo-gu, Seoul
Customer Service Office 080-033-4114
www.3m.co.kr
Nut joint
Head
Body
Bottom
Tail
Question and Answer IconNeed help?

Do you have a question about the 3M Shower Filter and is the answer not in the manual?

Summary

3 M Shower Filter Self-Diagnosis and Solution

CASE A: Leak between nut joint and faucet

Troubleshoots leakage between the shower filter's nut joint and the faucet due to missing gasket or improper tightening.

CASE B: Leak between nut joint and head

Addresses leaks between the shower filter's nut joint and its head, often due to product assembly defects.

CASE C: Leak between head and body

Diagnoses leaks between the shower filter's head and body, possibly caused by foreign substances on O-rings.

CASE D: Leak between body and bottom

Identifies leaks between the shower filter's body and bottom, usually due to foreign substances or loose fitting.

CASE E: Leak between tail and shower hose

Resolves leaks occurring between the shower filter's tail and the shower hose if not properly tightened.

Precautions for Use

General Usage and Safety Precautions

Covers warnings for installation, water pressure, material compatibility, and general handling to prevent damage or malfunction.

How to Install 3 M Shower Filter

How to Replace 3 M Shower Filter Refill

Filter Replacement Time

Overview

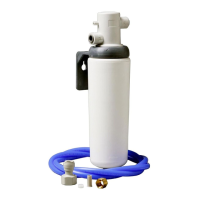
The 3M Shower Filter is designed to enhance your showering experience by filtering tap water. This user manual provides comprehensive guidance on its installation, usage, maintenance, and troubleshooting.

Function Description

The 3M Shower Filter is primarily designed to filter tap water used for showering. It aims to improve water quality for personal hygiene purposes. The filter is compatible with both standard and premium shower systems. It is intended for use with tap water only and is not recommended for filtering unidentified water or water containing microorganisms. The device is designed to be installed between the shower hose and the faucet, or directly onto the faucet, depending on the specific setup.

Usage Features

Installation: The installation process involves three main steps:

  1. Remove the shower hose from the faucet.
  2. Connect the 3M shower filter to the bottom of the faucet.
  3. Connect the separated hose to the bottom of the 3M shower filter.

It is crucial to handle the shower filter carefully during installation. The manual explicitly states that if the head is rotated during installation or replacement, there is a risk of damage, and the head should never be turned. The product can be tightened by hand, but if a separate tool is used, overtightening should be avoided to prevent damage. If the head is rotated excessively after installation, a safety pin might come off; however, this does not affect the product's functionality.

Precautions for Use:

  • The filter should only be used with tap water and is not suitable for filtering unidentified water or water containing microorganisms.
  • Before installation, check the water pressure. If the pressure is 4.0kg/cm² or more, consult an expert for a pressure-reducing device.
  • The filter is not recommended for use with valved shower heads.
  • After installation, run water for at least 5 seconds.
  • For premium shower filters, some activated carbon powder may be released during initial use. In such cases, run water for 1-2 minutes or more until it clears.
  • The filter is intended for showering purposes only and not for drinking water.
  • The main material is polycarbonate (PC), and it should be used within a temperature range of 4-45°C.
  • Do not lubricate the rubber O-ring or clean the product with chemicals.
  • Avoid direct sunlight during use or storage.
  • The filter is compatible with both standard and premium shower systems.
  • Applying external force to the filter after installation may cause damage.
  • Ensure there is sufficient space (at least 6cm) between the faucet and the wall for proper mounting.

Maintenance Features

Filter Replacement: The filter replacement process is also straightforward:

  1. Pull the shower filter head lock to separate it from the body.
  2. Twist the separated body in the direction of the arrow.
  3. Replace the dirty filter with a new one.
  4. Reassemble in reverse order and reinstall the shower filter.

Replacement Schedule: Filter replacement is recommended when the 3M logo on the filter is clearly visible. Based on a daily usage of 40L for adults, the typical filter replacement cycle is 2-4 months. However, this duration may vary depending on the specific water environment and usage conditions. Regular checking of the filter's color is advised to prevent flow rate decrease due to clogging. The filter should also be replaced if it becomes dirty or if the water pressure weakens.

Troubleshooting Leakage: The manual provides a self-diagnosis guide for five common leakage scenarios after installation:

  • CASE A: Leak between the nut joint and the faucet.

    • Cause: Missing rubber stopper (gasket) or improper tightening.
    • Solution: Ensure the rubber stopper is present and tighten the nut joint further until it no longer turns. A spanner can be used if necessary, but avoid turning the shower filter head/body to prevent damage.
  • CASE B: Leaks between the nut joint and the head.

    • Cause: Defective product assembly.
    • Solution: Return or exchange the product.
  • CASE C: Leaks between the head and body.

    • Cause: Foreign substances in the small rubber O-ring mounted on the body, causing intermittent leakage.
    • Solution: Separate the body and head, wash the rubber O-ring lightly with water, and reassemble.
  • CASE D: Leaks between the body and bottom.

    • Cause: Foreign substance in the large rubber O-ring under the body, causing intermittent leakage, or improper tightening.
    • Solution: Remove the bottom, lightly wash the O-ring with water, and reassemble.
  • CASE E: Leak between the tail and the shower hose.

    • Cause: Shower hose not properly tightened.
    • Solution: Refit until no more turns.

Post-Replacement Leakage: If intermittent leakage occurs after replacing the shower filter, it may be due to the rubber ring getting caught between the body and the head or bottom. In this case, separate the product and parts, soak the rubber ring in water sufficiently, and then reassemble it.

General Information: 3M does not compensate for losses due to incorrect use or carelessness. If a product problem occurs, the purchase price will be refunded, or the product will be exchanged. The product is a registered trademark of 3M Corporation and is eligible for compensation according to consumer dispute resolution standards in line with the Consumer Protection Act.

3M Shower Filter Specifications

General IconGeneral
Flow Rate2.5 gpm
Operating Temperature40 - 100 °F
Maximum Operating Temperature100 °F
Filter Life6 months
Filter MediaActivated Carbon
ReducesChlorine

Related product manuals