EasyManua.ls Logo

4DRC 4D-F8 - Page 8

4DRC 4D-F8
16 pages
Print Icon
To Next Page IconTo Next Page
To Previous Page IconTo Previous Page
Loading...
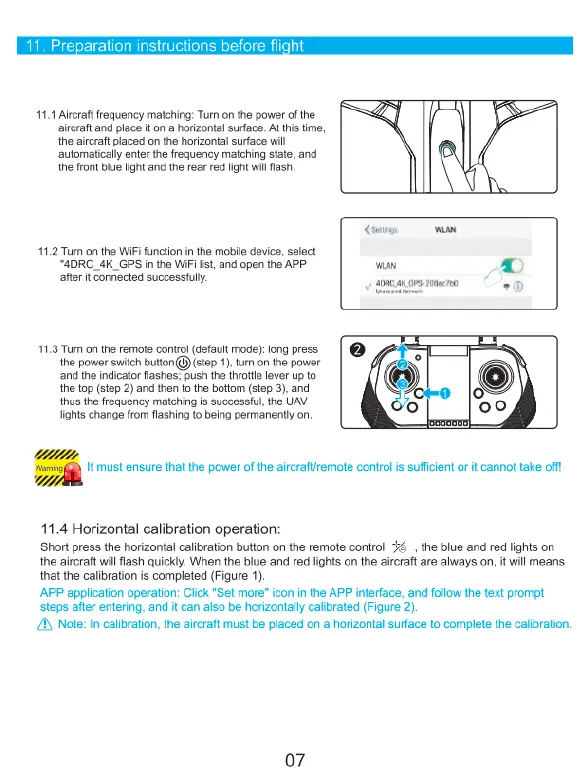
11.
Preparation
instructions
before
fli
1.1 Alcraft
frequency
matching:
Turn
on
the
power
of the.
aircraft
and place
it
on
a
horizontal
surface.
At
his
time,
the
aircraft
placed
on
the
horizontal
surface
will
automatcally
enter
the
frequency
matching
state,
and
the
front
blue
ight
and
the
rear
red
light
wil
flash
Conre
wan
1.2
Tum
on the
WIFi
funilon
in
the
mobil
device,
saect
“4DRC.
4K_GPS
intha
WIF
ist,
and
open
o
APP.
o
e
after
it
connected
successfuly.
b
1.3
Tum
on the
remote
contrl
(default
mode:
ong
press.
the
power
swich
buton(@)(step
1),
ur
on
the
power
and
the
ndicator
flashes;
push
tha
thrtle
ever
up
to
e
t0p
(tep
2)
and
then
o
the
bottom
(step
3).
and
hus
the
frequency
matching
s
successtu,
the
UAV
Tights
change
from
flashing
o
being
permanenty
on
-
Hmust
ensur
ha
h
power
ofth
arcratiremoteconirl
s
suffcient
i
cnnot
akeoft
11.4
Horizontal
calibration
operation:
Short
press
the
horizontal
calibration
button
on
the
remote
control
¥4
|,
the
blue
and
red lights
on
he
aircrait
il
lash
quickly.
When
the
blue
and
red
lights
on
the
arcraftare
always
on,
it
wil
means.
that
the
calibration
is
completed
(Figure
1).
APP
application
operation:
Click
"Set
more*
icon
in
the
AP
interface,
and
follow
the
text
prompt
steps
after
entering,
and
it
can
also
be
horizontally
calibrated
(Figure
2).
£
Note:
I
calibration,
the
arcraft
must
be
placed
on
a
horizontal
surface
to
complete
the
calibration
07

Related product manuals