Install HPT 372 IDE RAID Driver (For KD7-RAID) F-5
• Select Disk Drives:
This item allows you to select the disk
drives to be used with the RAID array.
• Stripe Size:
This item allows you to select the stripe
size of the RAID array. There are five
options: 4K, 8K, 16K, 32K, and 64K.
• Start Creation Process:
After you have made your selection,
choose this item and press <Enter> to
start creation.
Option 2
Delete RAID
This item allows you to remove a RAID Array
on this IDE RAID controller.
NOTE: After you have made and confirmed
this selection, all the data stored in the hard disk
will be lost. (The entire partition configuration
will be deleted too.)
Option 3
Rebuild Mirror Disk
This item allows you to select the disk you wish
to rebuild in preparation for a “Mirror Disk
Array”.
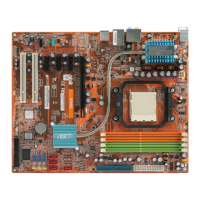
After you have selected the function you want
in the main menu, you may press <Enter> key
to enter the sub menu as shown below:
• Select Source Disk:
This item selects the source disk. The size
of source disk must be smaller or equal to
the size of target disk.
• Select Target Disk:
This item selects the target disk. The size
of target disk must be greater or equal to
the size of source disk.
• Start Duplicating Process:
After you had selected this item, the BIOS
setting will take up to 30 minutes to run
the duplication. Please wait, or you may
press <Esc> to cancel.
Option 4
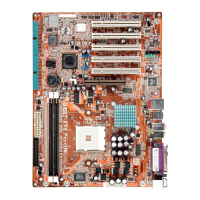
Add Spare Disk
To add the spare disk:
1. Select “4. Add Spare Disk” in the Main
Menu, and press <Enter> to confirm.
2. In menu zone of the pop up sub interface,
select “1. Select Mirror Array: None” and
press <Enter> to confirm.
3. In the validated channel status zone, select
the mirror array and press <Enter> to
confirm.
4. In the menu zone of the pop up subinterface,
select “2. Select Spare Drive: None” and
press <Enter> to confirm.
5. In the validated channel status zone, select
the spare disk to be added and press
<Enter> to confirm.
User’s Manual