EasyManua.ls Logo

Abit WX6 User Manual

Abit WX6
134 pages
To Next Page IconTo Next Page
Page #1 background imageLoading...
Page #1 background image

             
            

      

         

           
            

!"#
          
         

            

Question and Answer IconNeed help?

Do you have a question about the Abit WX6 and is the answer not in the manual?

Abit WX6 Specifications

General IconGeneral
BrandAbit
ModelWX6
CategoryMotherboard
LanguageEnglish

Summary

Introduction to WX6 Features

1-1. Features of This Motherboard

Outlines the primary features and functionalities of the WX6 motherboard.

1-2. Specifications

Lists the detailed technical specifications and components of the WX6 motherboard.

1-3. Layout Diagram

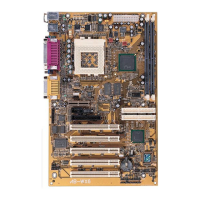
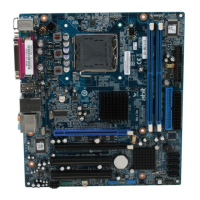
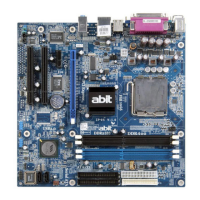
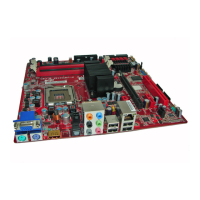
Provides a visual guide to the physical layout of the WX6 motherboard components.

1-4. The System Block Diagram

Illustrates the internal architecture and data flow of the WX6 motherboard.

Installing the Motherboard

2-1. Installing the Motherboard to the Chassis

Step-by-step instructions for physically mounting the motherboard into a computer chassis.

2-2. Installation of the Celeron™ PPGA Processor

Detailed guide on how to safely install the CPU onto the motherboard socket.

2-3. Installing System Memory

Instructions for properly inserting RAM modules into the motherboard's DIMM slots.

2-4. Connectors, Headers and Switches

Explains the function and location of various connectors, headers, and switches on the motherboard.

Introduction of the BIOS

3-1. CPU Soft Menu™ II

Configuration options for CPU speed, multiplier, and voltage within the BIOS.

3-2. Standard CMOS Features Setup Menu

Basic system settings including date, time, and IDE drive configuration.

3-3. Advanced BIOS Features Setup Menu

Covers advanced BIOS settings for boot order, memory, and security features.

3-4. Advanced Chipset Features Setup Menu

Configuration of chipset-specific settings for memory timing and performance.

3-5. Integrated Peripherals

Management of onboard devices like IDE, USB, AC97 audio, and serial/parallel ports.

3-6. Power Management Setup Menu

Settings for system power-saving modes like Suspend and HDD power down.

3-7. PnP/PCI Configurations

Configuration of Plug and Play and PCI resource allocation (IRQ, I/O).

3-8. PC Health Status

System monitoring for CPU, fans, voltages, and temperatures.

3-9. Load Fail-Safe Defaults

Resets BIOS settings to safe, default configurations.

3-10. Load Optimized Defaults

Loads BIOS settings optimized for system performance.

3-11. Set Supervisor Password / Set User Password

Enables setting BIOS passwords for system security.

3-12. Save & Exit Setup

Saves current BIOS settings and exits the setup utility.

3-13. Exit Without Saving

Exits BIOS setup without saving any configuration changes.

Appendix A IDE & USB Drivers Installation for Windows® 98 SE

Note A-1

Prerequisite information for installing IDE and USB drivers.

Note A-2

Details on checking system properties for driver installation.

Appendix B Installing the VGA Driver for Windows® 98 SE

Note B-1

Prerequisite information for installing VGA drivers.

Note B-2

Details on checking system properties for VGA driver installation.

Appendix C Installing the Audio Driver for Windows® 98 SE

Note C-1

Information on checking system properties for audio driver installation.

Appendix D Installing the VGA Drivers for the Windows® NT 4.0 Server / Workstation

Note D-1

Information on installing VGA drivers for Windows NT 4.0.

Note D-2

Details on checking display properties for VGA driver installation.

Appendix E Installing the Audio Drivers for the Windows® NT 4.0 Server / Workstation

Note E-1

Information on installing audio drivers for Windows NT 4.0.

Note E-2

Details on checking multimedia properties for audio driver installation.

Appendix F BIOS Flashing User Instructions

Note F-1

Important considerations for BIOS file names and compatibility.

Note F-2

Explanation of parameters used in BIOS flashing commands.

Appendix G Installing the HighPoint XStore Pro Utility

Important Note

Crucial information regarding the utility's installation and potential conflicts.

Appendix H Hardware Monitoring Function (Installing the Winbond Hardware Doctor Utility)

Step 1.

First step in installing the Winbond Hardware Doctor utility software.

Step 2.

Second step in installing the Winbond Hardware Doctor utility software.

Step 3.

Third step in installing the Winbond Hardware Doctor utility software.

Step 4.

Fourth step in installing the Winbond Hardware Doctor utility software.

Step 5.

Fifth step to launch the installed Winbond Hardware Doctor utility.

Step 6.

Explains the monitoring screen and warning messages in the utility.

Appendix I Installation Guide for Suspend to RAM

Note

Essential notes for enabling the ACPI BIOS function for Suspend to RAM.

Appendix J Troubleshooting (Need Assistance?)

Example 1:

Troubleshooting scenario for a system failing to boot.

Example 2:

Troubleshooting scenario for sound card driver issues.

Related product manuals