Do you have a question about the AccuAir e-Level+ and is the answer not in the manual?
Learn how to manually save vehicle heights to the system by holding position buttons.
Configure system accuracy levels and RideMonitor™ mode settings.
Download and install the e-Level+ app for enhanced control and features.
Calibrate sensors and suspension travel automatically for initial setup.
Perform a lighter recalibration to retain settings and improve accuracy.
Manually set maximum safe travel limits for suspension calibration.
Understand error codes indicated by button flashes for system issues.
Diagnose sensor or valve errors via red arrow indicators on the controller.
Identify voltage issues based on strobing red arrows indicating UP or DOWN.
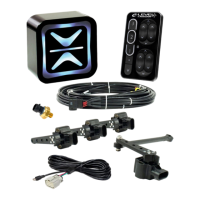
The AccuAir e-Level+ system is a sophisticated air suspension control unit designed to provide precise and customizable ride height management for vehicles. This quick user guide outlines its primary functions, operational features, and basic maintenance procedures, including calibration and troubleshooting.
The e-Level+ system allows users to control their vehicle's ride height with accuracy and ease. At its core, the system utilizes height sensors to monitor the vehicle's position relative to the ground, enabling automatic adjustments to maintain desired settings. It offers three savable ride heights, allowing users to quickly switch between preferred positions such as "Raised," "Ride Height," and "Lowered." This capability is particularly useful for navigating different terrains, parking, or achieving a specific aesthetic. The system also incorporates a RideMonitor™ mode, which, depending on its accuracy setting, continuously monitors and adjusts the vehicle's height to compensate for changes in load or road conditions, ensuring a consistent ride. An ActiveStart™ feature is also available, which can be configured to automatically adjust the vehicle to a pre-set ride height upon startup. The system includes a compressor status indicator, providing feedback on the air compressor's operation, which is crucial for maintaining air pressure in the tank.
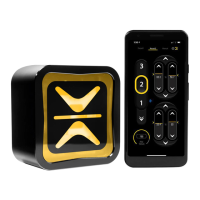
The e-Level+ system is operated via a user-friendly touchpad, which features dedicated buttons for each of the three savable heights (1, 2, and 3), as well as individual controls for raising or lowering each corner of the vehicle. There are also "All Down" and "Program" buttons, the latter of which is central to accessing settings and initiating calibration.
Saving Heights: To save a new ride height, the user first manually adjusts the vehicle to the desired position using the individual corner controls. Once the desired height is achieved, the user holds down the corresponding position button (1, 2, or 3) for three seconds. The position indicator will flash and then become solid, confirming that the new height has been saved. This allows for quick recall of frequently used heights.
System Settings: The touchpad also provides access to various system settings. By momentarily pressing the "Program" button, users can enter the settings menu. Here, adjustments can be made to features such as "Backlighting Increase" and "Backlighting Decrease" to control the brightness of the touchpad's illumination. The "Ride-Height On-Start" setting determines whether the vehicle automatically adjusts to a specific height when the system is powered on. The "RideMonitor™ Mode" can be toggled on or off, and its accuracy level can be set to one of three options:
Individual and Paired Controls: The touchpad includes distinct sets of arrows for "Front Controls," "Rear Controls," and "Individual Controls." The "Paired Controls" allow for simultaneous adjustment of both front or both rear wheels, while the "Individual Controls" provide granular control over each corner of the vehicle, enabling precise leveling or custom stances.
All Down Feature: The "All Down" button, when held for 5 seconds, will fully lower the vehicle, providing a convenient way to achieve the lowest possible stance.
Downloadable App: For enhanced control and additional features, the e-Level+ system supports a companion mobile application. Users can download and install the "e-Level+ APP" from the Apple App Store or Google Play Store, extending the system's functionality to their smartphone or tablet.
The e-Level+ system requires calibration, especially if height sensors are used or if any suspension components are changed or replaced. Calibration ensures that the system accurately reads the vehicle's height and can make appropriate adjustments.
Error Codes and Troubleshooting: The system is equipped with a diagnostic feature that indicates errors through flashing patterns on the position buttons and color changes in the corner arrows. This allows users to identify and address issues promptly.
These detailed error codes and indicators empower users to diagnose and potentially resolve common issues, or to provide specific information to AccuAir Tech Support for more complex problems. Regular calibration and attention to error codes ensure the optimal performance and longevity of the e-Level+ system.
| Type | Air Suspension Controller |
|---|---|
| Bluetooth | Yes |
| Pressure Sensor Support | Yes |
| Self-Learning | Yes |
| Input Voltage | 12V DC |
| Communication | CAN Bus |
| Wireless Connectivity | Bluetooth |
| Control | Smartphone App |
| Height Sensors | Yes |
| Compatibility | Universal |
| ECU | Integrated |
| Mounting | Universal |
| Waterproof Rating | IP67 |