Do you have a question about the ACLAS CR6X and is the answer not in the manual?
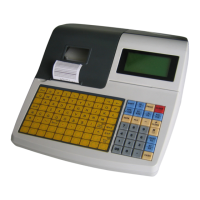
Shift the key functions.
Advance receipt paper continuously. Use SHIFT + #2 for journal paper.
Connect with external equipment like RFID, E card, or IC card for various payment modes.
Cancel wrong operations/errors. Exit operations or wake up the ECR.
Enter other functions, refer to chapter 2.6. Check work attendance.
Subtract or add a percentage from the sales sum. Open cash drawer without a sale.
Cancel selected transaction (item, last, or all). Return or refund merchandise.
Clerk login/operation mode. Register requires clerk sign-in. Member card format can be set.
Open tables in restaurant version, up to 128 tables. Combine tables for a meal.
Hold current sales transaction and recall another. Choose instructions for menu items.
Sell preset PLU by number entry. Work as a calculator. Split bills of merged tables.
Enter items like 'TAKEAWAY', 'NUMBER OF DINERS', 'PROMOTER'. Use SHIFT + Take Away for takeaway PLU.
Multiply a quantity of items. Division symbol.
Change PLU or department price. Open drawer without making a sale. Minus symbol.
Display sale subtotal. Perform money detection in some countries. Addition symbol.
Calculate total, finalize sale, open cash drawer. Enter function settings. Equals symbol.
Use to input double 0.
Use for fractional percentage discounts. Lock keyboard by pressing for 3 seconds.
Use to make numerical entries.
Punctuation marks: () [] and #.
Punctuation marks: ., ? * @ and Space.
Sales operations require a logged-in clerk. Errors cause continuous beeping.
CLERK 1 has manager privileges and access to all functions.
Set the date and time using the Attendance and P/O keys.
Configure header and footer messages for receipts using Attendance and P/O keys.
Set up Product Look-Up (PLU) codes, including barcode, name, price, and tax.
Input PLU price (max 999999.999) and confirm.
Select tax mode, 0 for no GST, 1 for GST.
Input PLU type: NORMAL, COMBINE, or FRESH GOODS.
Input the department number to which the PLU belongs.
Configure department settings, including number, name, price, tax, and printer links.
Input department number (1-99) and confirm.
Input the department's name and confirm.
Input the department's price (0-9999999) and confirm.
Select the tax mode for the department.
Link department to a kitchen printer or set to 0 for none.
Input department discount percentage if required.
Input department member discount percentage if required.
Allow or disallow subtotal discounts for the department.
Configure hotkeys for PLU, Meal, or Department assignments.
Choose PLU, Meal, or Department for hotkey assignment.
Follow the SET PLU instructions (step 3.3.1).
Input meal number and press Enter.
Follow the SET DEPARTMENT instructions (step 3.4.1).
Print a duplicate copy of the last transaction after completion.
Turn off automatic tax invoice printing after each transaction.
Obtain a receipt copy by pressing Enter after a transaction if auto-print is off.
Sell items using pre-set prices via department keys or key-in prices.
Sell items using PLU codes via barcode scanning or manual entry.
Apply percentage or amount discounts to PLU/Department sales or total sales.
Cancel items or entire sales transactions with options for last item, previous items, or all items.
Enter RETURN mode to process returns or refunds similar to sales operations.
Add money to the drawer for non-transaction purposes using SHIFT and R/A.
Withdraw money from the drawer for non-transaction purposes using SHIFT and P/O.
Process EFTPOS, VISA, and MASTERCARD transactions after sales using SHIFT and CARD.
Obtain a copy of the current receipt by pressing Enter after the sales transaction.
Print X (read totals) or Z (read and reset totals) daily reports.
View total sales figures broken down by department.
Resolve Error 19 by printing the daily report. Refer to Section 5 for details.
Resolve Error 2 by logging in a clerk. Refer to Section 2 for login instructions.
Access clerk management options like logout, manage, X report, and Z report.
Manage clerks: add new, delete existing, or change passwords.
Input the clerk number to manage their settings.
Enter the clerk's name using the keyboard.
Set or input the clerk's password.
Re-enter the clerk's new password to confirm.
Assign specific function authorities to clerks. 'CHECK ALL' grants full authority.
Log in, press CLERK key, navigate to CLERK MANAGE.
Select CHANGE PSW option within CLERK MANAGE.
Enter the clerk number whose password will be changed.
Input the clerk's current password.
Enter the new password for the clerk.
Re-enter the new password to confirm it.
| Brand | ACLAS |
|---|---|
| Model | CR6X |
| Category | Cash Register |
| Language | English |