"'JV
16
GB
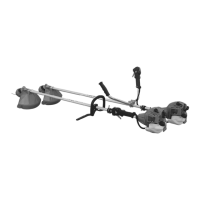
5. ASSEMBLY
";&CJJJJJD'Y
E/F8
- Connect the engine (B) to the transmission (A) by
means the screw (C).
Make sure that the drive shaft and the tube are
E&&"&V&VC&&'<D'IJ&JZ&<V
ZCJ E/F@
- Remove the filter cover
- Introduce the throttle cable (A) through of the cable
tensioner (B). Make sure that the cable sheath (C) rest
against the inside of the tensioner (B). Ensure that the
throttle lever is not in half-throttle, then connect the cable
terminal in the clamp (E). Adjust cable tension (A) by
loosening the lock nut (D) and turning the tensioner (B).
Once the correct tension is reached, tighten the lock nut
(D). lf adjusted correctly, throttle trigger will move freely
approximately 2 mm before carburettor lever (E) moves.
Connect the stop switch wires (F- G).
E&&"&VVI'D<Y<'D%I''%
&Y
E/FG.)5'%L
Remove the screws (1) open the loop
handle (2) in order to slip it on to the tube (3) and secure
it by means the screws (1) and the nuts (4). Fit the safety
bar (5) into it’s seat and secure it by means the screws
(6) and nut (7).
The position of the handle could be adjusted according
with the requirements of the operator.
E/F$.)5D%L
Fit two half-handles (1-2) on the bracket
(D). Make sure the ends of the half handles are located
into the groove (4), see the arrow, and secure them using
the cover (5), screws (6) and nuts (7).
JJD'YJE&Y"BCIE/F:
Mount the total protection (A) on the transmission pipe
(B) and secure using the jumper (C), screws (D),
piatrina (G) and nuts (F).
IMPORTANT: Make sure the jumper (C) is fixed
washer (E). CAUTION: Use protection (A) with the
head of a nylon wire. Use only the protection (A) with
the lame.Per reasons of safety, the saw blades can not
be used with no protection provided.
D'IJJD'Y$%E/F#L>
- Loosen the nut (1) clockwise; remove cup (2) (only if is
the skid unit version) and lower flange (3).
- Fit the blade (4) as showed in the picture making sure
that the upper flange (5) is well fitted.
- Fit the blade making sure that the rotation direction is
correct (the inscription on the blade should be facing up).
- Fit the lower flange (3), the cup (2) (only if is the skid unit
version) tighten the nut (1) anti-clockwise at 30 Nm ( 3.0
kgm).
- While tightening the nuts (1), the blade can be held fast
by inserting the allen key Ø 4 mm into the cap, the upper
flange and gear case holes. To do this, rotate the cutiing
tool until the two holes coincide.
Y'VIJJD'Y8%E/F?LA9
Mount the head of a nylon wire following the Illustrated:
upper flange (1) and turn clockwise to the head of nylon
threads.
Tighten by hand clockwise head as shown in Fig.10
after entering the Allen key (4 mm) in the conical bore
of the pair.
For your safety, use only original cutting tools.
WARNING: ONLY FOR EVOLUTION MODELS
E&&"&V&&<V&JE/F8$
Loose, counter-clockwise, the lever (1).
- Pull up the pin (12) and slip the tube (2) into the coupling
(4) as far as the reference (3) (about 40mm.). In order to
ease the introduction of the inner shaft (5) into the coupling
shaft (6), twisting slightly one way and the other the
attachment till it is slipped to the ref. (3).
Make sure that the pin (12) is inserted into the hole
(13). Block the tube through the lever (1)
E&&"&V&J
E/66/*F 2[62*(/)* ; .0+M/*2 E/F 8G
- Loosen, counter-clockwise, the lever (1).
- To slip the extension tube (2) into the coupling (4) as far
as the reference (3) (about 40mm.). Rotate the extension
in order to locate the coupling (10) in the same position
as the coupling (4) and secure it by the lever (1).
E/66/*F 0660+M.2*6 ; 2[62*(/)* E/F 8G
- loosen, counter-clockwise, the lever (7).
- To slip the attachment tube (8) into the coupling (10) as
far as the reference (9) (about 40mm.) In order to introdu-
ce the shaft (11) with ease into the extension coupling
shaft, twist slightly one way and the other the attachment,
till the tube is fully introduced.Rotate the attachment in
the working position and secure it by the lever (7).
ZC" 6)N(26M20660+M.2*6((226M2
&M2 .0[/.N. 2[62*(/)* 011)W25 /( AG99..=
)6M2-W/(2 /6 /( 50*F2-)N( *1X )*2 2[62*(/)* 20+M
6/.2 +0* P2 N(25 )* 6M2 .0+M/*2= 6M2 #G9.. )-
0162-*06/721X 6M2 AG99..
 Loading...