EasyManua.ls Logo

Acura ROOF BOX User Manual

Acura ROOF BOX
4 pages
To Next Page IconTo Next Page
Page #1 background imageLoading...
Page #1 background image
© 2017 American Honda Motor Co., Inc. – All Rights Reserved. BII07186-13 (1709) 1 of 4
08L20-TAI-2000-91
VERSION 1
Publications No.
Issue Date
INSTALLATION
INSTRUCTIONS
Accessory Application
ROOF BOX (SHORT)
2018 MDX
SEP 2017
PARTS LIST
Roof box
4 Brackets A
4 Brackets B
9 Plates
4 Knobs
8 Bolts
8 Washers
2 Straps
Seal
2 Keys
4 Large pads
4 Small pads
TOOLS AND SUPPLIES REQUIRED
Isopropyl alcohol
Shop towel
INSTALLATION
NOTE:
Be careful not to damage the finished surfaces of the
body when installing the roof box.
An Acura roof rack is required to install the roof box.
The maximum load capacity for roof racks vary from
model to model. Check the vehicle owner’s manual, the
roof rack installation instructions, or the load label on
the rack for the roof rack load capacity.
The maximum load capacity for the roof box is 110lb
(50kg): approximate roof box weight is 29lb (13kg).
Do not allow the combined weight of the roof box and
cargo to exceed the carrying capacity of the roof rack.
1. With the help of an assistant, carefully place the box
on the crossbars. Open the tailgate to make sure the
box will not interfere with the tailgate when it is open.
2802030M
ROOF BOX
TAILGATE
CROSSBARS
Check that the box
is not interfering
with the tailgate.
P/N 08L20-TAI-200
Question and Answer IconNeed help?

Do you have a question about the Acura ROOF BOX and is the answer not in the manual?

Acura ROOF BOX Specifications

General IconGeneral
BrandAcura
ModelROOF BOX
CategoryAutomobile Accessories
LanguageEnglish

Summary

Parts List

Tools and Supplies

Installation

Positioning Roof Box on Crossbars

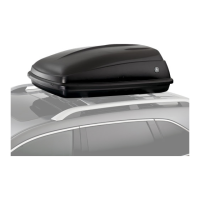
Assist in placing the roof box on crossbars and check for tailgate interference.

Attaching Plates to Crossbars

Slide plates to align holes with mounting locations on the front crossbar.

Sealing Unused Mounting Holes

Apply adhesive seals to unused mounting holes to prevent water entry.

Attaching Pads to Brackets and Plates

Clean brackets and plates, then attach small and large pads using adhesive.

Securing Brackets and Plates

Insert bolts through bracket B, plate, and into the roof box bottom.

Installing Brackets A and Knobs

Fit Bracket A over bolt threads, add washer, and loosely install knob.

Repeating Mounting Point Installation

Repeat steps for securing brackets and installing knobs at remaining points.

Final Box Placement and Securing

Place box on crossbars, adjust spacing, and tighten knobs and bolts.

Inserting and Attaching Straps

Insert straps through eyelets in bracket A and attach each strap together.

Loading the Roof Box

Use and Care

Unlocking and Locking the Roof Box

Instructions for unlocking the roof box lid using the key and center button.

Related product manuals