EasyManua.ls Logo

AcuRite 13024A1 - User Manual

AcuRite 13024A1
12 pages
Print Icon
To Next Page IconTo Next Page
Loading...
Instruction Manual
SAVE THIS MANUAL FOR FUTURE REFERENCE.
Questions? Contact Customer Support at
(877) 221-1252 or visit www.AcuRite.com.
CONTENTS
Unpacking Instructions ........... 2
Package Contents .................. 2
Product Registration ............... 2
Features & Benets ................. 3
Clock Setup ........................... 5
Atomic Clock ......................... 6
Set the Time & Date ............... 6
Placement Guidelines ............. 7
Using the Clock...................... 8
USB Charging ........................ 8
Troubleshooting ..................... 9
Care & Maintenance .............10
Specications ........................ 10
FCC Information ...................10
Customer Support ................. 11
Warranty..............................11
Atomic Dual Alarm Clock
model 13024A1
Question and Answer IconNeed help?

Do you have a question about the AcuRite 13024A1 and is the answer not in the manual?

Overview

The AcuRite Atomic Dual Alarm Clock, model 13024A1, is a radio-controlled alarm clock designed to provide accurate timekeeping, dual alarm functionality, and indoor temperature display. It features an atomic clock that synchronizes with the National Institute of Standards and Technology (NIST) Radio Station WWVB, located near Fort Collins, Colorado, ensuring split-second accuracy and automatic updates for Daylight Saving Time.

Function Description:

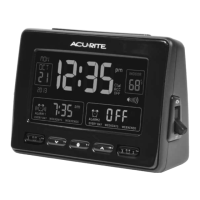
The primary function of the device is to serve as an alarm clock with atomic time synchronization. It includes two independent alarms, each configurable for "EVERY DAY," "WEEKDAYS," or "WEEKENDS" operation. The clock displays the current time (hour, minute, AM/PM), date (month, day, year), and indoor temperature in either Fahrenheit or Celsius. An atomic signal strength indicator shows the reception quality of the WWVB signal. The device also features a USB charging port for compatible mobile devices, providing a maximum output of 5V 1A (1000mA).

Important Technical Specifications:

  • Temperature Range: 32°F to 122°F (0°C to 50°C)
  • Power: 5V power adapter (primary); 3 x AA alkaline batteries (backup only)
  • USB Charging Output: 5V 1A (1000mA)

Usage Features:

  • Front of Clock Controls:
    • SNOOZE Button/Momentary Backlight: Activates snooze function and provides temporary backlight.
    • Alarm #1 ON/OFF Switch: Toggles Alarm 1 on or off.
    • Alarm #1 Setup Button: Enters setup mode for Alarm 1.
    • ∧, ∨ & ⚙ Buttons: Used for setup preferences (adjusting values, entering setup mode).
    • Alarm #2 Setup Button: Enters setup mode for Alarm 2.
    • Alarm #2 ON/OFF Switch: Toggles Alarm 2 on or off.
  • Back of Clock Controls:
    • +/- Brightness Button: Adjusts display brightness.
    • +/- Alarm Volume: Adjusts alarm volume.
    • USB Charging Port: For charging compatible mobile devices.
    • Power Adapter Input: Connects the 5V power adapter.
  • Bottom of Clock Controls (inside battery compartment):
    • RCC ON/OFF Switch: Controls synchronization with the atomic signal.
    • °F/°C Temperature Units: Switches between Fahrenheit and Celsius display.
    • RESET Button: Resets the unit to factory defaults.
  • Atomic Clock (RCC) Functionality:
    • Automatically searches for the atomic clock signal when the RCC button is set to ON.
    • Manual search for the atomic signal can be initiated by pressing and holding the "∧" button when RCC is ON.
    • Signal reception is typically better at night and in clear weather.
    • The atomic signal generally takes a few hours to synchronize, so manual time and date setting is recommended after initial power-on.
  • Setting Time & Date:
    • Press and hold the "⚙" button to enter SET MODE.
    • Use "∧" or "∨" buttons to adjust flashing items (press and HOLD for fast adjust).
    • Press "⚙" to save adjustments and move to the next preference.
    • Preferences set order: TIME ZONE (PST MST CST EST AST HAST AKST), AUTO DST ON/OFF, CLOCK HOUR, CLOCK MINUTE, CALENDAR MONTH, CALENDAR DATE, CALENDAR YEAR.
    • The device automatically exits SET MODE after 5 seconds of inactivity.
    • DST should be set to ON if living in an area that observes Daylight Saving Time.
  • Setting Alarm Time:
    • Slide Alarm #1 and/or Alarm #2 switch to ON.
    • Press and release the "⚙1" or "⚙2" button to enter ALARM SET MODE.
    • Use "∧" or "∨" buttons to adjust flashing items (press and HOLD for fast adjust).
    • Press "⚙1" or "⚙2" to save adjustments and move to the next preference.
    • Preferences set order: ALARM CLOCK HOUR, ALARM CLOCK MINUTE, ALARM EVERY DAY or WEEKDAYS ONLY or WEEKENDS ONLY.
    • The device automatically exits ALARM SET MODE after 5 seconds of inactivity.
  • Backlight:
    • During power adapter use, press the Snooze button for momentary 100% brightness.
    • During battery-powered use, press any button for momentary backlight.
    • The backlight may automatically turn off at 2:00 AM and 3:00 AM to acquire the atomic clock (RCC) signal.
  • USB Charging:
    • Available only when using the power adapter. Not active on battery power.
    • Users should follow their mobile device manufacturer's instructions for compatibility.

Maintenance Features:

  • Clock Care: Clean with a soft, damp cloth. Avoid caustic cleaners, abrasives, dust, dirt, and moisture. Regularly clean ventilation ports with a gentle puff of air.
  • Battery Replacement: The device uses 3 x AA alkaline batteries for backup. These should be replaced following the polarity diagram in the battery compartment.
  • Troubleshooting:
    • If the clock is too dark or hard to read:
      • Check if the power adapter is plugged in.
      • Verify batteries are correctly installed and replace if needed.
      • Increase brightness using the +/- buttons on the back.
      • Note that the backlight may turn off automatically at 2:00 AM and 3:00 AM for atomic clock signal acquisition.
      • The optimum viewing angle is slightly above the device.
      • Reset the unit using the RESET button on the bottom.
    • If the indoor temperature is inaccurate:
      • Ensure the clock is placed out of direct sunlight and away from heat sources or vents.
    • If atomic signal or time syncing problems occur:
      • Refer to http://www.nist.gov/pml/div688/grp40/radioclocks.cfm for additional troubleshooting.
  • Placement Guidelines:
    • Place in a dry area free of dirt and dust.
    • For accurate temperature, avoid direct sunlight and heat sources/vents.
    • For optimal atomic signal reception, place away from large metallic items, thick walls, metal surfaces, or other objects that may limit radio communication.
    • To prevent wireless interference, place at least 3 ft (.9 m) away from electronic devices (TV, computer, microwave, radio, etc.).

Product Registration and Warranty:

AcuRite encourages product registration online at www.AcuRite.com to receive a 1-year warranty. The warranty covers defects in material and workmanship for one year from the date of purchase. Remedy for breach of warranty is limited to repair or replacement of the defective item(s). The warranty does not cover normal wear and tear, damage from acts of nature, tampering, abuse, improper installation, shipping damage, or repairs by unauthorized personnel.

AcuRite 13024A1 Specifications

General IconGeneral
BrandAcuRite
Model13024A1
CategoryAlarm clocks
LanguageEnglish

Related product manuals