Kochs
Adler
AG
Postfach
103 + 105, D-4800 Bielefeld 1
Telefon:
(05 21) 20 97 -1
Telex:
932 759
adlr
d
Telegramme:
Adler
Bielefeld
Adjusting the bottom feed stitch length
Forward stitch only:
move
the
lever
8,
fig.
1,
in
the
slot
upwards
for
reduced stitch length,
or
downwards for increased stitch length.
The
adjustable screw 9 serves as a stop
to
find quickly any stitch length
once set.
Adjusting
the
needle feed stitch length
The
path
of
the
needle feed
foot
(the stitch length) has been pre-set
at
the
works
to
match
that
of
the
bottom
feed, in
other
words,
they
both
follow
the
same
patch
(stitch length). ·
If, for any reason, an adjustment should still become necessary proceed
as follows:
turn
the
screw
27,
fig.
1,
clockwise
to
increase
the
path (stitch length)
of
the
needle feed
foot
13,
or
anti-clockwise
to
reduce
the
path.
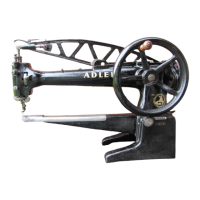
Preparation for sewing and actual operation
1.
The
voltage on
the
electricity meter must tally with
the
details given
on
the
motor
plate.
2. Plug
in
to
mains.
3.Start
the
motor
by
means
of
the
switch
on
the
front
righthand side
of
the
stand.
4.Pull
the
bobbin thread
up
while holding
the
needle
thread
and
rotat-
ing
the
handwheel once
in
a forward direction.
5. Raise
the
presser
foot
by
means of
the
lifting lever
22,
fig. 1.
6. Place
both
threads rearwards underneath
the
presser
foot.
7. Place
the
material underneath
the
presser
foot
up
to
stop
101,
fig.
1,
and lower
the
presser foot. The screw
100
will adjust
the
stop
101
according
to
the
desired distance between seam
and
edge.
The
sub-class
105-25Mo
is
mainly employed for stitching
the
,original mocassin'.
The
production
of
this mocassin requires
the
use
of
two
different sewing machine sub-classes, namely
105-25MO
and
105RM-25/SP
75.
The
105RM-25/SP
75
being used during
the
first operating stage, we recommend studying
the
leaflet
published in respect of this sub-class concerning
the
stitching
of
the
,original mocassin'.
When stitching
the
so-calles 'imitation mocassin' which can be pro-
duced as a mocassin with turned-<lown bead seam
or
as a
bound
mocassin,
the
following points have
te
be
observed:
Mocassin with turned-down bead
seam
(fig.
5).
Two operating stages are required.
In
the
first,
the
previously skived insert
is
stitched,
at
a distance
of
3
mm,
to
the
sank edge, by means
of
a flat-bed sewing machine
or
a
post
type
sewing machine (Adler
67
or
68).
The
material is placed underneath
the
presser
foot
which
is
then
lowered.
In
the
second operating stage,
the
insert (on
the
105-25MO)
is
turned
and stitched
into
a beaded seam with
the
aid
of
the
guide
101, fig. 2. Screw
100
will adjust
the
guide 101 according
to
the
desired distance between seam and edge.
It
is
important
that
the· beaded seam· should cover
the
first seam.
Thick ornamental
thread
or
Ritza
1.0-1.2
mm is
to
be used.
Point
8
shows
you
how
to
operate
the
sewing machine.
Bound
mocassin
Pass
the
tape
coming from the
tape
reel
into
the
binder
103,
fig.
4,
and
at
a right angle underneath
the
needle, with
the
presser
foot
raised.
The
material
to
be
bound
is
conveniently placed between
the
tape underneath
the
needle. Screw 102 will adjust
the
tape
binder as
required.
Lower
the
presser foot.
8.Depress
the
pedal. The machine will
now
start
stitching.
The further
the
pedal
is
depressed,
the
faster
the
sewing speed
of
the
machine.
Check
the
direction
of
rotation of
the
machine;
the
handwheel
should
rotate
towards
the
operator.
9.Allow
the
machine
to
run
without
material only with
the
presser
foot
raised.
10
.After sewing switch
the
motor
off.
Cleaning
a11d
oiling
Proceed
as
indicated in
the
basic instructions,
but
instead
of
depressing
lever
50
(fig. 8 basic classes) slacken
the
screws taking
the
place
of
the
guide pins 53.
Anderungen vorbehalten
Printed in West Germany
GAZ.
436
105 -
lb23.1
- April
1978
Supplement au mode
d'emploi
Vu que ces sous-classes correspondent en majeure partie a l'emploi
de
base de
la
classe 105, nous avons indique ici seulement !
es
modifications
relativement
au
mode d'emploi principal. L
es
illustrations
supp
le
men-
taires se trouvent au verso de ces instructions.
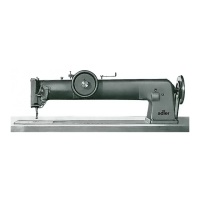
Elements de
conduite
105
MO-25
1
vis
de reglabe de
la
pression du
pied
2
Vis
de reglage de
la
longueur
de
point
pour
pied d'entraine-
ment superieur
3
Vis
de reglage
pour
elevation
du
pied
4 Ecrou
de
fixation
pour
eleva-
tion du pied
5 Cheville porte-bobine
6 Volant a main
7 Echelle de reglage
de
longueur
de
point
8 Levier de reglage de longueur
de point
pour
transport
infe-
-rieur
9 Butee reglable pour marche
avant
10
Trou
gu
ide-fil
11
Vis de fixation de l'aiguille
12 Vis de fixation
du
pi
ed
13 Pi
ed
de bische
14 Butee
15 Plaque a aiguille
16 Guide-fil
17
Vis
de fixation
pour
couve
rc
le
de la
tete
18
Tole de reglage
19
Guide-fil
20
Tension du fil
21
Cheville guide-fil
22
Levier
pour
elevation du pied
23
Levier tendeur de fil
24
Tension du f
it
Reglage
de l'elevation du pied de biche
L'elevation
du
pied de biche a
et
e reglee
de
l'usine selon
le
domaine
d'emploi de
cene
sous-classe. Si des
mat
ieres
ex
t remement minces
ou
epaisses doivent etre cousues
ii
faut
regler l'elevation
du
pied de biche
comme
suit
:
1. Regler l'elevation selon la grosseur
de
la
mat
iere a coudre.
Le
pied
de
biche
bait
s'elever au dehors de la matiere a coudre seulement de
telle maniere
que
la
matiere
peut
etre
pivotee librement.
2. Desserrer l'ecrou de fixation 4 fig. 1
en
le tournant vars
la
gauche.
3.
Tourner
la
vis
de reglage 3.
vers
la
droite
= elevation plus haute
du
pied
de
biche
vers
la
gauche=
elevation plus
petite
du
pi
ed
de biche.
4.
Serrer l'ecrou
4.
Regler la longueur de
point
de l'entrainement par la griffe
Seulement marche-avant:
Deplacer
le
levier 8 fig. 1 dans la fente.
En
haut
= longueur de point plus
pet
i
te
En
bas=
longeueur de point plus grande.
Pour trouver plus rapidement une certaine longueur
de
point
reglee, la
vis reglable 9
peut
etre
utilisee cilmme butee.
Regler la longueur de point du pied d'entrainement superieur
L'avancement
du
pied
d'entrainement
superieur
ou
bien
la
longueur de
point
ant
ete
adaptes par l'usine a l
'entrainement
par
1-!__griffl\c
c. a
d.
taus
Jes
deux
executent
le
meme avancement (longueur de point). Si
pour quelques raisons un reglage est indispensable
ii
faut
proceder
comme
suit:
Tourner
la vis 2 fig. 1
vers
la
droite = avance
ment
plus grand (longueur
de
point)
du
pied
d'entrainement
superieur 13
vers
la
gauche = avancement plus
pet
it
Preparatifs precedant
le
piquage
et
piquage
1.S'assurer
que
la tension (volt) indiquee
sur
le
compteur corre
sp
ond
aux indications de
la
plaque du moteur.
2.Brancher
la
fiche du cable d'alimentation a pla prise de courant
du
reseau.
3.Mettre
en circuit le
moteur
par l'interru
pteur
(a droite de
la
table).
4.
Faire venir
le
fil
de
canene
(retenir
le
fil
d'aiguille
et
tourner
le
volant a main
d'un
tour
en
avant).
5.
El
ever le pied de biche
moyennant
le
le
vier coude
22,
fig. 1.
6. Tirer
les
deux
fils
en
arriere sous
le
pied de biche.
7.Placer la matiere a coudre jusqu'a
la
but
ee 101 fig. 2 sous le pied
de
biche
et
abaisser le pied de biche. Selan la distance desiree
entre
la
piqure
et
le
bard,
la
butee 101 peut etre reglee relativement moyen-
nant
la
vis
100
.
La
sous-cl.11sse
105
MO-25
est
utilisee particu
li
erement
pour
la
fabri-
cation des mocassins originaux. Pour la fabrication de ce mocassin,
deux
diverses machines a
coud
re
la
classe 105 Mo-25
et
la
classe
105RM-25/SP
75
doivent
etre
utilisees.
 Loading...