Adjusting
the
stitch length
Increased stitch length:
1. Loosen
the
wing screw
15,
fig. 9.
2. Lower
the
slide ) 2.
3.
Tighten
the
wing screw
15.
Reduced stitch length:
1. Loosen
the
wing screw
15,
fig. 9.
2.
Lift
the
slide 12.
3.
Tighten
the
wing screw 15.
Adjustment
of
the
reverse
stitch
is,
in
this case, replaced
by
the
universal feed device which
is
governed by rotating
the
wing
handle
13.
Adjusting
the
sewing
foot
pressure
High pressure:
1. Loosen the
counter
nut
56, fig. 4.
2.
Turn
the
screw 57 clockwise.
3.
Tighten
the
counter
nut.
Low pressure:
1.
Loosen
the
counter
nut
56.
2.
Turn
the
screw 57 counter-clockwise
3.
Tighten
the
counter-nut.
a Adjusting the sewing
foot
lift
Adjust
the
sewing
foot
lift according
to
the
thickness
of
the
material
to
be
sewn.
1. Loosen
the
screw
102,
fig.
4.
2. Displace
the
lift adjusting clamp
69
on
the
leaf spring 59.
The
further
the
clamp
is
moved
to
the
left,
the
higher
is
the
presser
foot
I ift.
3.
Tighten
the
screw 102.
Adjusting the thread take-up lever
The
thread
take-up lever has been adjusted in
the
factory
for stan-
d&rd sewing material. When processing
extremely
thick
or
thin
material
the
thread
take-up lever must be adjusted accordingly.
1. Loosen
the
screw
3,
fig. 1, and set
the
pointer
on
the
scale 4
accordingly.
thin
=
for
2
mm
thick
material
medium
= for 5
mm
thick
material
thick
for 8
mm
thick
material.
Each division on
the
scale corresponds
to
a material thickness
of
1
mm.
2.
Tighten
the screw
3.
3.
Ensure
that,
when adjusting
the
take-up lever,
the
thread
is
not
tensioned
when
the
needle
point
enters
the
material.
Preparation for sewing and sewing
Foot-operated
machine:
1. Pull
up
the bobbin
thread.
While doing this,
hold
fast
the
needle
thread
and
rotate
the
handwheef
7,
fig.
1,
clockwise (the locking
button
6
must
have
snapped,
so
that
the
sewing mechanism follows
the
rotation
of
the
handwheel).
2. Lift
the
sewing
foot
10
by
the
lever 14.
3.
Place
both
threads
to
the
rear blow
the
sewing
foot.
4.
Place
the
material
underneath
the
sewing
foot
and
lower
the
sewing
foot
by
the
lifting lever 14.
5.
Put
the
sewing machine
into
motion
by
the
handwheel
and,
at
the
same
time,
place
both
feet on
the
pedal
and
start
sewing
by
operating
the
pedal in a regular manner.
If
you
are
not
used
to
operate
the
pedal, we recommend
that
you
practise
for a while with
the
sewing mechanism
cut
out.
6.
Never push
or
pull
the
material
to
be sewn.
7. Changing
the
direction
of
sewing by rotating
the
double-sided
wing_handle
13.
This
should
be
done
only
while
the
feeding
foot
does
not
press
onto
the
material (so as
not
to
damage
the
surface
of
the
sew-
ing material).
The
wing handle can be locked in position
by
the
screw
61 (constant direction of sewing).
8.
Operate
the
machine
without
fabric
only
if
the
sewing
foot
is
lifted.
Foot and motor-operated machine:
1.
The
voltage
on
the
current
meter
should
coincide with
the
de-
tails
on
the
motor
plate.
2. Plug
supply
llne Into mains.
3.
Hang
out
the
flywheel
tie
rod by loosening
the
screw.
(For
pedal
operation
the
motor
tie rod must be disengaged.)
4.
Pull
up
the
bobbin
thread
(hold fast
the
needle
thread
and
turn
the
handwheel
once
clockwise).
5.
Lift
the
sewing
foot
10
by
the
lever
14,
fig. 1.
6.
Place
both
threads
towards
the
rear
underneath
the
sewing
foot.
7. Place material
under
the
sewing
foot
and
lower
the
latter
by
the
lever 14.
8.
Lower
the
pedal.
The
machine will
start
sewing.
The
further
the
pedal
is
lowered,
the
fast
the
machine will sew.
Never push
or
pull
the
material
to
be sewn.
9. Changing
the
direction of sewing by rotating
the
double-sided
wing handle
13.
This should be
done
only
while
the
feeding
foot
does
not
press
onto
the
material (so as
not
to
damage
the
surface of
the
sew-
ing material).
The
wing handle
can
be locked
in
position by
the
screw
61,
fig. 1
(constant
direction of sewing).
10. Allow
the
machine
to
run
without
any
material only with
the
sewing
foot
lifter.
11.
After
sewing, switch
off
the
motor.
Adjusting the thread tension
1. Check
the
seam
after
having sewn a
short
distance.
2.
Fig. 8 (stitch
type)
above
correct
interlocking of threads
centre
needle
thread
tension insufficient
or
bobbin
thread
tension
excessive
below needle
thread
tension excessive
or
bobbin
thread
tension
insufficient
3.
Adjust
the
needle
thread
tension by
the
nut
103,
fig.
4:
For
reducing
the
tension
=
turn
the
nut
103
clockwise.
For
increasing
the
tension=
turn
the
nut
103
counter-clock-
wise.
4.
If
possible,
do
not
change
the
bobbin
thread
tension.
Should
this, however,
become
necessary, regulate
it
by
the
screw
62,
fig.
6.
For
increasing
the
tension=
turn
the
screw
62
clockwise.
For
reducing
the
tension=
turn
the
screw
62
counter-clockwise.
Cleaning and oiling
1.
After
a longer
period
of
use
or
standstill
the
sewing machine
must
be cleaned (see also "cleaning
and
oiling"
above).
2. Before oiling, apply a small
amount
of
paraffin
to
the
poinds
indicated.
3.
Operate
the
machine for a
short
while with
the
foot
lifted.
4.
Wipe
off
any
dirt
and
oil
the
machine.
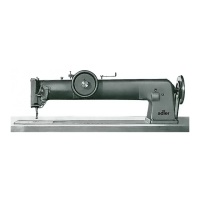
Use
of
fit-on table
In
order
to
be able
to
carry
out
"flat"
work
on
the
Adler
30,
a
fit-on table can
be supplied. This
wooden
table
is
fitted
over
the
lower arm in
front
and
hooked
into
the
lugs provided for
the
purpose
on
the
lower arm. Swing
out
the
table
support
and
in-
sert
into
the
hole
the
stand
plate.
Use
of
the tape binder
1. Unscrew
the
normal
throat
plate.
2. Screw-on
the
throat
plate
63,
fig.
10,
which
is
provided with
tape
guide pins.
3.
Secure
the
tape
guide worm
64
by
the
screw
65
in such a
manner
that
the
throat
plate lug
66
locates
in
the
groove of
the
fastening
pl
ate.
4.
The
front
edge of
the
worm 64
should
be flush with
the
edge
67
of
the
needle hole.
5. Unscrew
the
standard
sewing
foot.
6.
Screw-on
the
special sewing
foot
in such a
manner
that
the
lower
part
situates itself
under
the
throat
plate
trunnion
and
that
the
trunnion
locates itself between
the
guiding pins.
8.
Place
the
tape
reel between
the
disks
and
tighten
the
tension-
ing
nut
so
that
the
tape
is
slightly tensioned.
9. Pass
the
tape
(slightly
taper
the
leading edge)
through
the
pins
68,
through
the
worm
64
and
between
the
upper
and
lower section
of
the
sewing
foot.
10.
Push
the
material
to
be
bound
between
the
worm shoulders
and
thus
between
the
binding
tape,
the
inner edge
of
the
worm
serving as a
stop
to
ensure
an
even infeed of
the
material.
11.
The
tape
width
should
be
adapted
to
the
worm, i.e.
it
must
not
be wider
than
the
worm permits. It is,
therefore,
necessa-
ry
to
use a
different
worm
for
each
tape
width.
General indications
Should
you
have
any
queries, please
demand
the
visit of an agent
or
of
a consulting engineer.
If
your
questions are
directed
to
the
factory,
please specify:
1 . The
date
of del Ivery
2.
The
class designation
3.
The
machine head
number
From the Library of Superior Sewing Machine & Supply LLC
 Loading...