English
36
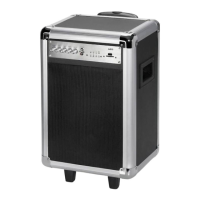
Side
17 USB CHARGING port
18 DC-12 V IN input
19 AC/DC POWER mains switch
a DC ON (12 V operation)
b OFF (Off)
c AC ON (mains operation)
20 AC INPUT mains cable connector
Carrying handles (not shown)
Rear (not shown)
Extendablehandle
Delivery scope (not shown)
2x Microphone
1x 12Vcaradaptercable
1x Mainscable
First Use of the Device/Introduction
• Selectaproperplaceforthedevice.Adry,level,andslip
proof surface is suitable.
• Makesurethedeviceisventilatedsufciently!
• Removetheprotectivelmfromthedevice,ifpresent.
Power supply
1. Make sure the grid voltage corresponds to the specifica-
tions on the rating plate.
2. Connect the provided mains cable to the AC INPUT con-
nector (20) on the side of the device.
3. Insert the mains plug to a properly installed socket.
4. Set the mains switch to “AC ON” position (19c).
NOTE:
Disconnect from mains power supply during longer periods
of non-use.
Operation via 12 V car adapter
The 12 V cigarette lighter adapter is suitable for cars that
feature a 12 V power supply with negative grounding.
1. Connect the provided car adapter cable to the DC-12 V
IN input (18) on the side of the device.
2. Connect the other end of the cable to the cigarette
lighter receptacle in your car.
3. Set the mains switch to “DC ON” position (19a).
4. Disconnect the 12 V adapter from the device and ciga-
rette lighter receptacle after use.
CAUTION:
• Onlyusethecaradaptercableprovided.
• Usetheprovidedcaradaptercableforthisdeviceonly.
Do not use for other devices.
• Donotusethedevicewhiledriving.Makesurethe
device is securely attached or stored away in order not
to fall inside the vehicle in case of an accident.
USB CHARGING port (17)
Use the port on the side of the device to charge your smart-
phone. When operated via mains cable, the device supplies
5 V/1 A. Use the USB cable of your smartphone for the con-
nection.
NOTE:
• Duetothevarietyofsmartphonetypesavailableand
their different charging capacity, the charging time
depends on the smartphone used and its operating
condition.
• Thisportisnotsuitableforplayingaudioles.
Battery operation
It is possible to operate this device with the built-in battery.
General information
• Chargethebatterycompletelybeforeyouuseittooper-
ate the device.
• Avoidfullydischargingthebattery.
• Chargethebatterycompletelyaftereachuse.
• WhentheBATindicatorlamp(1)startsashing,thebat-
tery must be recharged.
Charging the battery
1. Connect the mains cable provided to the AC INPUT con-
nector (20) on the side of the device.
2. Connect the mains plug to a properly installed socket.
3. Set the mains switch to “AC ON” position (19c).
Depending on the battery’s capacity charging can take up to
11 hours.
CAUTION:
Never leave the device unattended during charging.
NOTE:
• Thebatterycanonlybechargedwhenthespeakeris
switched on.
• Ifyoudonotusethedeviceforalongerperiodoftime,
you should charge the battery at least once every 3
months. Even when switched off, the battery discharges
continuously.
• Whenthebatteryisalmostempty,theBATindicator
lamp will start flashing. The battery requires recharging.
• Ifthebatteryhasbeendischargedcompletely,the
device cannot be recharged via mains socket. In such a
case, recharge the battery using the DC-12 V IN input
(18). Even when switched off (mains switch at OFF posi-
tion) the battery can be charged via this input.
Operation
AC/DC POWER mains switch (19)
Use the switch to select one of the following operating
modes:
 Loading...