Do you have a question about the Aeon Labs Aeotec Smart Switch 7 and is the answer not in the manual?
Details the process of adding devices via SmartStart scanning.
Overview of the Aeotec Smart Switch 7 capabilities like power metering and S2 Security.
Instructions on how to include a device and reset it to factory defaults.
Step-by-step guide for adding and removing devices from a Z-Wave network.
Explains device behavior based on button presses and LED feedback.
Hints for resolving common network installation problems.
Describes how devices control each other via association groups.
Configures automatic switch-off for overload and over-current conditions.
Defines switch reaction to alarms, including LED blinking and control lockout.
Configures which alarms the switch reacts to using a bit field.
Specifies methods for disabling alarms, like button taps or duration.
Sets the amount of blinks per second for LED indicators during alarms.
Determines the switch's behavior after a power interruption.
Configures commands sent via Lifeline when the switch state changes.
Sets the power threshold (W) that triggers automatic reports.
Configures which meter readings (power, voltage, etc.) are reported.
Defines the time interval for sending meter reports.
Lists physical characteristics like dimensions and weight.
Details the Z-Wave version, certification ID, and product ID.
Lists the Z-Wave command classes supported by the device.
Explains the roles of controllers and slaves in a Z-Wave network.
Defines key Z-Wave processes like adding, removing, and linking devices.
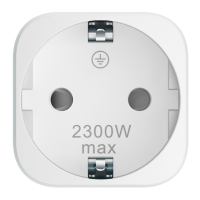
The Aeotec Smart Switch 7 (ZW175) is a secure On/Off Power Switch designed for use in Europe, offering a blend of elegant appearance, small size, and ease of use within a Z-Wave network. This smart plug supports Security 2 Command Class, ensuring enhanced security when paired with an S2-enabled controller. It can be seamlessly integrated into any Z-Wave network and operated alongside other Z-Wave certified devices from various manufacturers.
The Smart Switch 7 functions primarily as an On/Off Power Switch, allowing users to remotely control the power supply to connected appliances. Beyond simple switching, it incorporates a comprehensive power metering function, providing high measurement accuracy for detailed insights into the power consumption of the connected load. This feature helps users monitor and manage their energy usage effectively.
The device is equipped with advanced protection mechanisms, including over-current, over-load, and over-heat protection. These safeguards enhance the safety and reliability of the connected appliances by automatically cutting off power if predefined thresholds are exceeded. This proactive protection helps prevent damage to both the switch and the connected devices.
For enhanced user experience, the Smart Switch 7 includes a Night Light Mode, designed to reduce light pollution by adjusting the indicator light's behavior. It also supports scene personalization, allowing users to integrate the switch into various smart home scenarios for automated control based on specific events or schedules. The inclusion of S2 Security and SmartStart further simplifies the inclusion process and strengthens the overall security of the Z-Wave network.
SmartStart Inclusion: The Smart Switch 7 simplifies the inclusion process through SmartStart. Users can add the device to a Z-Wave network by scanning the QR Code on the product or its packaging with a SmartStart-enabled controller. Once powered on within the network vicinity, the product will automatically be added within 10 minutes. The indicator light provides visual feedback during this process:
Manual Inclusion/Exclusion: For networks without SmartStart, the device can be manually included or excluded.
Load Control: The device allows control of the connected load. A single tap or click of the Action Button will toggle the load state, with the LED indicator following the load control state (configurable).
Pair Mode: Pressing the Action Button twice slowly will enter pair mode. The LED will flash blue quickly, then red after the first click, and orange after the second click. If the device is paired, the LED will turn green.
Unpair Mode: Pressing the Action Button twice quickly will enter unpair mode, indicated by the LED turning purple after the two presses.
Alarm Response Control: Pressing the Action Button three times will disable the Alarm Response function.
LED Display Mode Toggle: Pressing and holding the Action Button for 2 to 5 seconds will toggle the LED display mode when the Smart Switch 7 is paired. The LED will stop flashing, and a yellow LED will indicate the change. In "Enabled" mode, the LED follows the ON/OFF state; in "Disabled" mode, the LED is off.
Communication Quality Test: Pressing and holding the Action Button for 5 to 10 seconds initiates a communication quality test. The Indicator Light will turn cyan when pressed and quickly flash cyan when released, signaling the start of the test between the product and Node 1. Upon completion, the Indicator Light will display a color corresponding to the communication quality: green for good, yellow for general, and red for poor.
Overload Alarm Reset: Pressing and holding the Action Button for 10 to 15 seconds will reset the overload alarm and over-current alarm.
Factory Reset (Partial): Pressing and holding the Action Button for 15 to 20 seconds will reset all settings back to default while keeping the device in the Z-Wave network. The red LED will flash faster during this process.
Complete Factory Reset: Pressing and holding the Action Button for 20 seconds or more will perform a complete factory reset, removing the device from the Z-Wave network. The LED will breathe blue, indicating a successful reset.
Configuration Parameters: The Smart Switch 7 offers extensive configuration parameters to customize its functionality beyond its default settings. These parameters allow users to adapt the device to specific needs and unlock enhanced features. Examples include:
Factory Reset or Initialization (Parameter 255): This write-only parameter allows for a complete factory reset, restoring the product to its factory settings and removing it from the network, or initializing all configuration parameters to their default values.
The Aeotec Smart Switch 7 is designed to provide a robust, secure, and flexible solution for smart home power control, with features aimed at both convenience and energy management.
| Category | Switch |
|---|---|
| Protocol | Z-Wave |
| Model | Aeotec Smart Switch 7 |
| Max Load | 15A |
| Operating Temperature | 0°C to 40°C / 32°F to 104°F |
| Operating Humidity | 8% to 80% |
| Wireless Range | Up to 150 meters / 492 feet outdoors. |
| Z-Wave Chip | Z-Wave Plus |
| Certifications | FCC, CE |