The Pilot is a based loosely on a modern 20 m pilot vessel. Boats of this kind are encountered along the Baltic and North
Sea coasts, and are very fast - around 25 - 30 kn - and manoeuvrable. Their task is to transport pilots safely to the great
ocean giants, regardless of the weather. The area aft of the control stand provides space for several pilots, so that a single
trip can carry all of them to their workplaces. Most of the typical characteristics and handling of these vessels have been
incorporated in our model, which is equally fast and agile, since it is based on a modern planing hull. The boat is powered
by two electric motors, and steered by means of a dual-rudder system.
The boat features a fully-fitted wheelhouse, while the etched parts for the instrument panel allow many of the instruments
to be illuminated. 3 mm LEDs can be fitted to all the model's lamps. The two bow searchlights are very powerful, and
combine with the vessel's black rubbing strake to provide a distinctive appearance. The main searchlight is assembled from
etched parts and is fully articulated. The reflector and the LEDs are carefully matched to each other, giving a tremendously
powerful, concentrated beam of light. Additional working systems can also be added to the model at the builder's discretion,
as the hull provides ample space for additional auxiliary functions such as bow thruster, lighting system or sound generator.
You will find a brief overview of marine lighting systems at the end of these instructions, together with information on simple
methods of lighting the model.
Specification
Scale 1 : 25
Length 715 mm
Beam 200 mm
Weight 2400 - 3000 g
Introduction:
The model should be assembled following the sequence of the part numbers, as described in these instructions.
You will find part numbers on the laser-cut components. It may be necessary to use a thin modelling knife to release the
laser-cut parts: cut through the small lugs which hold them in their sheets. Check that all components fit accurately before
reaching for the glue, and carry out any minor trimming required. Allow all glued joints to dry out fully before starting the
next stage of construction. We recommend UHU plast spezial or Ruderer adhesive for joints involving the hull; both set
quickly.
Recommended power system (not included in the set)
Motor 2 x Race 400 / 7.2 V Order No. 7000/40
with six sub-C cells or 2S LiPo
Propeller 3-blade, 30 mm Ø, M4 Order No. 7166/01, 7166/02
Speed controller 1 x Multi 40 Truck Plus Order No. 7019/73 or
Speed controller 2 x Multi 25 Order No. 7019/71
Servo Standard size
Materials and tools required (not included in the set)
Adhesives:
ABS - ABS UHU plast spezial 7632/06 or
ABS - ABS Ruderer L530 7646/42
ABS - metal Cyano-acrylate, medium 7646/52
ABS - metal Stabilit express 7646/01
ABS - glazing Canopy glue or solvent-free adhesive
ABS - etched parts Canopy glue or solvent-free adhesive
Modelling knife Balsa knife 8188/00
Abrasive paper 100 - 150 grit
Soldering iron min. 60 W
Building instructions
Hull
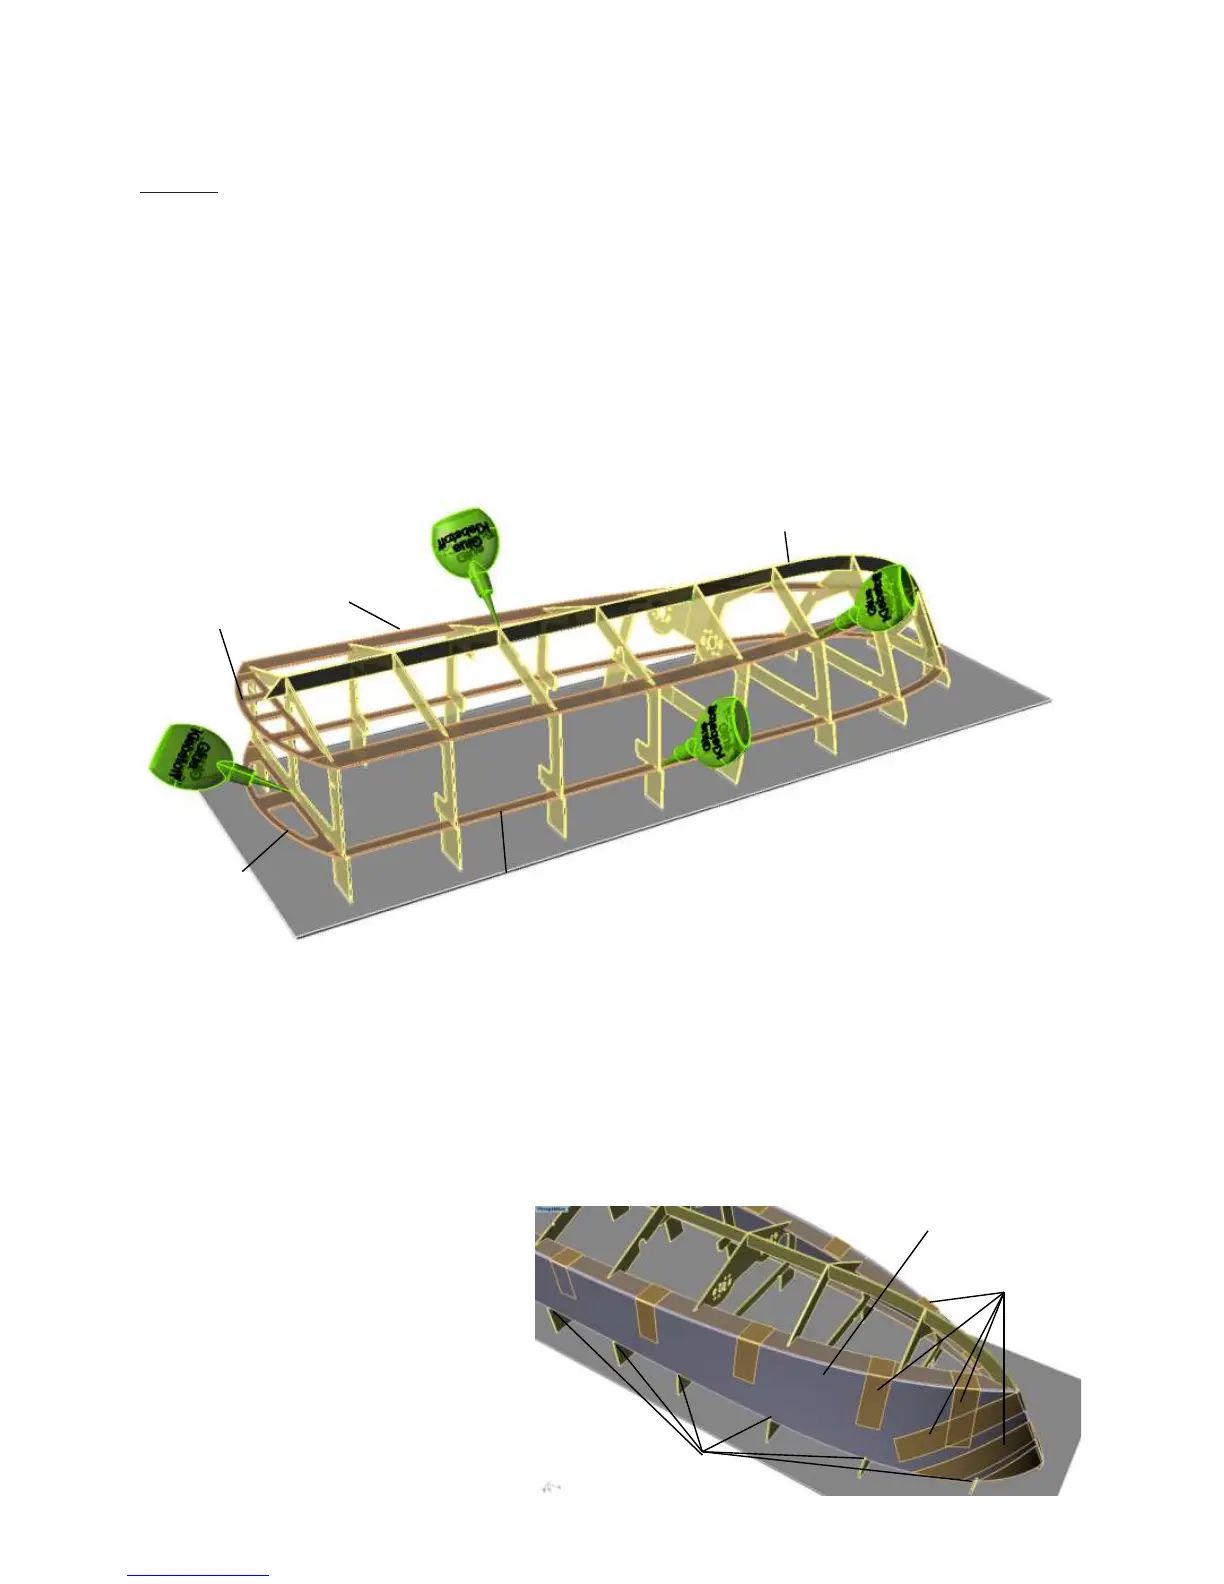
Fit the keel 9 into frames 1 - 8 and glue the joints.
Insert the chine stringers 10 in the sides of the frames and glue them in place. Twist the deck stringers 11 into the
frame notches from above, starting with frame 8 at the bow (front); you will need to exert slight pressure.
Glue the lower stern former 12 to frame 1 between the chine stringers 10, then glue the upper stern former 13 to frame
1 between the deck stringers 11.
Bevel the front inside edge of the two hull sides 14 at an angle of about 30°. Join the panels using adhesive tape and
insert them in the frame lugs as shown.
glue strip
Frame lugs
14
Fig. 2
A certain amount of sanding at an angle is required on the laser-cut parts and some sub-assemblies, since the laser
can only cut at an angle of 90°. Please use a fine file or a sanding block with abrasive paper glued to it for this
purpose.
Important:
Before you remove the components from the ABS sheets we recommend that you sand away the excess material
along the cut lines on the back; this makes it easier to remove the parts. A useful sanding block consists of a flat piece
of wood of an easily handled size, with 120-grit abrasive paper stuck to it. Sand in a circular pattern in order to avoid
scratches. Any adhesive tape residues can easily be removed with lighter fluid on a piece of paper towel. If you need
to smooth out Stabilit express or remove it while still soft, use methylated spirit ('meths') on a cloth.
10
9
13
7
6
5
4
3
2
1
Fig. 1
8
0
11
12
 Loading...