TM
8-10
YRS
INSTRUCTION GUIDE
Contents:
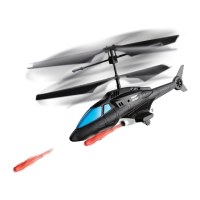
1 Air Hogs
®
Jet
1 Controller/Charger
2 Spare Propellers
(left and right)
1 Instruction Guide
Air Hogs
®
, related trademarks and © 2011 Spin Master Ltd. All rights
reserved. This product conforms to safety requirements of ASTM
F-963, EN-71 & CHPA. • Please retain this information for future
reference. • Please remove all packaging materials before giving to
children. • An adult should periodically check this toy to ensure no
damage or hazards exist, if so, remove from use. • Children should
be supervised during play. • Keep addresses and phone numbers
for future reference. • The item inside this package may vary from
the photographs and/or illustrations. MADE IN CHINA.
20043697 GTL English REV 1
T44398_0009_20043697_GTL_IS_R2
SPIN MASTER LTD., 450 FRONT STREET WEST, TORONTO,
ON M5V 1B6 CANADA
Customer Care: 1-800-622-8339 Fax: 416-364-8005
Email: customercare@spinmaster.com
Spin Master Inc., PMB #10053, 300 International Drive, Suite 100,
Williamsville, NY 14221, USA
Imported into EU by:
SPIN MASTER INTERNATIONAL, S.A.R.L.,
16 AVENUE PASTEUR, L-2310, LUXEMBOURG
www.spinmaster.com
BATTERY SAFETY INFORMATION:
• Requires 6 x 1.5-V AA batteries (not included).
• Batteries are small objects.
• Replacement of batteries must be done by adults.
• Follow the polarity (+/-) diagram in the battery
compartment.
• Promptly remove dead batteries from the toy.
• Dispose of used batteries properly.
• Remove batteries for prolonged storage.
• Only batteries of the same or equivalent type as
recommended are to be used.
• DO NOT incinerate used batteries.
• DO NOT dispose of batteries in fire, as batteries may
explode or leak.
• DO NOT mix old and new batteries or types of batteries
(i.e. alkaline/standard).
• DO NOT use rechargeable batteries.
• DO NOT recharge non-rechargeable batteries.
• DO NOT short-circuit the supply terminals.
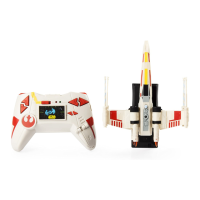
Your Air Hogs
®
Jet Set™ is equipped with a
Lithium Polymer battery.
SPECIAL LiPO BATTERY INSTRUCTIONS:
• Never charge battery unattended.
• Charge battery in isolated area. Keep away from flammable materials.
• Do not expose to direct sunlight.
• There is a risk of the batteries exploding, overheating, or igniting.
Do not disassemble, modify heat, or short circuit the batteries.
Do not place them in fires or leave them in hot places.
• Do not drop or subject to strong impacts.
• Do not allow the batteries to get wet.
• Only charge the batteries with the specified Spin Master™
battery charger.
• Only use the batteries in the device specified by Spin Master™.
• Carefully read the instruction guide, and use the batteries correctly.
• In the unlikely event of leakage or explosion use sand or a chemical
fire extinguisher for the battery.
• Batteries must be recycled or disposed of properly.
PRODUCT BATTERY REMOVAL INSTRUCTIONS: Internal battery is factory installed, product disassembly and battery removal must
be performed by an adult. Do not use any tools for disassembly. Pulling, tearing, and deforming of the product during disassembly,
while necessary, should be as limited as possible. Do not compress the product at any time. Ensure product is turned off. Find a
point where the two body halves meet; the nose of the aircraft or where the wing meets the body. Start to peel the halves apart,
separating them where they are glued together; remove any tape as necessary. Separate product body halves to expose internal
electronics. To separate battery from product use scissors to cut a single battery wire, immediately wrap the cut wire end with tape
to isolate it, repeat until all battery wires are cut and isolated. Dispose of battery in accordance with your local battery recycling or
disposal laws. NOTE: Opening of product and/or removal of battery will render product inoperative and voids manufacturer
warranties, dispose of remaining product components in accordance with local laws.
4 1
2 3
FCC Statement: This device complies with Part 15 of the FCC rules. Operation is subject to the following two conditions: (1) This
device may not cause harmful interference, and (2) This device must accept any interference received, including interference that
may cause undesirable operation. This equipment has been tested and found to comply with the limits for Class B digital devices
pursuant to Part 15 of the FCC rules. These limits are designed to provide reasonable protection against harmful interference to
radio communications. This equipment generates, uses and can radiate radio frequency energy and, if not installed and used in
accordance with the instruction, may cause harmful interference to radio communication. However, there is no guarantee that
interference will not occur in a particular installation. If this toy does cause interference to radio or television reception (you can
check this by turning the toy off and on while listening for the interference), one or more of the following measures may be useful:
• Reorient or relocate the receiving antenna • Increase the separation between the toy and the radio or the TV • Consult the dealer or
an experienced TV-radio technician for help. NOTE: Changes, adjustments or modifications to this unit, including but not limited to,
replacement of any transmitter component (crystal, semiconductor, etc.) could result in a violation of FCC rules under part 15
and/or 95 and must be expressly approved by Spin Master Ltd. or they could void the user’s authority to operate the equipment.
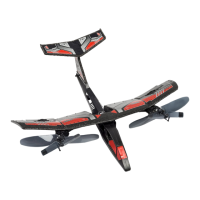
Experience radio-controlled flight with the Air Hogs
®
Jet Set™! The Jet Set™ makes flying fun
& easy! Just choose the direction you want to fly and move the controller throttle stick. The
ultra-light Jet Set™ is powered by a lithium polymer battery for long flights, features precision
speed control and damage-
resistant foam. The Jet Set™
also includes an integrated
controller/charger unit for
convenient portability and
easy handling on the field.
Perfect for outdoor flights.
Controller/Charger
Antenna
Throttle
Stick
(Speed
Control)
Power Indicator
Direction Stick
(LEFT/RIGHT)
Charging Indicator
Steering Trim Knob
Power Switch
(ON/OFF/CHG)
Charge
Rod
HOW TO INSTALL YOUR BATTERIES
CONTROLLING JET FLIGHT
TRIMMING YOUR JET
HOW TO CHARGE YOUR JET SET™
PRE-FLIGHT ENVIRONMENT CHECK
TROUBLESHOOTING
IMPORTANT CHARGING INFORMATION
• Before taking your initial flight, charge the plane for a complete charge cycle on your charger.
• Depending upon the length of future play, you will not need to complete a full charge before each flight.
NOTE: A shortened charge results in a shorter playtime (may take up to 1/2 hour to fully charge).
For best performance, use new batteries only and let motor cool for 10-15 minutes between charges.
1. Location – Fly in a large wide-open, grassy location that is free of buildings, trees, overhead wires, and other
obstructions. Do not fly near people or animals.
2. Weather – Fly on mild, sunny days. Do not fly in electrical storms, rain, sleet, snow or other adverse weather
conditions. Do not fly if the temperature is below 7°C/45°F. In very cold temperatures, the plane will become fragile
and the engine performance will decrease.
3. Wind Conditions – Do not fly in strong wind. Strong winds may overpower the jet and make it difficult to control.
In windy conditions, it may appear as though you have no control over the jet.
pic.1pic.1 pic.2pic.2 pic.3pic.3
1. Set the switch on the
jet to OFF.
2. Set the controller/
charger switch to CHG.
3. Insert charge rod of
controller/charger into
charge plug of jet
aligning jet with charger
as shown.
4. The charging LED will
flash. When charging is
complete, both charge and
power indicators will flash
concurrently. Remove jet
from controller/charger.
1. Fully extend controller/
charger antenna.
3. Power indicator will
light up.
If the wings on
your jet get
damaged they can
be easily repaired
with clear tape as
shown.
5. When launching the jet, use
partial throttle. Refrain from
using the directional stick at
initial launch. Launch the jet into
the wind and parallel to the
ground. When preparing for take
off, check the direction of the
wind. Always launch your plane
into the wind for the best take
off and flight results.
2. Set controller/
charger switch to ON.
4. Set jets switch to ON.
PROBLEM
Jet will not start or has
low power.
Jet will not turn.
Jet is flying too low.
Jet is flying too high.
Motors don’t stop
when controller/charger
turned OFF.
CAUSE
1. Jet not charged.
2. Battery power is drained.
3. Jet was not set to OFF during
charging.
4. Controller/charger was not set
to CHG while trying to charge.
1. Controller/charger is not ON.
2. Controller/charger antenna is
not extended.
3. It’s a windy day.
1. Needs more power.
2. The six AA batteries in the
controller/charger are drained.
Need to decrease power.
Radio interference from some
other source.
SOLUTION
1. Charge jet for a complete charge cycle.
2. Replace the controller/charger batteries after
approximately 8 to 10 flights.
3. The jet won’t accept a charge in the ON position.
Always set to OFF before charging.
4. The controller/charger will NOT charge in the OFF
or ON position. Always set the controller/charger to
CHG before attempting to charge.
1. Set controller/charger to ON.
2. Fully extend controller/charger antenna before flying.
3. Do not fly in strong winds. Strong windy conditions will
limit and prevent your ability to control the jet.
1. Push the throttle UP.
2. Charge jet for a complete charge cycle or, if batteries
are completely drained, replace batteries.
Pull the throttle DOWN.
Turn the switch on the plane to OFF.
NOTE: If normal function of the product is disturbed or interrupted, strong electro-magnetic interference may be causing the
issue. To reset product, turn it completely off, then turn it back on. If normal operation does not resume, move the product to
another location and try again. To ensure normal performance, change the batteries, as low batteries may not allow full function.
1. To make the jet climb, move the throttle
stick forward. Too much throttle can cause
a stall. To ACCELERATE upwards, move
the throttle stick further UP.
2. To FLY LEFT,
move the direction
stick left.
4. To LAND,
select a soft
grassy area
and pull the
throttle stick
back slowly.
If the jet turns
right involuntarily,
turn the trim knob
to the left until the
jet flies straight.
3. To FLY RIGHT,
move the direction
stick right.
If the jet turns left
involuntarily, turn
the trim knob to
the right until the
jet flies straight.
CANADIAN Class B statement: This class B digital apparatus meets all the requirements of the Canadian Interference-Causing
Equipment Regulations. This Category II radio communication device complies with Industry Canada Standard RSS-310.
FLYING INSTRUCTIONS REPAIRS
Hereby, Spin Master Ltd., declares that this
Jet Set™ is in compliance with the essential
requirements and other relevant provisions of
Directive 1999/5/EC. <http://www.airhogs.com>
Warning:
CHOKING HAZARD –
Small Parts.
BATTERY INSTALLATION – CONTROLLER/CHARGER
1. Open the battery door with a screwdriver (pic.1). 2. If used batteries are present, remove these batteries from
the unit by pulling up on one end of each battery. DO NOT remove or install batteries using sharp or metal tools.
3. Install new batteries as shown in the polarity diagram (+/-) inside the battery compartment (pic.2). 4. Replace
battery door securely (pic.3). 5. Check your local laws and regulations for correct recycling and/or battery disposal.
WARNING:
CHOKING HAZARD – Small parts.
Not for Children under 3 years.
Contains 1 x 3.7 V LiPo battery(s). Batteries or
battery packs must be recycled or disposed of
properly. When this product has reached the end
of its useful life it should not be disposed of with
other household waste. The Waste Electrical and
Electronic Equipment Regulations require it to be
separately collected so that it can be treated using the best available
recovery and recycling techniques. This will minimize the impact on the
environment and human health from soil and water contamination by any
hazardous substances, decrease the resources required to make new
products and avoid using up landfill space. Please do your part by keeping
this product out of the municipal waste stream! The “wheelie bin” symbol
means that it should be collected as “waste electrical and electronic
equipment”. You can return an old product to your retailer when you buy a
similar new one. For other options, please contact your local council.
WARNING: The antenna is not to be inserted into socket outlets.
CAUTION: Never fly near your face. Keep propeller away from
your fingers, hair, eyes and other body parts. Do not launch flying toy
at people or animals.
Carrier frequency 27.145 MHz. Field strength: 67.4dBuV/m at 3m.
!
!
!
WARNING: IF PROPELLER(S) BECOME
DAMAGED OR BROKEN, DO NOT FLY.
FLYING WITH BROKEN PROPELLER(S) MAY
CAUSE DAMAGE OR LEAD TO INJURY.
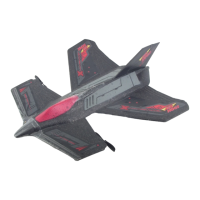
Jet Set™
Propeller
Canard
Propeller
Fuselage
Charge
Port
Main Wing
Vertical
Stabilizer
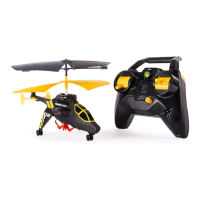
ALSO AVAILABLE
Repair
®
1
4
3
2
4
1
Folding
Instructions
Fold 1
Fold 2