The document describes the Air Lift Load Controller I Single Gauge (P/N 25655), an on-board compressor control system designed to manage air springs in a vehicle. This system allows for convenient adjustment of air pressure in the rear air springs to optimize ride, handling, and stability, especially when carrying varying loads or towing.
Function Description
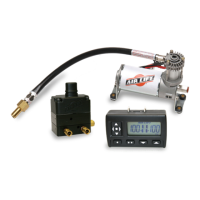
The Load Controller I system provides a means to inflate and deflate air springs using an on-board compressor and a dash-mounted gauge panel. The primary function is to maintain a level vehicle, improve ride comfort, and enhance stability by adjusting air pressure.
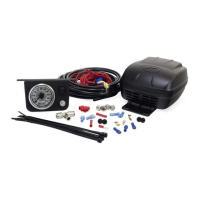
The system includes:
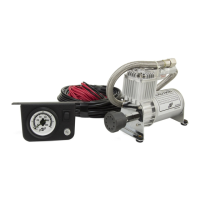
- Compressor: An air compressor that provides pressurized air to the air springs.
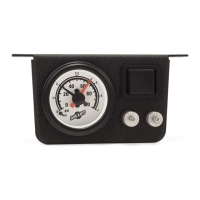
- Dash Panel: A control panel mounted inside the vehicle, featuring an ON/OFF switch and a pressure gauge to monitor and control air spring pressure.
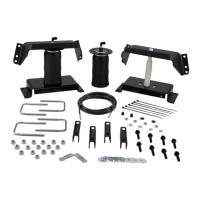
- Air Lines: Tubing that connects the compressor, air springs, and dash panel to form a closed pneumatic system.
- Air Inlet Filter: Filters incoming air to the compressor, protecting it from contaminants.
- Inflation Valves: Used for manual inflation/deflation and to connect the air springs to the system.
- Fuses and Connectors: Electrical components for power supply and circuit protection.
The system operates by allowing the user to turn on the compressor via the dash-mounted switch. The compressor then inflates the air springs, and the pressure can be monitored on the gauge. To deflate the air springs, a button below the ON/OFF switch is used.
Important Technical Specifications
- Part Number: 25655 (Single Gauge).
- Electrical Requirements: The system connects to a keyed power source (accessory circuit) and requires a 30 amp fuse.
- Fuse Types: Compatible with barrel-type fuses (Adapter #1), standard spade-type fuses (Adapter #2), and smaller spade-type fuses (Adapter #3).
- Air Line Connections: Utilizes self-locking push-to-connect fittings for air lines, ensuring secure, leak-free connections. Air lines should be cut squarely and pushed into fittings until a click is felt.
- Compressor Duty Cycle: Critical specification: Do not exceed a 15% duty cycle (3 minutes on, 20 minutes off). Exceeding this can lead to premature compressor failure and voids the warranty.
- Pressure Range: The gauge displays pressure in PSI and kg/cm². The system allows inflation up to maximum recommended pressure.
- Warranty:
- Load Controller (I): 2 Year Limited.
- Air Lift 1000, RideControl, SlamAir, LoadLifter 5000*: Lifetime Limited.
- EasyStreet Systems: 1 Year Limited.
- Load Controller (II), SmartAir, Wireless AIR, Other Accessories: 2 Year Limited.
- *formerly SuperDuty.
- The warranty covers manufacturing defects for the original retail purchaser under normal operating conditions on catalog-listed applications. It does not cover improper application, installation, racing, off-road, commercial use, or lack of maintenance.
Usage Features
- Vehicle Leveling: The primary use is to level the vehicle, especially when carrying additional loads or towing. This helps correct issues like headlights shining too high or the vehicle leaning.
- Ride Comfort Adjustment: Users can adjust air pressure to achieve the best ride comfort. Too much or too little pressure can result in a harsh ride.
- Stability Enhancement: Adjusting air pressure can improve vehicle stability, reducing sway, body roll, bounce, dive during braking, and sponginess. Increasing pressure generally improves stability.
- Manual Control: Air pressure is manually controlled via the dash-mounted ON/OFF switch and deflation button.
- Air Spring Inflation/Deflation: The system allows for both inflation (compressor on) and deflation (button below switch) of the air springs.
- Pressure Monitoring: The dash gauge provides real-time monitoring of air spring pressure.
- Fuse Adapters: The system includes various fuse adapters to ensure compatibility with different vehicle fuse types.
- Post-Installation Leak Check: After installation, it is recommended to inflate the system to maximum pressure and spray all connections with a soap and water solution to check for leaks.
Maintenance Features
- Compressor Placement: The compressor should be mounted in a rigid, convenient location, shielded from elements and heat sources. Avoid mounting in the engine compartment to prevent premature failure.
- Air Filter Maintenance: The air inlet filter should be attached to the compressor's inlet port to prevent contaminants from entering the compressor.
- Air Line Routing: Air lines must be routed away from heat sources (e.g., exhaust system) and moving chassis components. Secure air lines with nylon tie straps.
- Weekly Pressure Check: Air spring bellows naturally permeate air, leading to a loss of 3-4 p.s.i. per week. Weekly pressure checks are recommended. A higher rate of pressure loss indicates a leak.
- Leak Detection: If a leak is suspected, inflate the system to maximum pressure and spray soapy water solution on all fittings and connections (inflation valve, valve core, elbow fittings, air line connections) to identify the source.
- Troubleshooting Compressor Issues: If the compressor stops running, allow it to cool down and the thermal breaker to reset before attempting to restart it.
- Air Spring Protection: Maintain minimum air pressure in the air springs at all times to keep them in shape and prevent rubbing or wearing.
- Hoist Use: When lifting the vehicle on a hoist for service, support the axle with jack stands if the vehicle will be on the hoist for a prolonged period to relieve tension on the air springs.
- Warranty Service: For warranty claims, contact Air Lift Technical Support to obtain a Returned Materials Authorization (RMA) number before returning any defective product.