Do you have a question about the Aiwa CA-DW540 and is the answer not in the manual?
General safety instructions to prevent electric shock or injury during installation, use, and servicing.
Instructions for proper installation, including attachments, water, heat, mounting, and ventilation.
Avoid pushing objects into slots or spilling liquids to prevent fire or electric shock.
Operate unit from the indicated power source and use polarized plug correctly.
Route power cords to prevent them from being walked on or pinched.
Do not overload wall outlets or extension cords to prevent fire or electric shock.
Unplug the unit during lightning storms to prevent damage from surges.
Unplug before cleaning; use a damp cloth, avoid liquid or aerosol cleaners.
Refer servicing to qualified personnel for damaged cords, liquid spills, or operational issues.
Ensure service technicians use manufacturer-specified replacement parts.
Request safety checks after service to ensure proper operating condition.
Allow unit to acclimate after moving from cold to warm to prevent condensation issues.
Connect the supplied AC cord to the unit and a wall outlet.
Insert eight R20 (size D) batteries for battery power supply.
Observe guidelines for inserting, mixing, removing, and handling batteries to avoid damage.
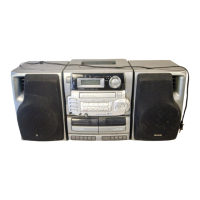
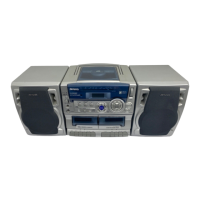
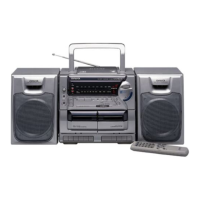
Connect speaker cords to the appropriate R and L terminals on the center unit.
Buttons on the remote control have identical functions to those on the main unit.
Press POWER on the remote to turn the display on or off.
Press FUNCTION to cycle through modes like CD, RADIO, TAPE.
Details frequency ranges and antenna types for FM and AM reception.
Information on track format, frequency range, recording system, and heads.
Details disc type, scanning method, rotation speed, error correction, and DAC.
Includes power requirements, dimensions, weight, power output, and accessories.
Details speaker type, dimensions, weight, impedance, and allowable input.
Press RADIO/BAND to select FM/AM, then use TUNING buttons to find a station.
Extend rod antenna for FM; position unit for best AM reception.
Press and hold TUNING buttons to automatically search for stations.
Use REPEAT/FM MODE/OSC/SLEEP for stereo/mono FM and AM noise reduction.
Adjust AM tuning interval between 10 kHz and 9 kHz steps.
Connect headphones with a stereo mini plug to the PHONES jack.
Select a station using tuning or direct number input.
Press STOP/MEMORY to store the selected station with a preset number.
Select a band then press PLAY/PAUSE to listen to preset stations.
Use numbered buttons 0-9 and +10 on the remote to select preset stations.
Select the preset number, then press and hold STOP/MEMORY to clear it.
Adjust volume using the VOLUME buttons or the remote control.
Select ROCK, POP, or JAZZ equalizer modes for different sound emphasis.
Activate the T-BASS system to enhance low-frequency sound.
Press PUSH OPEN to open the compartment, place disc printed side up, and close.
Press PLAY/PAUSE to start playback; press CD when power is off for direct play.
Use STOP, PLAY/PAUSE, SKIP/SEARCH, and REPEAT for playback control.
Use numbered buttons on remote to select and play tracks directly.
Avoid irregular CDs, do not touch the lens, and check CD-R/RW compatibility.
In stop mode, press STOP/MEMORY to store selected tracks up to 30.
Press PLAY/PAUSE to start playback of the programmed track sequence.
Press SKIP/SEARCH buttons in stop mode to check programmed tracks.
Press STOP/MEMORY in stop mode until 'M' disappears to clear the program.
Keep REPEAT/FM MODE/OSC/SLEEP pressed until '30' flashes to set timer.
Use SKIP/SEARCH buttons to specify the time until the power is turned off.
Repeat step 1 to display the remaining time for 4 seconds.
Display remaining time and press buttons repeatedly until OFF is displayed.
Press EJECT/CLOSE to open holder, insert tape with exposed side down, facing out.
Press PLAY while power is off; use STOP, PAUSE, REWIND/FAST FORWARD.
Deck 1 plays automatically after Deck 2 finishes; manual control available.
Insert tape into Deck 1, load CD or tune radio station as the source.
Press RECORD on Deck 1 to start recording; CD play starts simultaneously.
Program tracks using PROGRAMMED PLAY, then press RECORD to record.
Use STOP/MEMORY to stop, or PAUSE to pause and resume recording.
Press RECORD while power is off to erase recordings on Deck 1.
Insert tape into Deck 1 for recording and Deck 2 for playback.
Press DUB SPEED to select HI-SPEED or normal speed dubbing.
Press PLAY on Deck 2 to start dubbing; recording starts on Deck 1.
Press STOP on Deck 1 and Deck 2 to stop dubbing.
Connect microphone to MIC jack and record source with mixing.
Adjust MIC VOL to control microphone volume and prevent howling.
Use a soft cloth moistened with mild detergent solution for cleaning.
Clean heads every 10 hours with a head cleaning cassette.
Use a cotton swab moistened with cleaning fluid to clean the lens.
Break off plastic tabs on cassette tape after recording.
Cover tab openings with adhesive tape to record on the tape again.
Equipment tested and compliant with Class B digital device limits for residential interference.
Measures to correct harmful interference to radio or television reception.
Unauthorized modifications may void user's authority to operate the product.
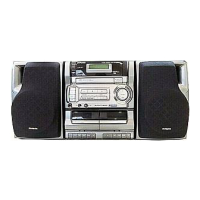
| Brand | Aiwa |
|---|---|
| Model | CA-DW540 |
| Category | Speaker System |
| Language | English |