Do you have a question about the Aiwa NSX-AJ50 and is the answer not in the manual?
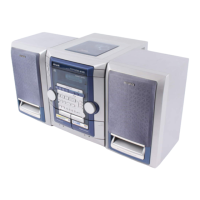
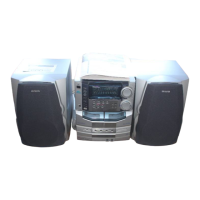
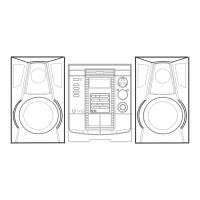
| Type | Stereo System |
|---|---|
| CD Player | Yes |
| Cassette Deck | Yes |
| Radio Tuner | AM/FM |
| Remote Control | Yes |
Record model and serial numbers for convenience and reference.
Reduce the risk of fire or electric shock by not exposing to rain or moisture.
Risk of electric shock; do not open the unit.
Explains symbols for dangerous voltage and important instructions.
Do not use the unit near water sources.
Avoid placing near heat sources or in extreme temperatures.
Place on a flat, even surface ensuring adequate space for heat ventilation.
Prevent foreign objects or liquids from entering the unit.
Move carts with the unit carefully to prevent overturning.
Allow unit to adjust to temperature changes to prevent condensation.
Do not mount on walls or ceilings unless specified.
Connect only to specified power sources marked on the unit.
Safety feature for polarized AC plugs; do not force into outlet.
Disconnect by plug, not cord. Avoid wet hands.
Ensure polarized plugs are fully inserted into extension cords.
Unplug if the unit is not used for several months.
Locate outdoor antennas away from power lines.
Properly ground antenna system for protection against surges.
Have unit serviced by a qualified technician for damage or malfunction.
Insert and replace batteries as needed for remote functionality.
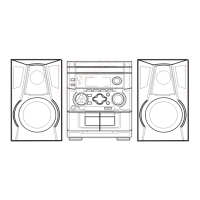
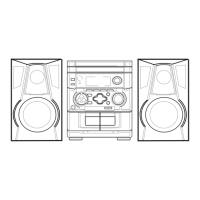
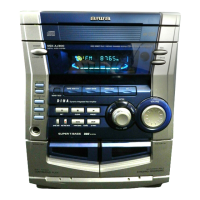
Access secondary functions and main unit functions using these buttons.
Connect an outdoor antenna for better FM reception.
Demonstrates unit features with colorful illumination.
Unit blackouts when off, indicator light remains. Display brightens briefly when button pressed.
Includes ECO ON features plus auto shut-off if idle for 10 minutes.
Power economizing mode is disabled.
Adjusts the brightness of the unit's display and buttons.
Controls the light on the top window of the unit.
Press CLOCK before completing step 3 to restore previous setting.
Press CLOCK to view time for 4 seconds.
Press CLOCK and then press within 4 seconds.
Indicates clock stopped due to power failure; reset required.
Adjusts the audio output level from 0 to 31.
Enhances clarity of high-frequency sound.
Enhances the realism of low-frequency sound.
Connect headphones to PHONES jack; speaker output is muted.
Output volume and tone adjustable during recording, unaffected by recording.
Select band and use tuning buttons to find stations.
Use SHIFT + MONO TUNER to reduce noise in FM stereo broadcasts.
Change AM tuning interval from 10 kHz to 9 kHz step.
Press and hold DOWN or UP to auto-scan for stations.
Select band/station, press SET to store with a preset number.
Use numbered buttons or BAND/SHIFT to select stored stations.
Select station, press CLEAR, then SET within 4 seconds.
Select deck, insert tape, and press play for playback.
Use stop, pause, fast forward, and rewind controls.
Press TAPE to turn on power and start tape playback when unit is off.
Press CLEAR in stop mode to set counter to 0000.
Deck 2 automatically plays after Deck 1 finishes when both are loaded.
Place discs on trays 1, 2, or 3 as instructed.
Play all discs starting from tray 1 or select a single disc.
Use stop, pause, search, skip, and remove disc functions.
Press CD to turn on power and start disc playback when unit is off.
Press CD EDIT/CHECK to display remaining time on the disc.
Use numbered buttons and DISC DIRECT PLAY to select specific tracks.
Replace discs without interrupting current playback.
Plays tracks on selected disc or all discs randomly.
Plays a single disc or all discs repeatedly.
Cancel RANDOM and REPEAT modes by pressing the function again.
Press to play all discs or DISC DIRECT PLAY 1-3 for a single disc.
Press CD BLANK SKIP to enable skipping silent portions between tracks.
Press CD BLANK SKIP again to disable the feature.
Program up to 30 tracks from inserted discs using numbered buttons.
Check programmed tracks or clear the entire program.
Press RANDOM/REPEAT while pressing SHIFT to repeat programmed tracks.
Use REC/REC MUTE to insert 4-second blank spaces for Music Sensor.
Adjust blank space duration by pressing REC/REC MUTE during flashing or pause mode.
Break off plastic tabs on cassette tapes to prevent accidental erasure.
Insert tape, set point, press REC/REC MUTE to start erasure.
Make exact copies of original tapes manually.
Insert tapes into decks 1 and 2, select deck 1, and press REC/REC MUTE.
Use SYNC DUB button for direct copying from Deck 1 to Deck 2.
Press to stop the dubbing process.
Enables CD recording by automatically calculating tape length and rearranging tracks.
Insert tape, load CD, press CD EDIT/CHECK, select disc, and designate tape length.
Press to stop recording and CD play simultaneously.
Clear edit programs or add tracks from other discs.
Actual cassette recording time may be longer than printed time.
Program tracks while checking remaining tape time for each side.
Insert tape, load CD, press CD EDIT/CHECK twice, designate tape length, select disc/tracks.
Press CD EDIT/CHECK and REC/REC MUTE to start recording for each side.
Press CD EDIT/CHECK to select side, then press repeatedly to view track order.
Clear program for a side, then reprogram tracks as needed.
Press CLEAR twice to remove the entire edit program.
Set the unit to turn off automatically at a specified time.
Press SLEEP once while pressing SHIFT to view remaining time.
Press SLEEP twice while pressing SHIFT to turn off the sleep timer.
Make sure the clock is set correctly before setting the timer.
Select source, set timer-on time, and duration for automatic playback.
Set the source volume level for when the timer activates playback.
Load CD, insert tape, or tune radio station for timer playback.
Press TIMER to display timer-on time, source, and duration.
Carry out steps from the beginning or press ENTER twice to continue.
Press TIMER repeatedly to cancel; press again to restore.
Unit can be used normally; turn power off after setting volume/source.
Applicable for TUNER and VIDEO/AUX sources using an external timer.
Start the game demo, stop numbers, and follow scoring rules.
Details on scoring points in the game demo.
Connect optional equipment using VIDEO/AUX jacks.
Use Aiwa turntable with built-in equalizer amplifier.
Use the CD DIGITAL OUT (OPTICAL) jack for digital sound signals.
Connect optional surround speakers (8-16 ohms) to the jacks.
Change 'VIDEO' display name to 'VIDEO', 'AUX', or 'TV'.
Use a soft, dry or lightly moistened cloth for cleaning.
Clean tape heads with a cleaning cassette after 10 hours of use.
Demagnetize tape heads with a cassette after 20-30 hours of use.
Wipe discs from center out; store in cases away from heat/humidity.
Store tapes in cases; keep away from magnets and direct sunlight.
Check power, connections, unit reset for common issues.
Address static, noise, and distorted sound in radio reception.
Troubleshoot tape not running, sound imbalance, recording, and erasure problems.
Troubleshoot CD not playing due to placement, dirt, or condensation.
Reset unit by turning off power, then back on while pressing CLEAR.
Details on FM/AM tuner, amplifier, and cassette/CD sections.
Details on speaker system type, units, impedance, sensitivity, and dimensions.
Trademarks, licensing for BBE system, and recording copyright laws.
Specifications for track format, frequency response, recording system, and heads.
Specifications for laser, D/A converter, S/N ratio, and harmonic distortion.
Specifications for power requirements, consumption, and unit dimensions.