Do you have a question about the Aiwa XR-M55 and is the answer not in the manual?
Guidelines for placing and environment for optimal operation and safety.
Instructions on connecting to power sources and handling the power cord.
Advice on using extension cords and their proper connection.
Instructions for unplugging the unit during extended periods of non-use.
Guidance on connecting and grounding an outdoor antenna for better reception.
Recommendations for cleaning and care of the unit.
List of conditions that require professional servicing for the unit.
Section to record model and serial numbers for future reference and support.
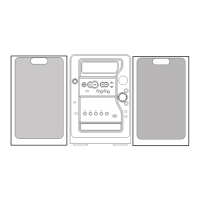
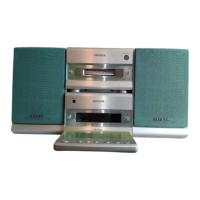
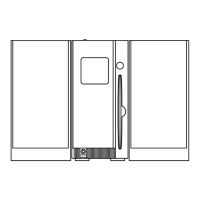
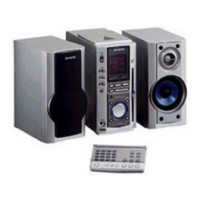
Guide to connecting system accessories like speakers, antennas, and remote control.
Detailed steps for connecting the right and left speakers to the main unit.
Instructions for connecting the FM and AM antennas to the unit.
Steps for connecting the AC power cord to the unit and an outlet.
Guidelines for positioning FM and AM antennas for optimal reception.
Instructions for connecting an outdoor antenna to the FM terminals.
Instructions for inserting batteries and using the remote control.
Steps to power on the stereo system using function buttons or the power button.
How to power off the stereo system and its behavior after shutdown.
Explanation of the demo mode and how to cancel it.
Connecting and using headphones with the stereo system.
How to activate power economizing mode to reduce power consumption.
Overview of the 4-channel amplifier and built-in subwoofer system features.
Adjusting the volume level using the unit or remote control.
Enhancing low-frequency sound realism with the T-Bass system.
Selecting equalization curves (ROCK, POP, JAZZ) for sound customization.
Tuning into radio stations using manual or auto search functions.
Adjusting reception for FM stereo broadcasts and handling noise.
Changing the AM tuning interval to 9 kHz or 10 kHz steps.
Storing and recalling favorite radio stations using preset numbers.
Selecting preset stations directly using numbered buttons or the unit.
Steps for opening the disc compartment and loading a CD.
Basic operations for playing a CD, including stop, pause, and resume.
Selecting specific tracks on a CD using numbered buttons or search functions.
How to enable and disable random and repeat playback modes for CDs.
Creating and playing custom track sequences from a CD.
Instructions for inserting and closing the cassette holder.
Choosing playback direction for one or both sides of the tape.
Basic operations for playing a cassette tape, including stop and pause.
Recording from tuner, CD, or external sources onto tape.
Adding 4-second blank spaces between tracks during recording.
How to erase existing recordings from a cassette tape.
Automatic recording based on tape length and CD track order.
Programming specific tracks for recording onto tape.
Setting the current time on the unit's display.
Programming the unit to turn off automatically after a set time.
Setting the unit to turn on at a specified time daily.
Guides for connecting external devices like MD players or other audio sources.
Connecting analog audio sources via RCA phono plugs.
Connecting an MD player using RCA phono plugs.
Outputting analog sound signals to other audio equipment.
Outputting digital CD sound signals to compatible equipment.
Instructions for cleaning the unit's cabinet and tape paths.
Procedure for demagnetizing tape heads to maintain sound quality.
Guidelines for cleaning and storing compact discs.
Recommendations for storing cassette tapes to preserve quality.
Common issues and solutions for the stereo system.
Technical specifications for the main stereo unit.
Technical specifications for the included speaker system.
| Brand | Aiwa |
|---|---|
| Model | XR-M55 |
| Category | Stereo System |
| Language | English |