EasyManua.ls Logo

Aiwa Z-D3200M - User Manual

Aiwa Z-D3200M
71 pages
Print Icon
To Next Page IconTo Next Page
Loading...
STEREO
SYSTEM
SISTEMA
ESTEREO
CHAINE
STEREO
Z-D3200M
OPERATING
INSTRUCTIONS
MANUAL
DE
INSTRUCCIONES
MODE
D’EMPLOI
Ea
G4
Question and Answer IconNeed help?

Do you have a question about the Aiwa Z-D3200M and is the answer not in the manual?

Overview

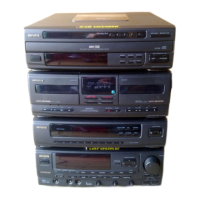
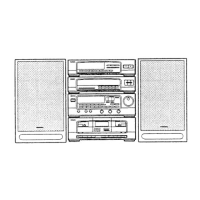
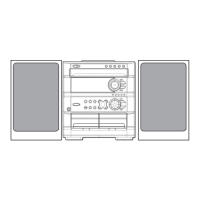
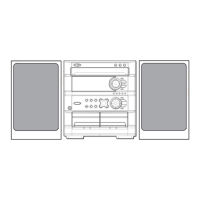
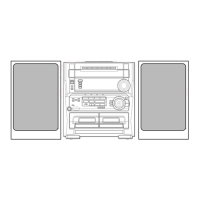
This document describes the AIWA Z-D3200M stereo system, which comprises a stereo synthesizer tuner (TX-Z9300), a stereo integrated amplifier (MX-Z3200M), a stereo cassette deck (FX-WZ7300), and front speakers (SX-Z3200). The system can be set up in either a vertical or horizontal placement.

Tuner (TX-Z9300)

  • Function Description: The tuner allows reception of FM, MW, and LW radio bands. It can store up to 10 preset stations on each band, totaling 30 preset stations.
  • Technical Specifications:
    • FM Tuner Section:
      • Tuning range: 87.5 MHz to 108 MHz
      • Usable sensitivity (IHF): 18.2 dBf (2.2 µV, 75 ohms)
      • Antenna terminals: 75 ohms (unbalanced)
    • MW Tuner Section:
      • Tuning range: 522 kHz to 1611 kHz
      • Usable sensitivity: 400 µV/m
      • Antenna: Loop antenna
    • LW Tuner Section:
      • Tuning range: 144 kHz to 290 kHz
      • Usable sensitivity: 1000 µV/m
      • Antenna: Loop antenna
    • General:
      • Dimensions (W x H x D): 360 x 88.5 x 320.5 mm (14¼ x 3½ x 12⅝ in.)
      • Weight: 2.1 kg (4 lbs 10 oz)
  • Usage Features:
    • Manual Tuning: Select a band (FM, MW, LW) using the BAND button, then use the DOWN or UP buttons to change the frequency. "TUNE" is displayed when a station is received. For FM stereo reception, "AUTO" and the stereo indicator are displayed.
    • Auto Search: Keep the DOWN or UP button pressed to quickly search for a station. The search stops when a station is tuned in. Auto Search may not stop for very weak signals.
    • FM Stereo Noise Reduction: If an FM stereo broadcast has noise, press the ST/MONO button (or FM MODE on the remote control) to make "AUTO" disappear, reducing noise but making reception monaural. Press again to restore stereo reception.
    • Presetting Stations: Up to 30 stations (10 per band) can be stored. Select a band, press SET, use DOWN or UP to select a station, press SET again, then select a STATION PRESET button (1-10) to store it. Presetting is not possible with the remote control.
    • Preset Number Tuning: Select a band, then press the desired STATION PRESET button. With the remote control, press the BAND button, then a numeric button (1-10).
    • Clock Setting: The clock flashes when the AC cord is connected for the first time. With the power off, press and hold SET for 2 seconds or more to set the hour (flashes), use DOWN or UP to adjust, press SET to confirm (minute flashes), use DOWN or UP to adjust, and press SET to complete.
    • 24-hour Standard: To switch to 24-hour mode, press POWER while pressing CLOCK/TIMER. Repeat to return to 12-hour mode.
    • Timer Function: Features two timers: EVERY (daily) and ONCE (one-time).
      • Setting: Press CLOCK/TIMER repeatedly to select EVERY or ONCE, then press SET. Select a source (TUNER, TAPE, DAT, CD) using DOWN or UP, then press SET. Designate timer-on and timer-off times using DOWN or UP and SET.
      • Source Preparation: For TUNER, select band/station. For TAPE ← TUNER REC, select band/station, insert tape into DECK 2, set Dolby NR and reverse mode. For DAT ← TUNER REC, set external timer. For CD, load disc into tray 1. For TAPE, insert tape into DECK 1 or 2. For DAT, set external timer.
      • Activation: Turn the unit off with the POWER button after setting volume and tone. The timer mode and indicator will remain on.
    • Sleep Timer: Press SLEEP repeatedly to set the time until power off (99, 90, 80...20, 10, 7 minutes, or Cancel). "SLEEP" is displayed.
  • Maintenance Features:
    • Antenna Positioning: Extend FM antenna fully for best reception. Position MW/LW antenna to find the best direction.
    • External Antenna: For better FM reception, an outdoor antenna is recommended, connected to the FM 75 Ω terminals.
    • Troubleshooting: Check antenna connections for static or distorted reception.

Amplifier (MX-Z3200M)

  • Function Description: The integrated amplifier controls volume, sound balance, and various sound enhancement features.
  • Technical Specifications:
    • Power requirements: 230 V, 50 Hz
    • Power consumption: 230 W (System total 250 W)
    • Power output:
      • Rated: 40 W + 40 W (without connecting SURROUND SPEAKERS, 6 ohms, T.H.D. 1%, 1 kHz/DIN 45500)
      • Reference: 50 W + 50 W (without connecting SURROUND SPEAKERS, 6 ohms, T.H.D. 10%, 1 kHz/DIN 45324)
      • DIN MUSIC POWER: 98 W + 98 W
    • Total harmonic distortion: 0.1% (25 W, 1 kHz, 6 ohms)
    • Outputs:
      • SPEAKERS: accepts speakers of 6 ohms or more
      • PHONES (stereo standard jack): accepts headphones of 32 ohms or more
      • SUPER WOOFER: 1.5 V
      • MONITOR OUT: 1 Vp-p (75 ohms)
      • REC OUT: 300 mV (1 kohm)
    • Inputs:
      • VIDEO 1/AUX 1: 300 mV (39 kohms)
      • VIDEO 2/AUX 2: 500 mV (39 kohms)
      • PHONO IN: 500 mV or more (36 kohms)
      • MIC 1, MIC 2: 1.4 mV (10 kohms)
    • Dimensions (W x H x D): 360 x 128.5 x 329 mm (14¼ x 5⅛ x 13 in.)
    • Weight: 5.3 kg (11 lbs 11 oz)
  • Usage Features:
    • Power On/Off: Press the POWER button.
    • DEMO Mode: When first connected to AC, the amplifier displays a demonstration. Press DEMO to stop/start.
    • Volume Control: Turn the VOLUME control or press the VOLUME button on the remote.
    • Mute: Press MUTE on the remote. The VOLUME indicator flashes. Press again to restore sound.
    • Balance: Turn the BALANCE control to adjust left/right balance.
    • SUPER T-BASS: Enhances low-frequency sound. Press T-BASS repeatedly to cycle through four levels or off.
    • BBE SYSTEM: Enhances high-frequency sound clarity. Press BBE repeatedly to cycle through four levels or off.
    • Spectrum Analyzer: Press SPECTRUM ANALYZER to select one of 7 display patterns. The pattern name appears for 2 seconds.
    • Display Dimming: Press and hold SPECTRUM ANALYZER for 2 seconds or more to dim the display. Repeat to restore.
    • Headphone Use: Connect headphones to the PHONES jack (ø6.3 mm/¼ inch). Speakers are muted.
    • Graphic Equalizer: Provides five preset equalization curves (ROCK, POP, CLASSIC, HS, CAR).
      • Activation: Press GEQ OFF/ON. The red border of GEQ appears.
      • Preset Selection: Press PRGM/MANUAL to select PROGRAM mode, then press one of the graphic equalizer preset buttons (1-5). The curve is displayed for 4 seconds.
      • Cancellation: Press GEQ OFF/ON.
      • Remote Control: After GEQ OFF/ON, press PRGM repeatedly to cycle through curves.
      • Check Setting: Press GEQ CURVE to display the current curve for 4 seconds.
    • Manual Customized Equalization Curves: Store up to five custom curves.
      • Setting: Use CURSOR CONTROL (◄► for frequency, ▲/V for level). Press MEMORY. While "MEMORY" flashes, press a manual preset number (1-5). Use CURSOR CONTROL to enter a file name (A-Z, 0-9, symbols). Press MEMORY to store.
      • Selection: Press GEQ OFF/ON, then PRGM/MANUAL to select MANUAL mode. Select a preset number (1-5).
      • Remote Control: After GEQ OFF/ON, press MANUAL repeatedly to cycle through stored curves.
    • AI Memory Function: Stores two complete sets of system settings (FUNCTION, T-BASS, BBE, GEQ presets, SPECTRUM ANALYZER, VOCAL FADER).
      • Storing: Adjust settings, press MEMORY, then press AI FUNCTION A or B within 4 seconds.
      • Recalling: Press AI FUNCTION A or B (unit powers on if off, current function stops if on). Playback starts with stored sound settings if CD or TAPE function is stored and media is inserted.
      • Remote Control: Press AI FUNCTION A/B repeatedly to toggle between A and B modes.
    • Karaoke Function:
      • Microphone Mixing: Connect microphones (standard ø6.3 mm/¼ inch plugs) to MIC 1 or MIC 2 jacks. Set MIC MIXING LEVEL to MIN before connecting. Select source with FUNCTION buttons. Adjust source volume/tone. Adjust microphone volume with MIC MIXING LEVEL controls.
      • Vocal Fader: Makes vocals on discs/tapes softer. Press VOCAL FADER repeatedly to cycle through V-FADER, V-FADER/AUTO, and Cancel. Musical notes appear on display when active.
  • Maintenance Features:
    • Cabinet Cleaning: Use a soft cloth lightly moistened with mild detergent solution. Avoid strong solvents.
    • Troubleshooting: Check AC cord, connections, function button, speaker short circuits for no sound. Check speaker connections for sound from one speaker. Check VOCAL FADER for non-stereo sound.

Cassette Deck (FX-WZ7300)

  • Function Description: The cassette deck features two decks for playback and recording. Deck 1 plays both sides once. Deck 2 allows selection of reverse modes (one side, front to back once, or both sides repeatedly). It supports Normal (Type I), CrO2 (Type II), and Metal (Type IV) tapes.
  • Technical Specifications:
    • Track format: 4 tracks, 2 channels stereo
    • Frequency response:
      • Metal tape: 20 Hz - 17000 Hz
      • CrO2 tape: 20 Hz - 16000 Hz
      • Normal tape: 20 Hz - 15000 Hz
    • Signal-to-noise ratio: 65 dB (Dolby NR ON, metal tape peak level above 5 kHz)
    • Wow and flutter: 0.12% (WRMS) ± 0.19% (WPEAK)
    • Recording system: AC bias
    • Heads:
      • DECK 1: Playback head × 1
      • DECK 2: Recording/playback/erase head × 1
    • Dimensions (W x H x D): 360 x 128.5 x 313 mm (14¼ x 5⅛ x 12⅜ in.)
    • Weight: 3.2 kg (7 lbs 1 oz)
  • Usage Features:
    • Playback:
      • Press TAPE. Press EJECT to open holder, insert tape (exposed side down), close holder.
      • Press DOLBY NR to match tape recording (on/off).
      • Press PLAY/DIR to start playback. (flashing for front side, flashing for back side).
      • To stop, press STOP. To pause (Deck 2 only), press PAUSE.
      • To change playback side, press PLAY/DIR during play/pause.
      • To fast forward/rewind, press or in stop mode, then STOP.
      • Reverse Mode (Deck 2): Press REVERSE MODE to cycle through (one side), (front to back once), (both sides repeatedly).
      • Continuous Play: Insert tapes into DECK 1 and DECK 2. Press REVERSE MODE and select. Press PLAY/DIR. Playback continues 8 times or until STOP is pressed.
    • Recording:
      • Basic Recording: Insert tape into DECK 2 (side to be recorded first facing foreground). Press DOLBY NR (on/off). Press REVERSE MODE to select (one side) or (both sides). Select source (TUNER, PHONO, VIDEO1/AUX1, VIDEO2/AUX2) with FUNCTION buttons. Adjust sound (BBE/GEQ settings affect recording). Press REC/REC MUTE to start. To stop, press STOP on DECK 2. To pause, press PAUSE on DECK 2.
      • Inserting Blank Spaces: During recording or recording pause, press REC/REC MUTE. The indicator flashes for 4 seconds (tape advances without recording), then enters pause. Press PAUSE to resume. For shorter blanks, press REC/REC MUTE again while flashing. For longer blanks, press REC/REC MUTE again after pause mode (adds 4-second blank).
      • Dubbing (Manual): Insert original tape into DECK 1, blank tape into DECK 2. Press DOLBY NR to turn off. Adjust sound. Press REC/REC MUTE to start recording, then PLAY/DIR on DECK 1 to start playback. To stop, press STOP on DECK 1 and DECK 2.
      • Dubbing (Whole Tape - SYNCHRO DUBBING): Insert original tape into DECK 1, blank tape into DECK 2. Press REVERSE MODE to select (one side) or (both sides). Press NORMAL (normal speed) or HIGH (high speed) SYNCHRO DUBBING button. To stop, press STOP on DECK 1 or DECK 2. Dolby NR setting from original tape is automatically applied.
      • Recording from CD Player (CD SYNCHRO REC): Insert blank tape into DECK 2. Load disc(s) into CD player. Press DOLBY NR (on/off). Press REVERSE MODE to select (one side) or (both sides). Adjust sound. Press CD SYNCHRO REC. Deck plays leader for 10 seconds, then disc playback and recording start simultaneously. CD player returns to start of interrupted track and resumes recording on reverse side if deck reverses mid-track.
      • Erasing: Press TAPE on amplifier. Insert tape into DECK 2. Wind to start point. Set reverse mode. Press REC/REC MUTE to start erasure.
  • Maintenance Features:
    • Cassette Tapes: Avoid 120-minute or longer tapes (thin, easily damaged). Take up slack with a pencil before use to prevent breakage/jamming.
    • Accidental Erasure Prevention: Break off plastic tabs after recording. To record again, cover openings with cellophane tape.
    • Dolby NR System: Reduces tape hiss. Turn on for tapes recorded with Dolby NR.
    • Head Cleaning: After every 10 hours of use, clean heads and tape paths with a head cleaning cassette or cotton swab moistened with cleaning fluid/denatured alcohol. Wait for parts to dry before inserting tapes.
    • Head Demagnetization: After 20-30 hours of use, demagnetize heads with a commercially available demagnetizer.
    • Tape Care: Store tapes in cases, away from magnets, motors, TVs, or other magnetic sources. Avoid direct sunlight or leaving in a car.
    • Troubleshooting: Check pause mode for tape not running. Check playback head for off-balance/low sound. Check erasure prevention tab for recording not possible. Check recording/playback head for high frequency sound not emitted.

Speaker System (SX-Z3200)

  • Function Description: Front speakers for audio output.
  • Technical Specifications:
    • Cabinet type: 3 way, bass reflex (Magnetism sealed type)
    • Speaker:
      • Woofer: 220 mm (8¾ in.) cone type
      • Tweeter: 60 mm (2⅜ in.) cone type
      • Super tweeter: 20 mm (¹³/₁₆ in.) ceramic type
    • Impedance: 6 ohms
    • Output sound pressure level: 90 dB/W/m
    • Dimensions (W x H x D): 275 x 456 x 210 mm (10⅞ x 18 x 8⅜ in.)
    • Weight: 4.5 kg (9 lbs 15 oz)
  • Usage Features:
    • Connection: Connect speaker cords to the MX-Z3200M amplifier. Cords with white stripes to (+) terminals, black cords to (-) terminals.
    • Surround Speakers (Optional): Connect to SURROUND SPEAKERS terminals (right to R, left to L). Place behind listening area.
    • Powered Super Woofer (Optional): Connect to SUPER WOOFER terminal.
  • Maintenance Features:
    • Troubleshooting: Check speaker connections for sound from one speaker.

Remote Control

  • Function Description: Provides remote operation for various system functions.
  • Usage Features:
    • Battery Insertion: Detach cover, insert two R6 (size AA) batteries.
    • Battery Replacement: Replace when operational distance (approx. 5 meters/16 feet) decreases.
    • Operation: May not operate correctly in direct sunlight or near other remote controls.
    • Functions: Controls volume, mute, AI Memory, GEQ presets (cyclically), manual GEQ curves (cyclically), tape deck playback (Deck 1 and Deck 2), and sleep timer.

Other Connections

  • TV or Video Units: Connect two video units and a TV for monitoring.
    • TV Connection: Connect to MONITOR OUT. Select VIDEO1/AUX1 or VIDEO2/AUX2 on amplifier to view video playback.
    • Video Unit Connection: Connect to VIDEO1/AUX1 IN or VIDEO2/AUX2 IN (AUDIO L, R).
    • Note: Audio from VIDEO1/AUX1 IN is not output through REC OUT. TV placement to the right of the system is recommended.
  • DAT or MD Recorder:
    • Recording: Connect REC OUT (AUDIO L, R) to DAT/MD recorder input.
    • Listening: Connect DAT/MD recorder output to VIDEO1/AUX1 IN (AUDIO L, R).
    • Note: Do not connect equipment to REC OUT and VIDEO2/AUX2 IN simultaneously to avoid noise/malfunction.
  • Turntable: Use an Aiwa turntable with an equalizer amplifier. Connect to PHONO IN (AUDIO L, R) terminals.
  • Listening to External Sources:
    • Connection: Connect equipment to VIDEO1/AUX1 IN or VIDEO2/AUX2 IN.
    • Playback: Press VIDEO1/AUX1 or VIDEO2/AUX2 on amplifier. Play connected equipment.
    • Sound Level Adjustment: For VIDEO1/AUX1 IN, turn VIDEO1/AUX1 INPUT LEVEL control to match other function sources.
    • Source Name Change: "VIDEO1" can be changed to "DAT" by pressing POWER while pressing VIDEO1/AUX1 (with power off). Repeat to return to "VIDEO1".

General Maintenance

  • AC Voltage: Check that the rated voltage on the MX-Z3200M rear panel matches local voltage.
  • Placement: Avoid extreme heat, cold, dust, humidity, or vibration. Place on a flat, even surface. Maintain adequate space around the unit for heat dissipation (10cm top, 5cm sides/rear). Avoid airtight racks. Keep away from TVs/radios to prevent noise interference.
  • Safety: Pull the plug, not the cord, when disconnecting AC. Disconnect AC cord if not used for extended periods (small current flows even when off). Contact dealer for damaged AC cord.
  • Repairs: Disconnect AC cord and contact qualified service. Bring TX-Z9300, MX-Z3200M, and FX-WZ7300 together for repairs.
  • Copyright: Check local copyright laws for recording from discs, radio, or external tape.

This product is manufactured to comply with the radio interference requirements of EEC directive 82/499/EEC. Specifications and external appearance are subject to change without notice due to product improvement.

Aiwa Z-D3200M Specifications

General IconGeneral
BrandAiwa
ModelZ-D3200M
CategoryStereo System
LanguageEnglish

Related product manuals