Do you have a question about the Aiwa Z-D5000M and is the answer not in the manual?
Digital Signal Processor system for surround sound.
Technology for high-definition music reproduction.
Connects various audio/video sources.
Mix microphone vocals with music sources.
AI FUNCTION, DEMO, T-BASS, surround terminals.
Synthesizer tuner, timer functions.
Dolby NR, dual-speed dubbing.
Check system voltage matches local voltage.
Handle AC cord carefully, disconnect when not in use.
Avoid extreme environments, ensure ventilation.
Two ways to set up the system.
List of compatible AIWA CD players.
Tips for safe and correct connection.
Match CD player signal codes.
General connection diagram.
Connecting flat cables to amplifier terminals.
Connecting speakers, impedance and shielding notes.
Location of antenna terminals.
Outdoor and indoor antenna setup.
Positioning antennas for best reception.
Handling AM loop antenna correctly.
Connecting a DAT deck.
Diagram for connecting surround speakers.
Guidelines for connecting surround speakers.
Connecting TV, LD/VCR, DAT/VCR, turntable.
General connection notes, RCA jacks.
Connecting turntables to PHONO IN.
Function of the monitor output.
Function of audio output jacks.
Adjusting input levels for connected equipment.
Initial clock setup.
Step-by-step guide for clock setting.
Setting clock after power interruption.
Switching between 12/24 hour format.
What to reset after power loss.
How the DEMO function works.
Turning the DEMO function on/off.
Specifics of DEMO function operation.
Using the T-BASS function for deep bass.
Using the BBE system for sound clarity.
Adjusting left/right speaker balance.
Adjusting overall volume.
Volume/balance effect during recording, headphone use.
Activating the graphic equalizer.
Choosing preset or manual mode.
Selecting a preset sound curve.
Explains ROCK, POP, CLASSIC, HS, CAR presets.
Resetting equalizer to flat.
Step 2 for setting custom EQ.
Step 3 for setting custom EQ.
How to select presets.
Selecting presets via remote.
Step 1 for custom EQ filename.
Step 4 for custom EQ filename.
Step 5 for custom EQ filename.
List of allowed characters for filenames.
Display of filename in manual mode.
How to edit filename characters.
Skipping filename entry.
Select desired DSP setting.
Explains DISCO, HALL, MOVIE, LIVE modes.
Turning off DSP.
Selecting DSP modes via remote controller.
DSP modes for monaural sources.
Checking EQ display modes.
Adjusting display brightness.
Step 1 for AI FUNCTION setup.
Step 2 for AI FUNCTION setup.
Recalling stored settings.
Note on auxiliary sources with AI FUNCTION.
Step 3 for AI FUNCTION setup.
Step 4 for AI FUNCTION setup.
Notes on AI FUNCTION operation.
Precautions regarding AI FUNCTION.
Step 1 for manual tuning.
Step 2 for manual tuning.
How to use auto search.
Adjusting tuning interval.
FM stereo indicator and AUTO indicator.
Adjusting antennas.
Step 1 for presetting stations.
Step 2 for presetting stations.
Step 3 for presetting stations.
Steps for completing preset.
Presetting FM mode with station.
Presetting stations with remote controller.
Step 1 for tuning into preset stations.
Step 2 for tuning into preset stations.
Notes on remote operation.
How to stop tape playback.
How to pause and resume playback.
Changing tape direction.
How to eject a tape.
Supported tape types.
Using Dolby NR for playback.
Selecting reverse mode.
Fast winding tape.
Sound from deck 2 when both play.
Tape stopping behavior on reverse.
Tape counter operation.
Avoiding interference from TV.
Automatically fast-forwarding through blanks.
Conditions where skipping blanks may fail.
Continuous play sequence.
Tape slack, C-120 tape warning.
Protecting tapes from accidental erasure.
How to record over erased content.
Setting Dolby NR for recording.
Selecting reverse mode for recording.
Choosing recording direction.
Selecting source for recording.
Initiating recording.
How to stop recording.
How to pause and resume recording.
Starting recording via remote controller.
Recording with Dolby NR system.
Selecting reverse mode for recording.
Recording considerations.
System state after playback.
How to stop recording.
Handling short CD playback.
Inserting blank spaces during recording.
Recording from multiple discs.
Adjusting tone quality during recording.
Explanation of CD Back Skip Recording System.
Preparing tapes for dubbing.
Selecting reverse mode for dubbing.
Initiating tape dubbing.
How to stop dubbing.
Dubbing single side.
Dubbing both sides (STSD).
Selecting dubbing speed (NORMAL/HIGH).
Explanation of STSD dubbing.
Notes on synchronized dubbing.
Adjusting tone quality during dubbing.
Creating blank sections by erasing.
Troubleshooting dubbing noise.
Monitoring other sources during dubbing.
Using compatible AIWA CD players.
Preparing tape for CD recording.
Step 1 for CD recording.
Step 3 for CD recording.
Step 4 for CD recording.
Step 5 for CD recording.
Recording with Dolby NR.
System state after CD playback.
How to stop recording.
Handling short CD playback.
Inserting blank spaces during CD recording.
Recording from multiple discs.
Adjusting tone quality during CD recording.
Note on listening to other sources.
Explanation of CD Back Skip Recording System.
Choosing timer mode.
Setting the timer activation time.
Setting the timer deactivation time.
Correcting timer settings.
Clock and station preset preparation.
Selecting function modes for timer.
Preparing sound sources for timer.
Checking programmed timers.
Modifying timer programs.
What happens when timer activates.
Cancelling timer standby.
Notes on timer functionality and components.
Priority rules for overlapping timers.
Special case for TUNER REC mode.
Step 1 for sleep timer.
Step 2 for sleep timer.
Adjusting sleep timer duration.
Cancelling sleep timer.
Sleep timer behavior with source change.
Activating sleep timer with power off.
Selecting and playing other sources.
Adjusting input levels for connected equipment.
DAT connection display.
Step 1 for karaoke mixing.
Step 2 for karaoke mixing.
Step 3 for karaoke mixing.
Recording mixed sound.
Using karaoke CDs/tapes.
Setting MIC MIXING to MIN.
Connecting multiple microphones.
Explains V-FADER modes.
Visual indicators during operation.
Limitations of vocal fading.
Notes on microphone mixing.
Technical specifications for the tuner.
Technical specifications for the amplifier.
Technical specifications for the cassette deck.
Technical specifications for the speakers.
Specs for power requirements, dimensions, accessories.
Troubleshooting for power and sound issues.
Troubleshooting for tuner issues.
Troubleshooting for amplifier issues.
Troubleshooting for cassette deck issues.
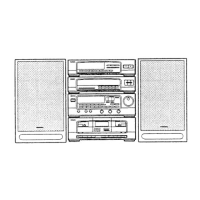
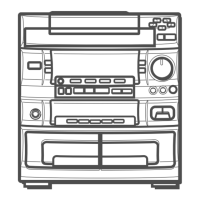
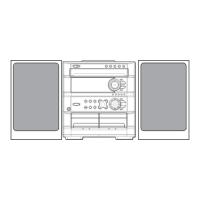
Identification of tuner components.
Identification of amplifier components.
Identification of cassette deck components.
Identification of remote controller buttons.
How to insert batteries.
Replacing remote control batteries.
Tips for remote control usage.
Battery handling notes.
How to clean the system cabinet.
Cleaning cassette deck parts for optimal sound.
| Total Harmonic Distortion | 0.8% |
|---|---|
| Remote Control | Yes |
| Tuner | FM/AM |
| Frequency Response | 20Hz - 20kHz |
| Type | Mini Hi-Fi System |