This document describes the AIYIMA® AUDIO 2.1 Channel HIFI Amplifier, Model: A03. It provides details on its functions, technical specifications, and usage.
Function Description:
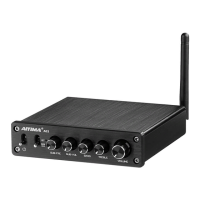
The AIYIMA A03 is a 2.1 channel HIFI amplifier designed to enhance audio output. It supports both Bluetooth and line-in (AUX) audio input, allowing for versatile connectivity with various audio sources. The amplifier features multiple controls for fine-tuning the audio experience, including adjustments for subwoofer frequency, subwoofer volume, bass, treble, and overall volume. It also provides dedicated outputs for right, left, and subwoofer speakers, enabling a complete 2.1 channel setup.
Important Technical Specifications:
- Chips: TPA3116+NE5532+LTO72+QCC3003
- Bluetooth Version: 5.0
- Power Input: DC12-24V (recommended DC19V 4.75A)
- Current: >3A
- Output Power: 50Wx2+100W @4Ω 19V,10%THD+N
- Speaker Impedance: 4~8Ω
- Bass Adjustment Range: +12dB, -14dB
- Treble Adjustment Range: +10dB
- Subwoofer Cutoff Frequency Adjustment Range: 40~240Hz
- SNR (Signal-to-Noise Ratio): >82dB
- Net Weight: 580g
- Size: 130x122×33mm
Usage Features:
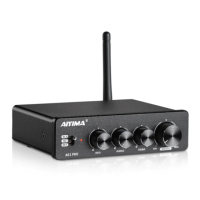
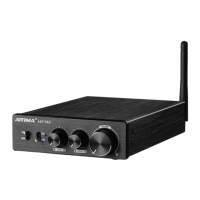
The amplifier's front panel provides intuitive controls:
- Power Switch: Turns the device on or off.
- Audio Input Select: A toggle switch to choose between "UP: Bluetooth mode" and "Down: Line in mode."
- Subwoofer Frequency Adjustment: Allows users to set the cutoff frequency for the subwoofer, ranging from 40Hz to 240Hz.
- Subwoofer Volume Adjustment: Controls the output volume specifically for the subwoofer.
- Bass Adjustment: Adjusts the bass level within a range of +12dB to -14dB.
- Treble Adjustment: Adjusts the treble level within a range of +10dB to -10dB.
- Total Volume Adjustment: Controls the overall output volume of the amplifier.
The rear panel offers essential connectivity:
- Bluetooth Antenna Jack: For connecting the Bluetooth antenna to ensure stable wireless connectivity.
- Line In (AUX) Jacks: RCA inputs for connecting external audio sources via a cable.
- Right Speaker Output: Terminal for connecting the right channel speaker.
- Left Speaker Output: Terminal for connecting the left channel speaker.
- Subwoofer Output: Terminal for connecting the subwoofer.
- Power Input (DC12-24V): Jack for connecting the DC power adapter.
Maintenance Features & Troubleshooting (Q&A):
The manual includes a comprehensive Q&A section addressing common issues and offering troubleshooting advice, which can be considered maintenance features as they guide users in resolving problems.
-
Current Sound and Noise:
- Causes: Poor power supply filter, wrong input (power or audio), poor input signal quality, poor quality input cable (bad connection, damaged wiring, suspended wiring), or shared power supply with other playback devices.
- Resolution: Check power supply filter, ensure correct input connections, verify input signal quality, inspect input cables for damage or poor connection, and avoid sharing power supplies with other devices if noise occurs.
-
No Sound Output or No Sound in One Channel:
- Causes: Broken speaker, poorly connected speaker cable, or poor input cable connection (damaged wiring, improper output from the connected device).
- Resolution: Check speaker functionality and connections, ensure input cables are properly connected and undamaged, and verify the output of the source device.
-
Volume Broken and Breaking Sound at High Volume:
- Causes: Insufficient power input (check wiring and current), poor speaker performance/damage, or incorrect speaker power (too small/large). Also, ensure left and right channel speakers are connected independently and not to each other.
- Resolution: Confirm sufficient power input and correct wiring. Inspect speakers for damage and ensure their power rating is appropriate for the amplifier. Verify independent speaker connections.
-
Speaker Broken Sound with Subwoofer Amplifier Volume High:
- Causes: Insufficient power input (check wiring and current), poor speaker performance/damage, or issues with the speaker box structure.
- Resolution: Ensure adequate power input and correct wiring. Evaluate speaker condition and suitability, and consider the speaker box design.
-
Insufficient Volume Power:
- Causes: Related to power and power supply voltage, amplitude of the sound source signal, and speaker impedance.
- Resolution: Any deficiency in these areas will affect the power output. Ensure adequate power supply, strong input signal, and appropriate speaker impedance.
-
Risk of Amplifier Burnout:
- Causes: Reversed positive and negative poles of the power supply, excessively high power supply voltage (exceeding operating limits), or direct connection to AC transformer power supply without rectification for DC-only boards. Incorrect wiring or short circuits can also cause damage.
- Resolution: Always ensure correct polarity when connecting power, use a power supply within the specified voltage range, rectify AC power to DC before connecting if required, and verify all wiring is correct to prevent short circuits.